Ausmini
It is currently Mon Apr 29, 2024 11:57 am

All times are UTC + 10 hours


Post new topic Reply to topic  [ 1864 posts ]  Go to page Previous  1 ... 115, 116, 117, 118, 119, 120, 121 ... 125  Next
Author Message
PostPosted: Fri May 02, 2014 10:27 pm 
Offline
1275cc
1275cc
User avatar

Joined: Fri Jun 17, 2005 10:31 am
Posts: 3183
Location: Burpengary, Queensland - Home of Tricky Performance Engineering
Hey Cam,

Yes, he is a bit happier now that some work is getting doen and we are making some progress.
Still lots to do though.

Cheers,
Tricky

_________________
"Not Speeding Officer..........Qualifying"


Top
 Profile  
 
PostPosted: Mon May 05, 2014 8:59 am 
Offline
1275cc
1275cc
User avatar

Joined: Fri Jun 17, 2005 10:31 am
Posts: 3183
Location: Burpengary, Queensland - Home of Tricky Performance Engineering
Quick Update:

Seems I am making a habit of putting a few hours on the weekends into The Cat, which of course is a very good thing.

With the boot space almost finished, I decided to move forward to the cabin and keep the electrical stuff happening as there is still a lot of it to do. But something kept ticking over in the back of my mind like I had forgotten something!! I ended up dragging out the box that all my WMI stuff was stored in and sure enough there it was - the water flow on/off solenoid!!

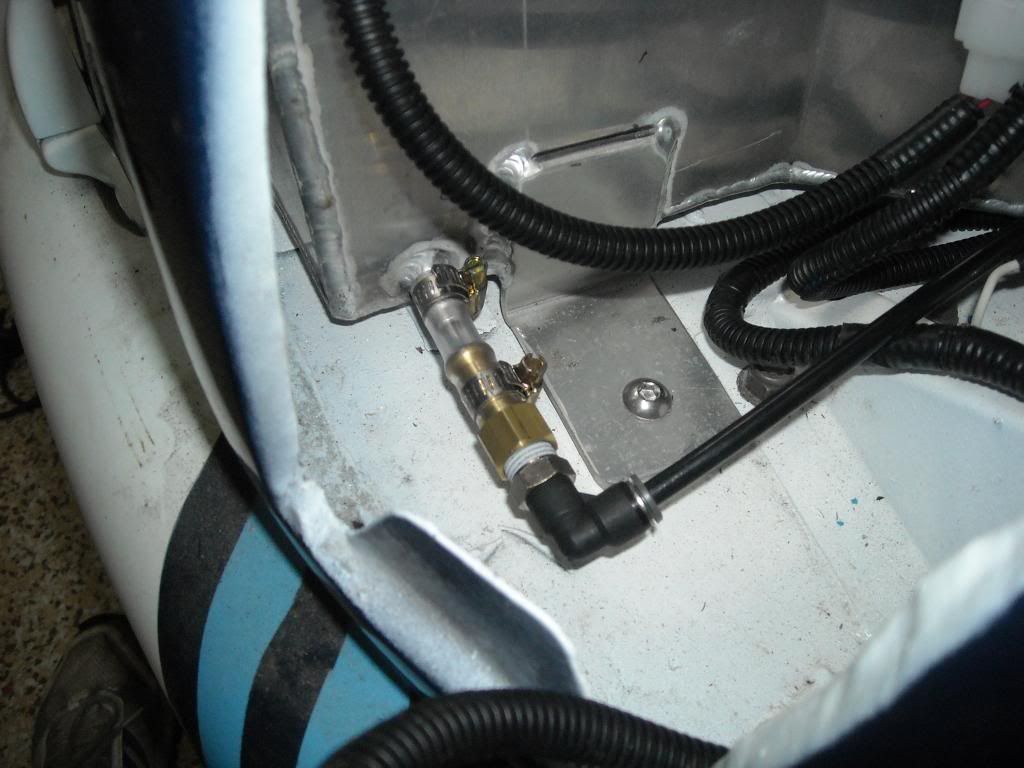
This valve opens when the pump starts and closes when the pump is off to maintain a) a positive head in the lines, and b) to ensure that there is no leak-back to the pump. Even though the solenoid is quite small by itself, it still has to be solidly mounted somewhere and not floating around to get damaged or kink the hard nylon water lines. I decided to make up a plate to mount the pump and the solenoid on, and then mount that plate to the existing mounting bosses welded onto the tank. This should allow me to orientate the pump and solenoid so they both fit and the hose runs are nice and unstressed.

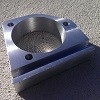
First off was to cut a piece of 3mm alloy plate for the task, drill the holes for the solenoid and the pump. I ended up making a 90-degree angle bracket for the solenoid, and pop-riveting it to the base plate, as I didnt want to drag out the TIG for two tack welds, and this bracket was under no stress whatsoever. This is what it looked like when done:
Image

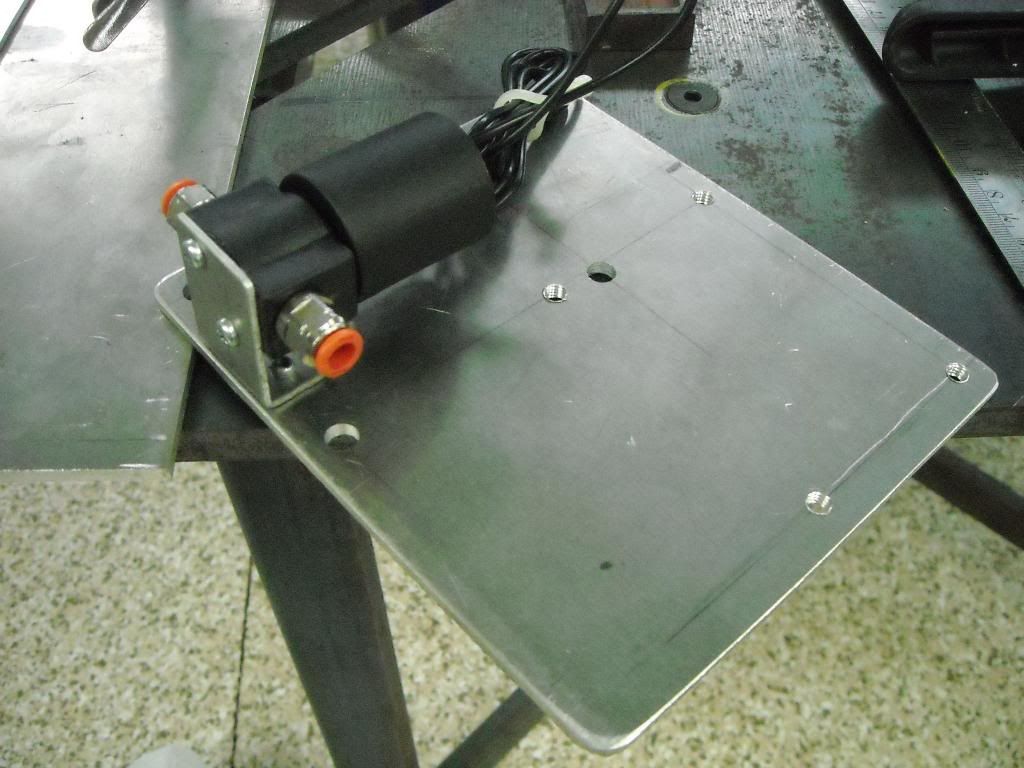
Then simply a matter of mounting it to the tank with some 6mm bolts. I had to make another connection for the solenoid too. Because it actuates when the pump is on, and closes when the pump is off, it can have the same switching as the pump itself - so I just paralleled up the pump connnection and put a 2-pin connector on it, and then on the solenoid too so it was all finished.
Image

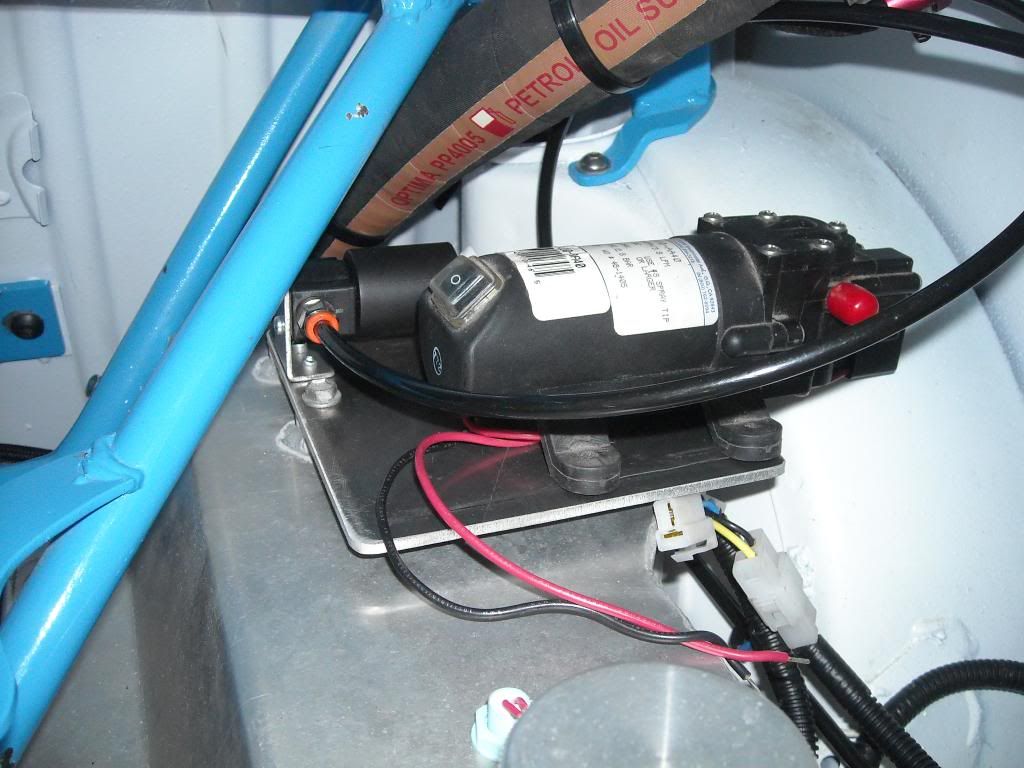
While I was fluffing about in this area, I decided to fit off the tank outlet as well. Because the pump and solenoids use 1/4 click connectors, and the tank oulet is a barb fitting, I had to use some 8mm silicon hose and a brass barb to 1/4 connector to make the transition - but it should work just fine. Time will tell if the industrial grade silicon hose is methanol resistant.
Image

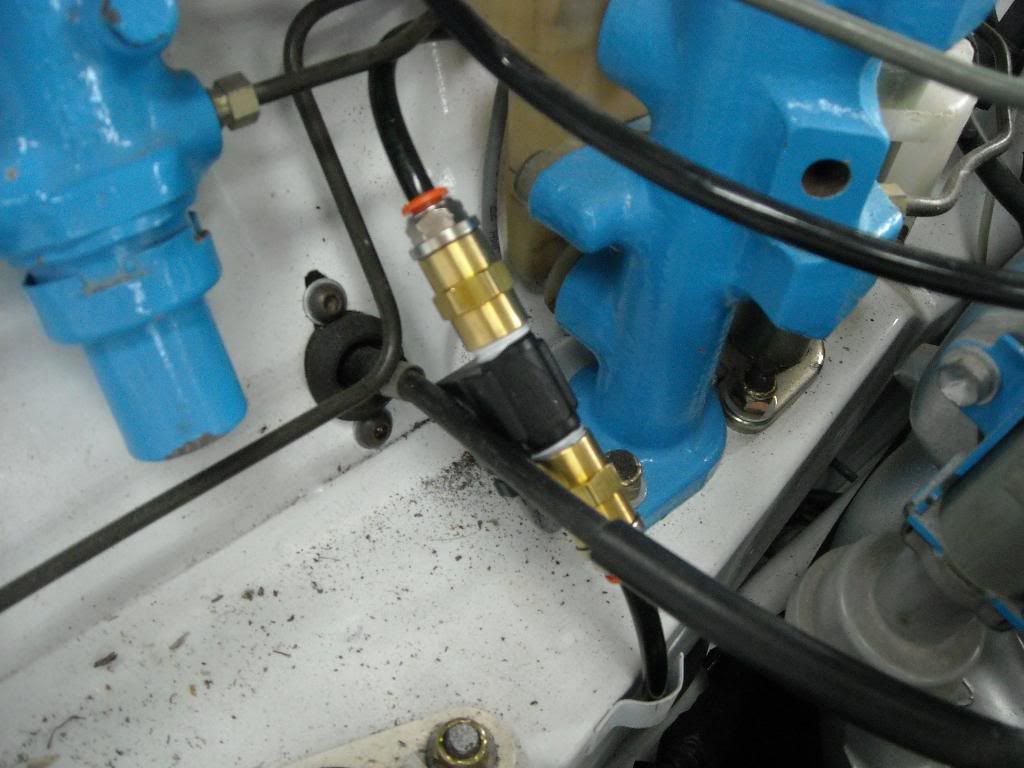
Also in the WMI box of bits is the flow sensor - basically a turbine wheel in a housing that spins when the water flows through it and it triggers a hall sensor. The WMI controller I am using is a learning-type, constantly monitoring flow rates, MAP and boost levels to adjust the amount of water that is being sprayed into the manifold. It needs an array of sensors to do this, and one of those is the flow sensor. It has to be located close to the meter so I decided to instal it in the engine bay directly before the Y-connector in the water line. The wires will be run through the firewall in the same space as all the other specialist wiring goes through (boost solenoid, Digidash wiring etc)
Image

Moving on from the WMI stuff, now essentially complete sans the new pump, I moved forward from the boot, into the cab. The rear bins is where the batteries are located - one for starting and running the car, and another for the ICE - isolated when the ignition is off, joined when the car is running so the batteries are charged - that way the starting battery will never get flattened by the amps etc. I needed to make up some ground leads for the negative side of both batteries, and join them to the body somehow - so I made up some 12" leads with lugs for this purpose (no pics).

Next on the agenda was the battery isolators that are located in each bin - one for each battery. For obvious reasons these cant be floating around in the bin area unsecured, so I decided to make up some brackets for these isolator swicthes. Out with the 3mm alloy again and after some drilling and bendind, these are what I had:
Image
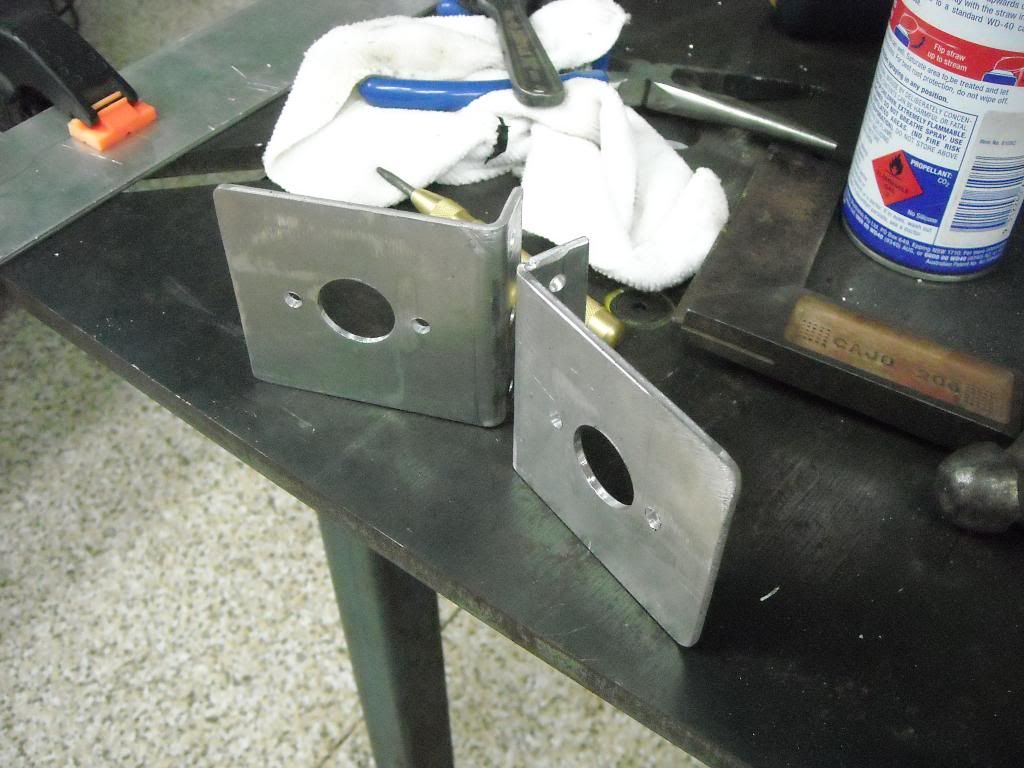
They simply screw down to the bottom flange of the bins, and the isolators get mounted to them with some 5mm socket head bolts. By this time it was getting late and the battery drill was flat, so I will mount them next time and take some more pics to show you what it looks like.

Cheers,
Tricky

_________________
"Not Speeding Officer..........Qualifying"


Top
 Profile  
 
PostPosted: Tue May 06, 2014 6:46 pm 
Offline
848cc
848cc
User avatar

Joined: Wed Mar 14, 2007 3:50 pm
Posts: 404
Location: MORNINGTON PENINSULA
I'm impressed mate
the ol girl wont know what hit her with all this attention

cheers Hallsey


Top
 Profile  
 
PostPosted: Tue May 06, 2014 7:30 pm 
Offline
1275cc
1275cc
User avatar

Joined: Fri Jun 17, 2005 10:31 am
Posts: 3183
Location: Burpengary, Queensland - Home of Tricky Performance Engineering
Thanks Ol' Sock!

Trying to really get a push along with it now if I can.
Taillights turned up today, so they will be going in on the weekend, and I will finish off the battery isolators and terminals then too! :wink:

Cheers,
Tricky

_________________
"Not Speeding Officer..........Qualifying"


Top
 Profile  
 
PostPosted: Sat May 10, 2014 3:45 pm 
Offline
1275cc
1275cc
User avatar

Joined: Fri Jun 17, 2005 10:31 am
Posts: 3183
Location: Burpengary, Queensland - Home of Tricky Performance Engineering
Quick Update.

Managed to keep the habit going today and spend an hour or so on The Cat in between doing yard work and setting up for tonights BBQ!

Still continuing on with the electrics (I will be up to my elbows in this for some time!) I continued on where I left off last week - the area contained within the rear bins. I finally bolted in the battery isolators to their brackets, and I have enough room to manipulate the keys and fit off the cables:
Image

Here you can also see the earth leads I made up and they are now connected to the body:
Image

Also contained within this space are my distribution blocks. These are made by Scorpion X and feature a 3-way cable in with 2-way cable out - both of which are independent of each other and fully fused. In the case of the battery that runs the car (starting battery) this is not so important, as there is only one cable going out. In the case of the stereo battery, it has to feed two amps so there are two cables going out. Using a distribution block makes this so much easier and safer - in the event of one amp going to ground it wont take out the other amp etc so fault finding is easier too. Another bonus of these distribution blocks is that they have a built in voltmeter which allows you to check the battery level at a glance.
Image

Once again, I started off with a bit of 3mm alloy plate and made up some brackets to mount the distribution blocks to:
Image

Then I simply mounted them to the sheetmetal that the seatbelts run through. On the back of the distribution blocks are small guage black wires which need to be earthed, so the voltmeter is grounded and works properly. I crimped on an eyelet to these and earthed it under one of the mounting screws. There is no current through these earths so not critical in terms of making sure it is as low a resistance as possible, as with the main earth cables.

Drivers side mounted:
Image

And passenger side:
Image

And just for shits n gigges I decided to connect up the gel cell to it to show you what the display looks like. Flash on (drowned out a bit with the flash, but you can read the '12.8' VDC on the display fine):
Image

Flash off:
Image

Also, I finished dragging the silicon hose for the windscreen washer through into the engine bay. I never realised how hard it was to find 4mm silicon hose - in the end I had to scavenge this bit off a wreck!!
Image

Also, these came mid-week. Minispares advertised a set of 2nd hand Rover taillights to suit the Mk 4/5 Mini - with the integral reversing lens and reflector. So, I grabbed them and got them delivered in two days - thanks Lindsay!! They are in great nick, and I will install these tomorrow. Should not take me too long, but I do need to change over the connector to the Narva 4-pin ones I have:
Image

More tomorrow (I hope)....

Cheers,
Tricky

_________________
"Not Speeding Officer..........Qualifying"


Top
 Profile  
 
PostPosted: Sat May 10, 2014 7:19 pm 
Offline
848cc
848cc
User avatar

Joined: Wed Mar 14, 2007 3:50 pm
Posts: 404
Location: MORNINGTON PENINSULA
Loving it bro ,its amazing how much you can get done with a couple hours here ,a couple there.

I must admit I thought the cat was going to be a dust collector when the business started.

Its amazing what a big foot up the clacker does :lol: :lol: :lol:

Seriously bro awesome job

Cheers Hallsey


Top
 Profile  
 
PostPosted: Sun May 11, 2014 6:53 pm 
Offline
1275cc
1275cc
User avatar

Joined: Fri Jun 17, 2005 10:31 am
Posts: 3183
Location: Burpengary, Queensland - Home of Tricky Performance Engineering
Thanks bro.

Its amazing how much a size 9 in the freckle gets you motivated!! :shock:

Didnt get to spend any time on him today though! :( Might see if I can do some work through the week nights! :D

More soon I hope.

Cheers,
Tricky

_________________
"Not Speeding Officer..........Qualifying"


Top
 Profile  
 
PostPosted: Mon May 19, 2014 12:12 am 
Offline
848cc
848cc
User avatar

Joined: Wed Jun 05, 2013 1:54 am
Posts: 405
Location: Jimboomba
Astonishing. How come i've never noticed you or anything going through burpengary? Do you go to the Mini Muster in september?

_________________
Why Drink And Drive When You Can Smoke Dope And Fly!?


Top
 Profile  
 
PostPosted: Mon May 19, 2014 12:31 pm 
Offline
848cc
848cc

Joined: Fri Oct 03, 2008 4:09 pm
Posts: 80
Location: Darwin, Oz
In case you need more windscreen washer hose, the small black irrigation hose from Bunnings is 4mm ID. You need to clamp it with small zip ties or similar, but it also means all the irrigation joiners, T-pieces etc fit too! :)

_________________
1.8L Sunshine - Legal, legit & lovinit


Top
 Profile  
 
PostPosted: Tue May 20, 2014 8:21 am 
Offline
Give Ash some flowers Nick .
User avatar

Joined: Wed Aug 09, 2006 1:22 pm
Posts: 10149
Location: Toowoomba Region, QLD
Just caught up on your thread Tricky. Looking good! The cat is getting close and I'm glad it is getting some time allocated to it!

_________________
"In two years time your car will be like a lady's clothes, out of date, my car will still be in fashion when I am dead" - Sir Alec speaking to Pininfarina


Top
 Profile  
 
PostPosted: Fri May 23, 2014 2:30 pm 
Offline
1275cc
1275cc
User avatar

Joined: Fri Jun 17, 2005 10:31 am
Posts: 3183
Location: Burpengary, Queensland - Home of Tricky Performance Engineering
AustinMiniMan98 wrote:
Astonishing. How come i've never noticed you or anything going through burpengary? Do you go to the Mini Muster in september?

I hide in the workshop a lot!! :D
Yes, will probably be at the Muster in September, hoping to have at least one car there too!

Slugman wrote:
In case you need more windscreen washer hose, the small black irrigation hose from Bunnings is 4mm ID. You need to clamp it with small zip ties or similar, but it also means all the irrigation joiners, T-pieces etc fit too! :)

Good call Slugman, it didnt click when I looked at the hardline at Masters - was too intent on getting the more flexible clear silicon line - which is almost impossible to get!!

1018cc wrote:
Just caught up on your thread Tricky. Looking good! The cat is getting close and I'm glad it is getting some time allocated to it!

Yes, so am I Nick, I am following your thread too with keen interest and like the progress you have made!

_________________
"Not Speeding Officer..........Qualifying"


Top
 Profile  
 
PostPosted: Fri May 23, 2014 5:11 pm 
Offline
1275cc
1275cc
User avatar

Joined: Fri Jun 17, 2005 10:31 am
Posts: 3183
Location: Burpengary, Queensland - Home of Tricky Performance Engineering
Hi Forumites,

A quick update....

Spent another hour or so on Sunday on The Cat, after Mitchells footy game. As per my previous post, the taillights from Lindsay turned up mid-week and I decided to install them. What should have been a very straightforward bolt-up turned into Mechanical Gymnastics and Contortionism 101 (well for the passenger side anyway) as there was a lot of stuff in the way to get to the bolts. But anyway, persistence prevailed and bolt them up I did. I might colour-code the body of them to match the dark blue when I paint the front bumper - what do you reckon?? Or should I leave them chrome, as there is no chrome on the car (yet!!)....

Passenger side:
Image

Drivers side:
Image

And the wiring - simple generic 4-way Hella plug and an earth connection to the light fitting (not a lot of space in there hey!!):
Image

I think I will have to take them out again anyway as the sealing gaskets on one of them was showing some slight cracking, so they will have to be replaced at some time.

Also accomplished was the wiring of the remote boot release - just cutting off the standard Honda plug and using a generic Hella one, done! Just needs some sticky-back cable tie holders to neaten up the wiring.
Image

I finished hooking up the windscreen washer lines to both jets, and tucked them up under the front cowl out of the way (no pics). The line should be more-or-less invisible as it is tucked away behind the oil catch can.

I painted and attached the license plate light too. As you can see the paint match was not right, piss-poor actually!! The car is painted in Mazda UC Crystal White, its a very white white with no yellowing. I went to our local paint shop ans asked for this in a pressure can, and as you can see, not even close. I will end up repainting this when the front bumper gets done, as I have some paint left over from when the car was sprayed.
Image

Still outstanding is the WMI pump - it has gotten lost in transit so the supplier as agreed to ship me another one FOC!! Very nice of him! If the other one shows up I will send it back, even though the seller has claimed it on insurance I believe. When the pump is finally here and installed, I can remount the bootlid and gas strut and that will be the bootspace finished!!

Trying desperately to make the Mini Muster in September - wish me luck!

Cheers,
Tricky

_________________
"Not Speeding Officer..........Qualifying"


Top
 Profile  
 
PostPosted: Fri May 23, 2014 5:20 pm 
Offline
848cc
848cc
User avatar

Joined: Wed Jun 05, 2013 1:54 am
Posts: 405
Location: Jimboomba
I hope you do! I'd love to see this there. Great build, great car. What do you intend to do with it when it's finished?

_________________
Why Drink And Drive When You Can Smoke Dope And Fly!?


Top
 Profile  
 
PostPosted: Fri May 23, 2014 5:25 pm 
Offline
Give Ash some flowers Nick .
User avatar

Joined: Wed Aug 09, 2006 1:22 pm
Posts: 10149
Location: Toowoomba Region, QLD
Yay more progress. Best of luck to get the cat done for this years muster mate! Will need to set some 'Tricky Performance Engineering' signage up in front of it.

_________________
"In two years time your car will be like a lady's clothes, out of date, my car will still be in fashion when I am dead" - Sir Alec speaking to Pininfarina


Top
 Profile  
 
PostPosted: Fri May 23, 2014 5:30 pm 
Offline
1275cc
1275cc
User avatar

Joined: Fri Jun 17, 2005 10:31 am
Posts: 3183
Location: Burpengary, Queensland - Home of Tricky Performance Engineering
AustinMiniMan98 wrote:
I hope you do! I'd love to see this there. Great build, great car. What do you intend to do with it when it's finished?

Thanks AMM98, so would I!! Short term just get some road miles under it and make sure it is 110% reliable. Long term, dont know. Always wanted to build a supercharged AWD Mini for myself!!

1018cc wrote:
Yay more progress. Best of luck to get the cat done for this years muster mate! Will need to set some 'Tricky Performance Engineering' signage up in front of it.

Thanks Nick. Going to try desperately hard to get The Cat there! Do you know a good Signwriter!

_________________
"Not Speeding Officer..........Qualifying"


Top
 Profile  
 
Display posts from previous:  Sort by  
Post new topic Reply to topic  [ 1864 posts ]  Go to page Previous  1 ... 115, 116, 117, 118, 119, 120, 121 ... 125  Next

All times are UTC + 10 hours


Who is online

Users browsing this forum: No registered users and 123 guests


You cannot post new topics in this forum
You cannot reply to topics in this forum
You cannot edit your posts in this forum
You cannot delete your posts in this forum
You cannot post attachments in this forum

Jump to:  

© 2016 Ausmini. All garage work involves equal measures of enthusiasm, ingenuity and a fair degree of irresponsibility.