Ausmini
It is currently Fri Apr 19, 2024 11:04 pm

All times are UTC + 10 hours


Post new topic Reply to topic  [ 1864 posts ]  Go to page Previous  1 ... 119, 120, 121, 122, 123, 124, 125  Next
Author Message
PostPosted: Tue Dec 30, 2014 5:31 pm 
Offline
1275cc
1275cc
User avatar

Joined: Fri Jun 17, 2005 10:31 am
Posts: 3183
Location: Burpengary, Queensland - Home of Tricky Performance Engineering
Hi Morbo,

In a day - wow, that takes some reading!!

Thanks for the kind words.

Cheers,
Tricky

_________________
"Not Speeding Officer..........Qualifying"


Top
 Profile  
 
PostPosted: Tue Dec 30, 2014 10:03 pm 
Offline
1098cc
1098cc

Joined: Wed Jun 26, 2013 10:05 pm
Posts: 1500
Location: perth WA
Updates tricky... updates. We all hanging out like heroin addicts here....

_________________
The best part of fixing your mini is the test drive

Minis..

1976 van daily drive
1975 van
1968 deluxe in the shed
1967 deluxe high strung 1310
1959 austin healey sprite


Top
 Profile  
 
PostPosted: Mon Feb 16, 2015 8:59 pm 
Offline
1275cc
1275cc

Joined: Sun Apr 02, 2006 2:38 pm
Posts: 2210
Location: Huon Valley, TAS
Not visited for a while and now caught up....

Great work Tricky.


Top
 Profile  
 
PostPosted: Mon Feb 16, 2015 9:08 pm 
Offline
1275cc
1275cc
User avatar

Joined: Thu Aug 31, 2006 7:56 pm
Posts: 2651
Location: Muswellbrook -- NSW
Bloody hell dickO , where ya been ? :shock: :lol: , it's been a while .


Top
 Profile  
 
PostPosted: Tue Mar 10, 2015 1:03 pm 
Offline
1275cc
1275cc
User avatar

Joined: Fri Jun 17, 2005 10:31 am
Posts: 3183
Location: Burpengary, Queensland - Home of Tricky Performance Engineering
Hi Guys,

Yes Dicko, where the bloody hell have you been - last time we talked you were looked at a Mazda engine or something.

Yes, I need to get back on it. Too many customers cars, importing and family stuff happening to spend a great deal of time on it. Although in saying that it wont take a lot more work to get it running!!

Ok, I will spend some hours on it very soon - ok!!

Cheers,
Tricky

_________________
"Not Speeding Officer..........Qualifying"


Top
 Profile  
 
PostPosted: Wed Apr 15, 2015 10:54 pm 
Offline
1275cc
1275cc
User avatar

Joined: Fri Jun 17, 2005 10:31 am
Posts: 3183
Location: Burpengary, Queensland - Home of Tricky Performance Engineering
Well, I had planned to spend the whole of Easter working on The Cat - as fate would have it the shed flooded due to all the rain Friday and it took me two days to clean it out!!

2nd time this year!

Reset to the next long weekend!

Cheers,
Tricky

_________________
"Not Speeding Officer..........Qualifying"


Top
 Profile  
 
PostPosted: Sun May 17, 2015 7:43 pm 
Offline
1275cc
1275cc
User avatar

Joined: Fri Jun 17, 2005 10:31 am
Posts: 3183
Location: Burpengary, Queensland - Home of Tricky Performance Engineering
Hi Everyone,

A quick update. It seems the planets havent aligned for me this year! I had set aside the Easter weekend to do a truck load of work on The Cat, only to have it rain like nobodies business and the shed flood - as I stated in the above post. So, I set aside the Anzac Day weekend to do the same, only to have it rain in biblical proportions and the shed flood again - there goes two days just in clean-up.

Well this weekend things kind of aligned. Mitch had a night game on Friday night under lights so that freed up Sunday, which is usually taken up with footy. I managed a couple of hours on the shed today and walked away with some jobs completed - any progress is good progress. :wink:

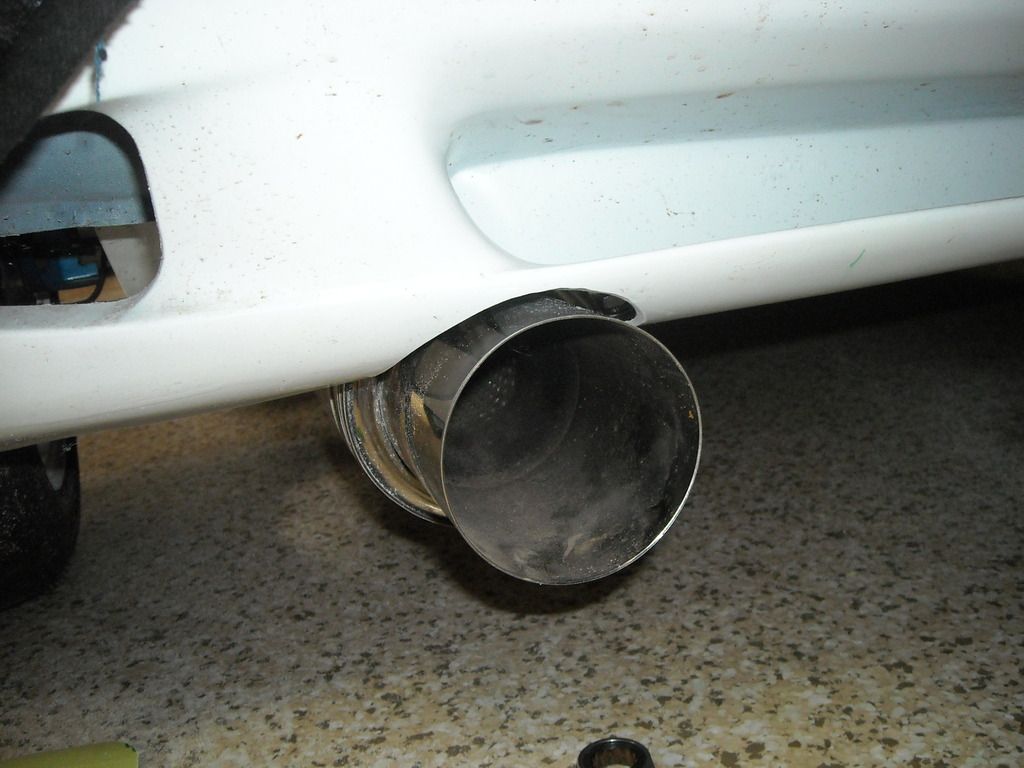
Previously, I had noticed the exhaust was hanging down a bit, lower than it had when I installed it in the first place. Upon inspection the centre cotton-reel rubber hanger had broken due to the excessive pressure that the exhaust had put it under - the brackets for the cannons on the back were too low, causing the whole system to sit too low and put stress on the centre hanger, which subsequently failed.

So, I measured to the underside of the exhaust as the car sat, which was pretty much ride height (less fuel etc). It was 90mm - way too low and not within the standards - minimum ground clearance needs to be 100mm or more, preferably more. So, an exhaust tuck was in order. To do this, I needed to trim the rear spoiler to be able to tuck the exhaust tips up higher.

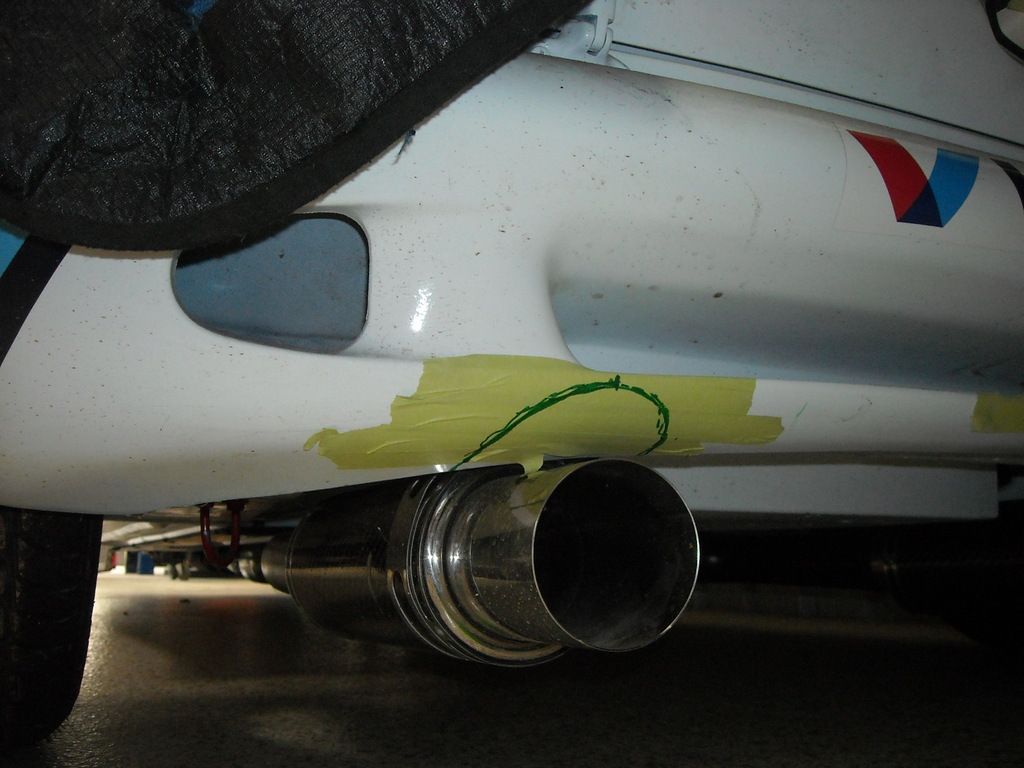
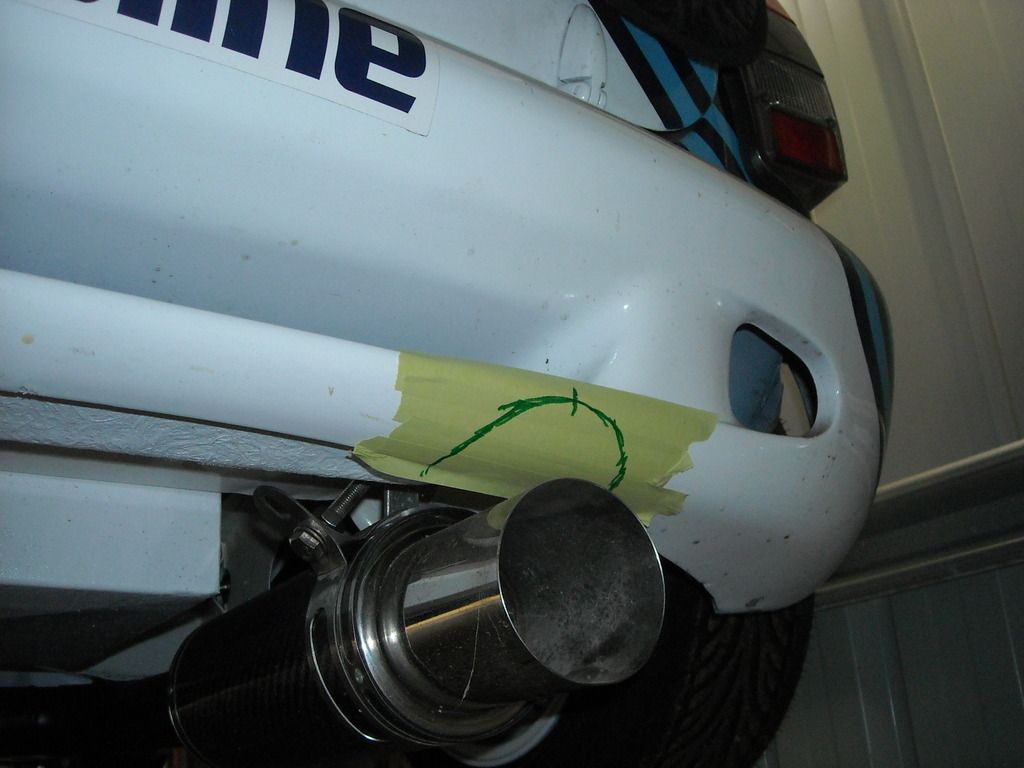
After masking the affected areas, I marked out the exhaust centrelines and drew a radius that followed the curve of the cannon outlets, which wasnt easy as the profile of the rear spoiler flared out underneath the car. This is the affected area that I wanted to cut out:
Image

Image

Next, I dropped the exhaust and got out with the panel saw. Some cutting and sanding later, and the job was done. Next I redrilled the rear hanger brackets that wrap the cannons lower (to make the exhaust sit higher) by 25mm. After rehanging everything and tightening up the bands this was the end result:
Image

Image

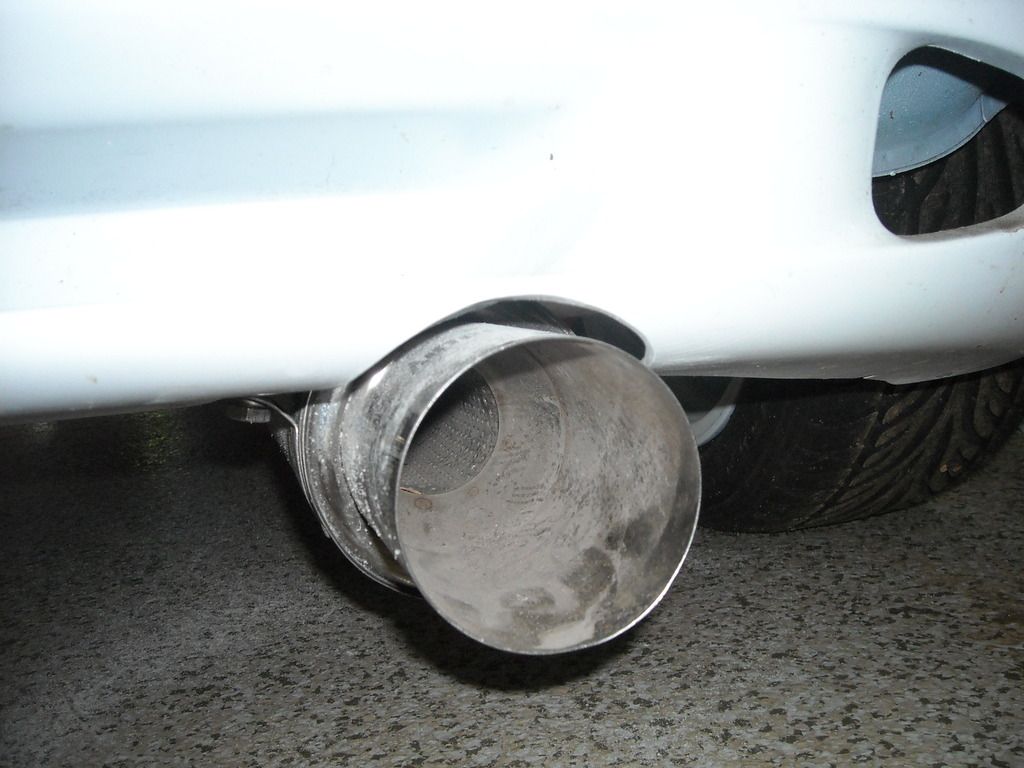
Tucked up nice and high and a good 120mm off the ground. This has now relived the stress on the centre hanger which I will replace when I the new one arrives. This is a view of the underside from the rear - nice ground clearance now:
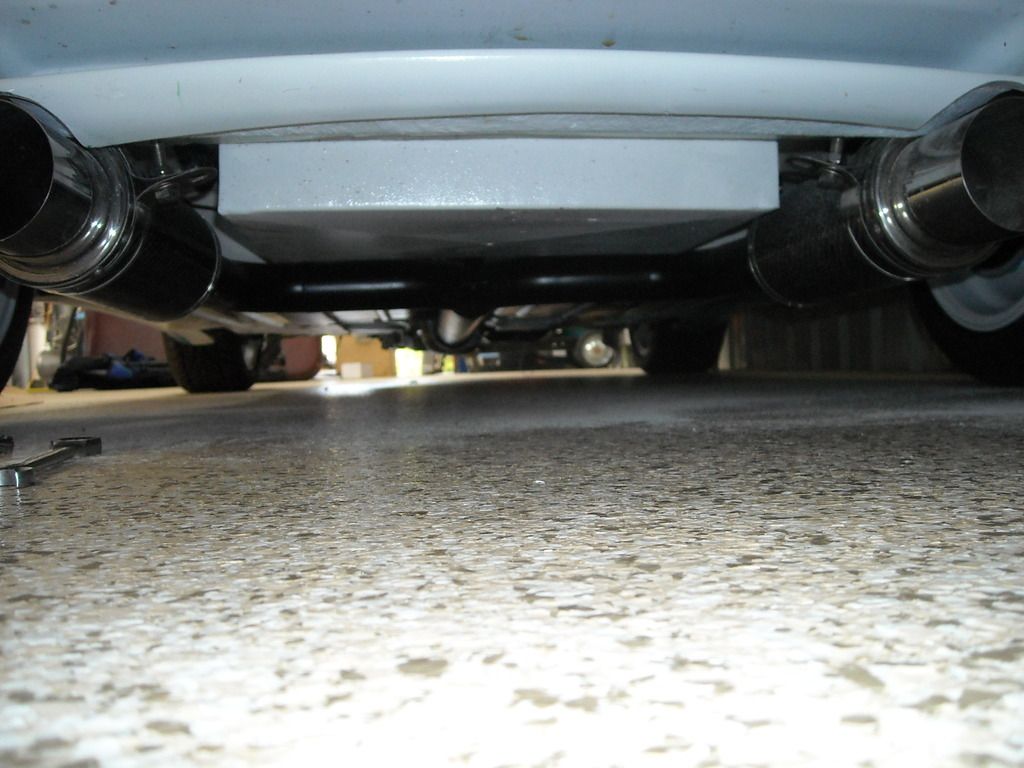
Image

First job - done!

Next job, affix the slam panel and bolt up the radiator - done! (In hindsight maybe a bit premature as I still have to connect the hoses. We will see, as its not a big job unbolting either the rad or the slam panel).

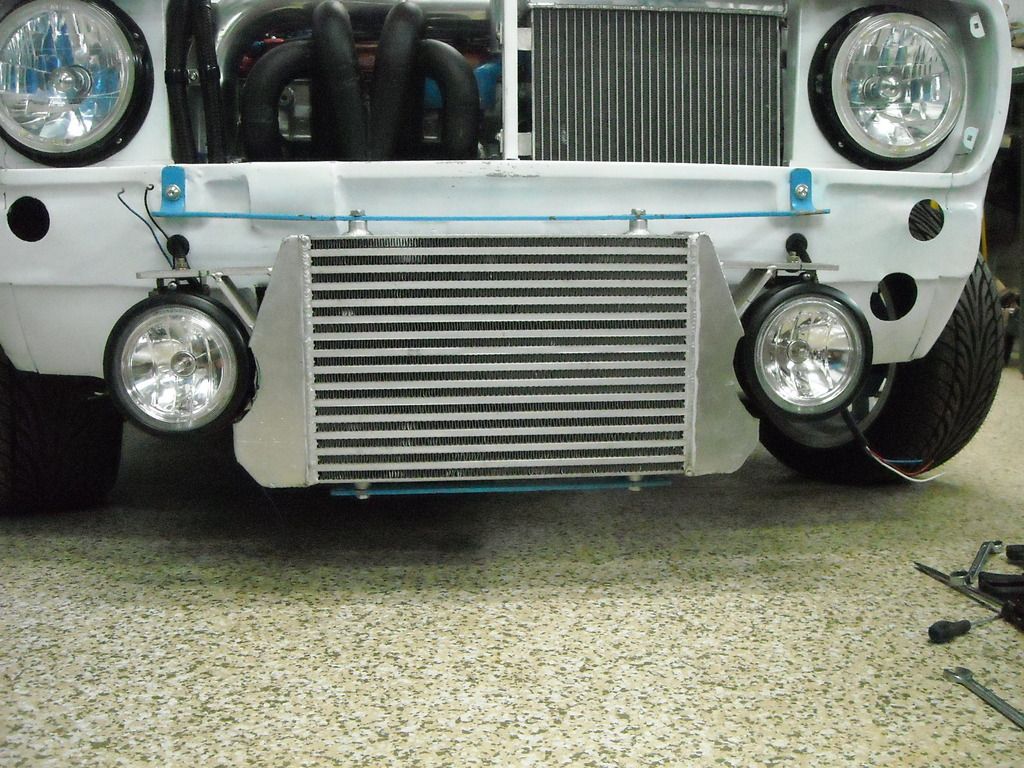
Next job, the the front spoiler. Way back when I designed the spoiler, I made a mold for it to then make a part for it. I then gave the mold to a proper fibreglass pattern maker to refine the mold and take a part from the mold. In this way, if the from spoiler ever got damaged, all I had to do was pull another part from the mold. Unfortunately, things didn't quite work out the way I planned. The mold have to be refined twice as it had 'grown' by 50mm during refining process and the original part we pulled had to be cut n shut to fit. This provided some other problems in that the driving light spacing from the centrline had now come in towards the centreline by some 25-30mm. Here is a previously posted photo that shows the end-tanks jutting into the driving light apertures.

Image

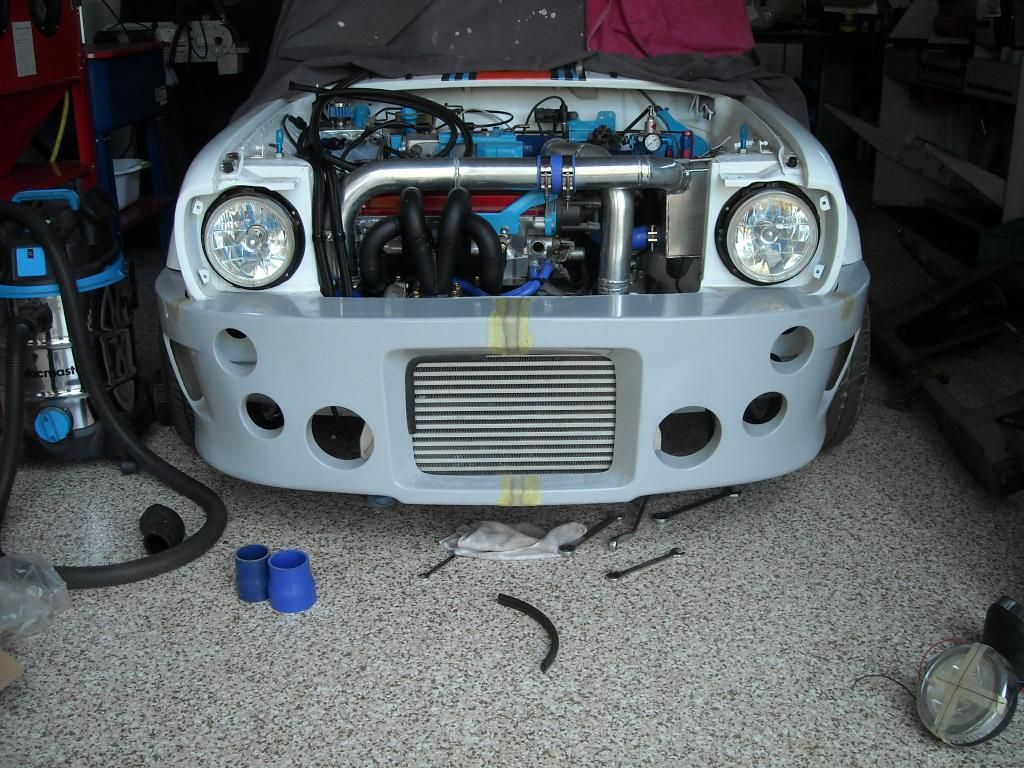
To make the driving lights fit, I either had to source some new lights with shallower surrounds, or alter the FMIC to make them fit. Seeing as the driving lights and the main headlights are a matching set with their blue halo's, I decided to alter the FMIC end-tanks to make the driving lights come inboard the right amount. Since this dimension was a bit unknown, I decided to slot the FMIC light brackets almost their entire length so I could fine-tune the driving light position when the final fit-up happened.

Next job was to cut the FMIC end-tanks to allow the driving lights to creep in towards the centreline. With the lights remounted this is what we looked like:

Image

I refitted the spoiler and found that the lights had to come inboard a further 30mm. Luckily for me the FMIC is over-sized for the turbs and I have got a lot of space to cut on the end-tanks. I remarked where I need to make the next cut and left it like that - time was up!!

Hopefully next week I will get the opportunity to finish the FMIC and then attack the front spoiler. If I can have it ready for paint by the next week I wil be happy. Of course the reinforcing of the mounting pionts need to be done but that is an easy job! Other than that the air inlet (3" hole on the lower passenger side needs to be shaved a bit to get the silcone hose on, but other than that, no more needs to be done to the front spoiler to finish it.

More next week (I hope, lots of work happening on clients customs, and our first container from the US arrived this week - yay!! :D )

Cheers,
Tricky.

P.S. Just a side note, I found out that the pattern maker I used to to do the front spoiler, Royce Kurchner, died in a car accident about 3 months ago. He leaves behind a wife and young baby girl. Royce, RIP buddy!

_________________
"Not Speeding Officer..........Qualifying"


Top
 Profile  
 
PostPosted: Sun May 17, 2015 11:08 pm 
Offline
848cc
848cc
User avatar

Joined: Wed Mar 17, 2004 6:05 pm
Posts: 310
Location: Kallangur, Brisbane
Tricky,
Good to see some progress mate!!

_________________
72 Clubbie - Current project - Vauxhall C20XE 2000cc 16v 150hp.
78 Clubbie - Future project.
Image


Top
 Profile  
 
PostPosted: Sat May 23, 2015 4:29 pm 
Offline
1275cc
1275cc
User avatar

Joined: Fri Jun 17, 2005 10:31 am
Posts: 3183
Location: Burpengary, Queensland - Home of Tricky Performance Engineering
Hey Gang,

Found myself with a few hours spare today, so decided to put them to good use ad do some more work on The Cat while there was some momentum happening!

From last week I was working on installing the driving lights in their correct position and this entailed cutting into the end tanks of the FMIC. Luckily, the FMIC is oversized a bit for the application so losing some volume in the end tanks should not hurt the flow very much, if at all. So, it was a matter of refit the front spoiler/bumper and mark out where the FMIC aperture was on the intercooler, and then from there we have a definitive distance from there to the driving light centreline - in this case 120mm.

So, after some marking out and cutting with the panel saw, this is what we came up with:
Image

As you can see from the shots from the side, still plenty of space in the end tanks to not limit the amount of airflow too much. If the turbo was a GT70 or something, then I would be worried, but the smaller KKK I have on the 4EFTE would not see any restriction:
Image

Image

I reinstalled the FMIC and bolted up the lights. With the new spacing of the light portals on the spoiler the lights were mounted about 20mm too high. To alleviate this I needed to replace the bolt on the driving lights with longer ones to accomodate the new length, and also make up some spacers to drop the lights down to the required height. I ended up turning down some brass stock I had lying around and then capped them off with some nylon ferrules:
Image

While the spoiler/bumper was off, I decided to take a bit of material off the cold air inlet to allow the silicon hose to slip on. It as a couple of millimetres too thick but after a touch up with a flap disc the silicon hose slipped on with little effort. Now all it needs is for the aluminium pipework to be made up frm the airbox to the inlet:
Image

Bolting the lights back up to the FMIC and mounting the intercooler to the car the end result was perfect. There is enough space around the lights to form a piece of aluminium sheet and fill in the concave cut-out and weld it up without touching the driving lights:
Image

Some slight trimming of the front spoiler/bumper around the driving light portals and a all was looking good. Because the FMIC and the lights are perfectly flat across the front, the spoiler had to be trimmed to allow it to fit back far enough against the car and not get interference from the lights. After a bit of fettling, a good result I think:
Image

Image

While it doesnt look like a lot went on today, this actually took me most of the day as it was a case of trim-test fit-remove-trim-test fit etc etc. But in the end, a job well done. Tomorrow if I have time I will sand and prep the front spoiler/bumper for paint and get it ready for the spray painter. There are some inlets to be caped as well as the indicators to be mounted.

The FMIC endcaps will need to be welded back up and the driving lights wired up with some waterproof connectors, along with the indicators. So a bit more work to do yet before the grill can go on.

More soon.

Cheers,
Tricky

_________________
"Not Speeding Officer..........Qualifying"


Top
 Profile  
 
PostPosted: Sat May 23, 2015 6:38 pm 
Offline
848cc
848cc
User avatar

Joined: Wed Mar 14, 2007 3:50 pm
Posts: 404
Location: MORNINGTON PENINSULA
aaahhh good to see some progress ol'cock

gotta say she looking a beast of a car

keep the momentum going bro

cheers Hallsey


Top
 Profile  
 
PostPosted: Sun May 24, 2015 12:50 am 
Offline
848cc
848cc
User avatar

Joined: Wed Jun 05, 2013 1:54 am
Posts: 405
Location: Jimboomba
Hey tricky, where did you get those headlights? I've been looking for some nice halos/angel eyes for mine and I'm having trouble deciding. Love the look of those though, great work on the cat. Look forward to seeing it finished! Hopefully at the muster this year. Hopefully mine will be too...

_________________
Why Drink And Drive When You Can Smoke Dope And Fly!?


Top
 Profile  
 
PostPosted: Sun May 24, 2015 9:51 am 
Offline
1275cc
1275cc
User avatar

Joined: Fri Jun 17, 2005 10:31 am
Posts: 3183
Location: Burpengary, Queensland - Home of Tricky Performance Engineering
Hallsey - thanks bro for the kind words!

Phil - Thanks also for the kind words! Honestly I cannot remember where I got the headlights and driving lights from, I got them so long ago - its been years! They did not come as a boxed set per se, but they were made by the same manufacturer! I remember the box (long since discarded) being blue and yellow, which would suggest Hella to me!!??? Other than that, I have no idea - sorry!

Busting may a$$ to get it to the Muster this year, although I have a client who wants his Prefect custom at the All Fords day which is in September as well!! Hopefully, we can see each others there together - I will if you will!! :shock:

Cheers,
Tricky

_________________
"Not Speeding Officer..........Qualifying"


Last edited by Archangel007 on Sun May 24, 2015 9:55 am, edited 2 times in total.

Top
 Profile  
 
PostPosted: Sun May 24, 2015 9:53 am 
Offline
848cc
848cc
User avatar

Joined: Wed Jun 05, 2013 1:54 am
Posts: 405
Location: Jimboomba
Ah damn, thanks anyway. I love the blue tinge to the light itself. That's why I liked them. Most of them I see are just halogens with white LEDs round the edges but I don't want it to be completely noticeable that it has halos.

_________________
Why Drink And Drive When You Can Smoke Dope And Fly!?


Top
 Profile  
 
PostPosted: Sun May 24, 2015 9:58 am 
Offline
1275cc
1275cc
User avatar

Joined: Fri Jun 17, 2005 10:31 am
Posts: 3183
Location: Burpengary, Queensland - Home of Tricky Performance Engineering
Sorry mate!!

The blue tinge is just a reflection of the blue bulbs!! They came with the lights so I thought 'why not'!!

But the halo rings are definitely blue!! I will go down to the workshop this afternoon and temporarily wire them up for you so you can get an idea of what they look like in the dark!

Cheers,
Tricky

_________________
"Not Speeding Officer..........Qualifying"


Top
 Profile  
 
PostPosted: Sun May 24, 2015 9:59 am 
Offline
848cc
848cc
User avatar

Joined: Wed Jun 05, 2013 1:54 am
Posts: 405
Location: Jimboomba
Thanks man. Hope I find them, looks awesome.

_________________
Why Drink And Drive When You Can Smoke Dope And Fly!?


Top
 Profile  
 
Display posts from previous:  Sort by  
Post new topic Reply to topic  [ 1864 posts ]  Go to page Previous  1 ... 119, 120, 121, 122, 123, 124, 125  Next

All times are UTC + 10 hours


Who is online

Users browsing this forum: No registered users and 34 guests


You cannot post new topics in this forum
You cannot reply to topics in this forum
You cannot edit your posts in this forum
You cannot delete your posts in this forum
You cannot post attachments in this forum

Jump to:  

© 2016 Ausmini. All garage work involves equal measures of enthusiasm, ingenuity and a fair degree of irresponsibility.