Ausmini
It is currently Tue Apr 16, 2024 11:21 pm

All times are UTC + 10 hours


Post new topic Reply to topic  [ 413 posts ]  Go to page Previous  1, 2, 3, 4, 5 ... 28  Next
Author Message
 Post subject:
PostPosted: Thu Jan 21, 2010 11:28 pm 
Offline
998cc
998cc
User avatar

Joined: Tue Nov 13, 2007 4:17 pm
Posts: 946
Location: NOR, Perth, W.A.
JC wrote:
Hey Alan, good progress.

What are you using for a jig to make the subframe? I have made the mistake of using a mini front cut - I wouldn't recommend it.


I just realised I havent posted pics of that yet! I made the jig in May last year so have had the subframe bolted into it for 8 months now and wheeling it off to the side every time it gets in the way. It's a simple design made from 25mm square tube and some small castors welded to the bottom. I made the mistake of putting some 15-20kg castors on it so they groan & squeak a bit once the weight of an engine was put on it.

Image Image

I had originally planned on getting started with the subframe customising over my Xmas and New Year break, but I got stuck into the spit & body instead. The shell goes off for blasting next weekend and then straight to a guy to do the rust removal & bodywork so I'll try and make use of the extra room and see if I can get the subframe done while I have it.

Out of interest, why was using a mini front cut for doing the subframe a mistake?

_________________
-Alan
I blame my dad for my love of minis. I think I was conceived in the back seat of one :D
I also blame my Dad for me being 6' 1" - not really the optimum height for driving a Mini.


Top
 Profile  
 
 Post subject:
PostPosted: Fri Jan 22, 2010 9:06 am 
Offline
1275cc
1275cc
User avatar

Joined: Thu Jun 03, 2004 2:56 pm
Posts: 3981
Location: Brisbane
I don't think you will be bolting the engine to the subframe while its in the jig so your castors will be ok.

Why wouldn't you bolt the engine into the frame while the frame is in the jig? The tolerances are so fine, depending on your subframe design, that you need to bolt the frame into the car then make the mounts accordingly.

Unknowingly, the cut I procured was a little out of whack. The conversion I was doing at that stage (suzuki Gti) was an even closer fit than the starlet. So when I went to fit the gti motor/new frame to my car, all was not well.

JC

_________________
But he's thriving and striving and hugging the turns.


Top
 Profile  
 
 Post subject: Weekend Work
PostPosted: Mon Jan 25, 2010 12:28 am 
Offline
998cc
998cc
User avatar

Joined: Tue Nov 13, 2007 4:17 pm
Posts: 946
Location: NOR, Perth, W.A.
Last weekend, removing underbody sealer. This weekend - more laborious and messy work of scraping off all the seam sealer in the engine bay, cabin & boot areas. A nice hint after you've scraping it off with a paint scraper - a rag & methylated spirits easily removes the sealer residue that can't be removed with the scraper. Another hint - wear latex gloves when wiping the residue off - it tends to stain your skin and took me ages to scrub it off in the shower.

The shell & panels will be dropped off to the sandblaster this Saturday. He does not blast the underside of the roof or bonnet as they are easy to buckle the panels so I have stripped the bonnet underside of paint with some paint stripper & wire wheel. I left the roof as it only has thin overspray layer of red paint on it anyway.

Image Image Image

_________________
-Alan
I blame my dad for my love of minis. I think I was conceived in the back seat of one :D
I also blame my Dad for me being 6' 1" - not really the optimum height for driving a Mini.


Top
 Profile  
 
 Post subject:
PostPosted: Mon Jan 25, 2010 7:37 am 
Offline
848cc
848cc
User avatar

Joined: Fri Jan 13, 2006 11:24 am
Posts: 404
Location: Mandurah, WA
Looking good Alan.
8)

_________________
68 Mini
70 Moke


Top
 Profile  
 
 Post subject:
PostPosted: Tue Feb 16, 2010 12:14 am 
Offline
998cc
998cc
User avatar

Joined: Tue Nov 13, 2007 4:17 pm
Posts: 946
Location: NOR, Perth, W.A.
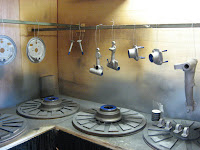
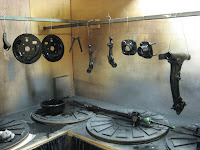
The shell and panels have been dropped off for sandblasting last weekend and coincidently my mate who was sandblasting my rear subframe and all the brake parts rang the next day so I picked up everything and started painting. :D

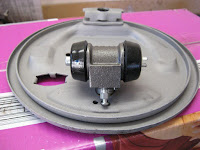
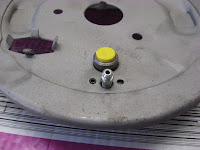
Before the brake backing plates were painted, I drilled a hole in each plate so that the new 5/8" brake cylinders would fit. The original backing plates were fitted with 3/4" cylinders but compared to the those, the locating pin on the 5/8" cylinders in on the other side of the bleed screw. A new 4.5mm hole must be drilled on the other side of the bleed screw to allow the locating pin to fit.
Before & After :
Image Image

All the parts were hand/brush painted with two thin coats of KBS Coatings RustSeal (2 hours between coats to become touch dry and can handle the subframe) and then a few hours later, 2 coats of black enamel sprayed on (RustSeal is not UV stable so requires any opaque coloured topcoat.
Image Image

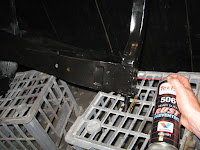
Even though the paint coverage on rear subframe was good, I was still concerned about the hollow sections (eg. The box section at the front of the subframe) so I liberally sprayed in any hollow section with Valvoline Tectyl 506, an excellent rust preventative wax coating. I'm pretty sure it's what Tint-A-Car uses when they do rust proofing - it looks the same goldy colour and smells the same as Tectyl 506...
Image

Just waiting on some parts now to rebuild the rear brakes and fit the rebuild kits for the radius arms. Until then, the front subframe work begins :?

_________________
-Alan
I blame my dad for my love of minis. I think I was conceived in the back seat of one :D
I also blame my Dad for me being 6' 1" - not really the optimum height for driving a Mini.


Top
 Profile  
 
 Post subject:
PostPosted: Fri Feb 26, 2010 8:30 am 
Offline
1275cc
1275cc
User avatar

Joined: Fri Jun 17, 2005 10:31 am
Posts: 3183
Location: Burpengary, Queensland - Home of Tricky Performance Engineering
Good work Alan, its race between you and Joe now!!

Cheers,
Tricky

_________________
"Not Speeding Officer..........Qualifying"


Top
 Profile  
 
 Post subject:
PostPosted: Mon Mar 01, 2010 12:22 am 
Offline
998cc
998cc
User avatar

Joined: Tue Nov 13, 2007 4:17 pm
Posts: 946
Location: NOR, Perth, W.A.
I've starting the subframe and given myself the challenge to design and fabricate it (and save myself some $$ too). I've taken design ques from a couple of subframe designs my fellow ausminiers have already done and started on my own hybrid-of-others design.

After a long time staring into the engine bay of my Mini front cut, and scrawling design possibilities on paper, all I got done today was fabricate the couple of brackets (from 6mm steel) that will be mounted to the front valance panel. I will make a brace bar for between the two brackets tomorrow. The tube I'll be using for this (and the rest of the upper frame) is 32mm OD structural tube with 3mm wall thickness.

The new panel (that will be welded in once the shell has been blasted) with the brackets attached.
Image

The horizontal section on the top of the bracket will be used to weld on the tube that leads up to the top of the subframe tower whereas the vertical flange on the RHS will be for mounting a smaller diamater tube that will brace the underneath and lead to the bottom of the tower.
Image

I initially designed and started drilling the holes using the front cut as a template but when I attempted to bolt the brackets onto the replacement valance panel I have, I found a big difference between the mounting points on the orginal valance versus the replacement valance. I don't know whether the method of bolting in the subframe changed or not (Can anyone shed light on this?). In the pic below (of the inside of the front valance panel - passengers side) the original subframe mount is the lower hole however in the replacement panel, this is a much larger hole in the same location! If I was bolting the orginal subframe back in, there would be a problem with mounting it but in my case, I can simply design the brackets around it.
Image

_________________
-Alan
I blame my dad for my love of minis. I think I was conceived in the back seat of one :D
I also blame my Dad for me being 6' 1" - not really the optimum height for driving a Mini.


Top
 Profile  
 
 Post subject:
PostPosted: Mon Mar 01, 2010 12:22 pm 
Offline
religious status
religious status
User avatar

Joined: Fri Mar 19, 2004 6:19 pm
Posts: 39637
Location: near Baulkham Hills, NSW
Around 1976 in the UK (NOT here) they changed to that type of front panel, the subframe was different too. There were 2 rubber teardrop mounts on the front, rubber mounts onto the floor, and rubber mounts and single BIG bolt each side at the top.
If using these front panels on an Oz Mini subby, just put the teardrop mounts onto the front. Or, make some alloy plate spacers.

_________________
DrMini- 1970 wasaMatic 1360, Mk1S crank, 86.6HP (ATW) =~125 @ crank, 45 Dellorto (38 chokes), RE282 sprint cam, 1.5 rockers, 11.0:1 C/R. :mrgreen:


Top
 Profile  
 
 Post subject:
PostPosted: Mon Mar 01, 2010 12:34 pm 
Offline
ET 13.457 seconds , OH YEAH !!!!
User avatar

Joined: Sun Sep 19, 2004 8:35 am
Posts: 7826
Location: Somewhere Around Sydney
You can also buy the solid alloy teardrop mounts from minisport locally, you only need the two teardrop mounts:

Image

_________________
Image
Starlet Conversion:
http://www.ausmini.com/forums/viewtopic.php?t=15484


Top
 Profile  
 
 Post subject:
PostPosted: Tue Mar 02, 2010 9:05 pm 
Offline
998cc
998cc
User avatar

Joined: Tue Nov 13, 2007 4:17 pm
Posts: 946
Location: NOR, Perth, W.A.
Ah - now I understand when I hear people talking about rubber mounted subframes! :)

I won't be using the teardrop mounts anyway. I'll weld up the hole so I can have two bolts mounting front of the subframe.

So slight progress ... I finished the brace bar between the two front mounts yesterday. Each end is welded onto two triangular-ish pieces, which are then bolted to the main brackets. I didn't weld the brace bar directly onto the mounts as I wasn't sure whether I could manoeuvre the subframe into place with an extra 50mm of length. As per most other designs, it is mounted forward (in my case about 5mm behind the valance) to give me more room to play with. It may be the difference between being able to squeeze in a decent exhaust size versus comprimising due to lack of space :(

Image

Image

I now have to wait until the shell gets back from the sandblaster (still there now) and panel beater so that the valance can be fitted and I have exact dimensions to work with. The shell has had a slight front push in its history and I don't want to go to the effort of making the whole subframe and have it not fit because one hole is 5mm out.

Edit : Also used 2x 3/8" washers which fitted perfectly in the 25mm diameter hole and left a lovely centred bolt/mount hole. Tacked & welded it in now :D
Image
Image

_________________
-Alan
I blame my dad for my love of minis. I think I was conceived in the back seat of one :D
I also blame my Dad for me being 6' 1" - not really the optimum height for driving a Mini.


Top
 Profile  
 
 Post subject:
PostPosted: Sun Mar 14, 2010 1:51 pm 
Offline
998cc
998cc
User avatar

Joined: Tue Nov 13, 2007 4:17 pm
Posts: 946
Location: NOR, Perth, W.A.
I picked up the shell and panels from the sandblaster yesterday and had a good look over it today... and had one of those "what have I got myself into?" moments. Quite depressing really :(

Boot, bonnet and passenger door were near perfect. Drivers door is a toss up whether I'll get a replacement. The rest is either new panel requirement or new sheet metal/repairs.

Not much more to say except - Swiss Cheese!

Firwall - minor repair
Image

Boot holes - will be cut out and replaced by a custom tank setup
Image

Passengers footwell
Image

Passengers front arch & sill
Image

Driver footwell
Image

Rear Valance (cringe)
Image

Rear window - minor repair
Image

Drivers door
Image

_________________
-Alan
I blame my dad for my love of minis. I think I was conceived in the back seat of one :D
I also blame my Dad for me being 6' 1" - not really the optimum height for driving a Mini.


Top
 Profile  
 
 Post subject:
PostPosted: Sun Mar 14, 2010 2:30 pm 
Offline
1275cc
1275cc
User avatar

Joined: Fri Apr 25, 2008 2:34 pm
Posts: 2002
Location: Brisbane
Just think of all of the weight you've saved by cutting it out.

_________________
Simplify and add lightness


Top
 Profile  
 
 Post subject:
PostPosted: Sun Mar 14, 2010 2:38 pm 
Offline
998cc
998cc

Joined: Sat Jan 07, 2006 11:52 pm
Posts: 966
Location: Bald Hills, Brisbane
pffft thats a good shell compared to most.


Top
 Profile  
 
 Post subject:
PostPosted: Sat Mar 27, 2010 4:58 pm 
Offline
998cc
998cc
User avatar

Joined: Tue Nov 13, 2007 4:17 pm
Posts: 946
Location: NOR, Perth, W.A.
I completed the support bracket for the equalising driveshaft / layshaft today. The bracket pieces were laser cut from 10mm steel and their minimum charge, I got 3 sets cut - both of the spare sets have been pre-sold to Joe (blue_deluxe) and a local guy here in Perth - both doing the 4EFTE conversion!

Side note - The equaliser shaft/layshafts are from a AE101 or AE111 Corolla/Levin with 4AGE engine

The design was based on the one made by Slinkey (thanks! :D ). The two main pieces bolt onto the shaft itself; and rear of the engine block (where the alternator used to be).
Image

Image

Image

The top part of the larger piece was bent to clear the centre bolt hole in the smaller piece. My arc welder was cranked right up for the 10mm steel and it was all welded up with a couple of gussets for bracing.
Image

Next step - replace my front valance panel (current one is bashed up and bent to sh!t) and complete the subframe design.

_________________
-Alan
I blame my dad for my love of minis. I think I was conceived in the back seat of one :D
I also blame my Dad for me being 6' 1" - not really the optimum height for driving a Mini.


Last edited by Mearcat on Wed May 20, 2020 11:13 am, edited 1 time in total.

Top
 Profile  
 
 Post subject:
PostPosted: Sat Mar 27, 2010 9:09 pm 
Offline
1275cc
1275cc
User avatar

Joined: Thu Jun 03, 2004 2:56 pm
Posts: 3981
Location: Brisbane
What sort of clearance do you have around the steering column with the lay shaft? Looks very professional by the way.

_________________
But he's thriving and striving and hugging the turns.


Top
 Profile  
 
Display posts from previous:  Sort by  
Post new topic Reply to topic  [ 413 posts ]  Go to page Previous  1, 2, 3, 4, 5 ... 28  Next

All times are UTC + 10 hours


Who is online

Users browsing this forum: No registered users and 10 guests


You cannot post new topics in this forum
You cannot reply to topics in this forum
You cannot edit your posts in this forum
You cannot delete your posts in this forum
You cannot post attachments in this forum

Jump to:  

cron

© 2016 Ausmini. All garage work involves equal measures of enthusiasm, ingenuity and a fair degree of irresponsibility.