Ausmini
It is currently Tue Mar 19, 2024 2:09 pm

All times are UTC + 10 hours


Post new topic Reply to topic  [ 413 posts ]  Go to page 1, 2, 3, 4, 5 ... 28  Next
Author Message
PostPosted: Fri Jan 08, 2010 9:57 pm 
Offline
998cc
998cc
User avatar

Joined: Tue Nov 13, 2007 4:17 pm
Posts: 946
Location: NOR, Perth, W.A.
Note : There is much more detailed info about the build, hints, tips, info for the stripping the Mini & Starlet etc at my blog of the build at http://mearcat.blogspot.com Consider this ausmini thread an abridged version of the blog :D If you have any questions at all, don't hesitate to PM or email me.


It all started when I regretfully sold my semi-restored 1972 Clubman 3 years ago to help pay for a good chunk of our wedding (2 years ago). My wife fell in love with our old Mini so when the question was soon posed whether I could restore another one, she jumped at it. Yaaaay :D

After much discussion with my wife and then research, we decided upon the (well known to many) 4E-FTE Toyota Starlet GT engine conversion. So the story begins 18 months ago, July 2008, when the purchase was made...

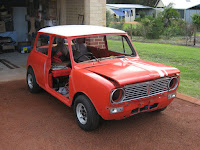
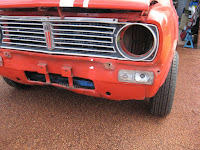
I found a 1978 Clubman in Bunbury, W.A. owned by a 17yo guy who had mostly stripped the shell and some of the engine - with intentions of doing an engine conversion of sorts but for various reasons, did not go through with it. Overall the shell was in good condition but with only a couple of concerns - the rear valance corner had a hole you could put your fist through, the front valance was severely dented had enough bog in it to sink a ship and a hole in the passenger side sill. it had been on the market for 5 months and no-one seemed to want a half-stripped shell & half stripped engine so for the measly sum of $1000, it was mine. Another 5 hour trip from Perth to Bunbury & back was in order, this time with a trailer. Unfortunately, we were half way through building our new house at this time so once it transported to Perth, the Mini was stored at a mate's garage for the next 6 months.

Image
Image

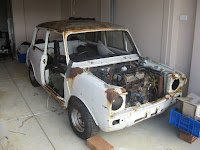
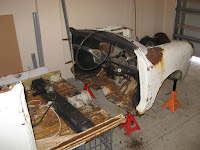
Once our house construction was completed, I moved the Mini to it's new home and at the same time, found a very neglected '75 Clubman (for $100) which had been out in a paddock with no glass or panels fitted, exposed for at least 2 years and quickly rusting away - The panels there was more holes and rust than straight steel and there was nothing special about the serial numbers. I wanted to strip this for some random parts and cut the shell in half so the front half could be used as a test rig for trial fitting the modified subframe & drilling any holes/brackets I may need. The plan is that Starlet engine and all ancillaries will be fitted to the white Mini and when completed, duplicated in the other Mini.

Image
Image

For many months, both cars sat collecting dust while I finished a huge list of things in the house, the workshop, workbench, spray booth and still more house stuff. My workbench didn't stay clean for long :D

Image

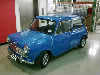
March 2009 rocked around and got a chance to see and drive what was the only (that I know of) legal Starlet GT engine conversion in Perth. James ('77 Clubby Van on ausmini) drove the 650km from Kalgoorlie to Perth to get the engineers' (pre-registration) inspection completed. I drove it, was suitably impressed even though it wasn't really in tune. But it was when he had a few spirited runs against my 305rwhp Nissan Skyline R33 (mid 13sec 1/4 mile car) when I realised that the 4E-FTE conversion in a Mini would be a ball tearer of a car :D James has since moved back to Victoria so once complete, my Mini will be a unique one in Perth. It was the motivation I needed to get started...

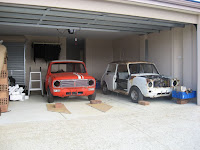
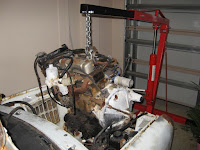
I stripped the rusty white Mini to bits, gave away the siezed engine, pulled off the various parts that I needed and dumped the rest at the scrap yard. Sara could now park her car in the garage for the first time. Needless to say, she was a happy chap.

Image
Image
Image

_________________
-Alan
I blame my dad for my love of minis. I think I was conceived in the back seat of one :D
I also blame my Dad for me being 6' 1" - not really the optimum height for driving a Mini.


Last edited by Mearcat on Sun Mar 03, 2024 12:54 pm, edited 80 times in total.

Top
 Profile  
 
 Post subject:
PostPosted: Fri Jan 08, 2010 10:00 pm 
Offline
998cc
998cc
User avatar

Joined: Tue Nov 13, 2007 4:17 pm
Posts: 946
Location: NOR, Perth, W.A.
I have also fabricated a spit / rotisserie for the Clubman after it was stripped of everything over Xmas and New year holidays. The question has been asked on the forums several times before how to do it on late model Minis since the hole in the firewall & boot was removed (around 1975-1976 I think). You can either put one piece of tube through the windows and entire length of the car (fitting as close as possible to the bottom of the window frames), but to balance the shell better when it’s rotated on it’s side or upside-down, you just need to keep the end tubes in the same position as the factory spit would have gone, but brace it more to the body. I have been advised by a sandblaster that as a precaution, to connect the bases of the end frames together so the shell doesn't potentially bend. The entire rotisserie cost me about $50. $35 for some 70kg EBay castor wheels and $15 in scrap steel from my local tip. 50mm square tube was used for the end frames, 25mm square tube for the main frames and some old metal bed frame pieces for the round tubes.

The front piece is attached to the subframe mounting points. The rear piece is attached to the rear shock mounts and rear seatbelt mounts on the parcel shelf.

The end product :
Image

End Frames (50mm square tube with an old sign post tube on top) :
Image

Front Bracket (25mm square tube) :
Image
Image
Image
Image

Rear Bracket (25mm square tube) :
Image
Image
Image
Image

_________________
-Alan
I blame my dad for my love of minis. I think I was conceived in the back seat of one :D
I also blame my Dad for me being 6' 1" - not really the optimum height for driving a Mini.


Top
 Profile  
 
 Post subject:
PostPosted: Sat Jan 09, 2010 11:40 am 
Offline
1275cc
1275cc
User avatar

Joined: Thu May 24, 2007 7:19 pm
Posts: 5370
Location: Yandina,Sunshine Coast,QLD
That spit is the same design as one of mine. The rear bolts onto the seat belt holes up top, but where dose your bottom section bolt onto?

_________________
Respect mine and I'll respect yours.


Top
 Profile  
 
 Post subject:
PostPosted: Sat Jan 09, 2010 2:58 pm 
Offline
848cc
848cc
User avatar

Joined: Wed Mar 14, 2007 3:50 pm
Posts: 404
Location: MORNINGTON PENINSULA
Top job on the spit AL , that will make life so much easier.

I had to roll mine onto some mattress's and tyre's, while it

worked the spit is much easier and more accessable.

Good work AL

Cheers Hallsey


Top
 Profile  
 
 Post subject:
PostPosted: Sat Jan 09, 2010 6:50 pm 
Offline
998cc
998cc
User avatar

Joined: Tue Nov 13, 2007 4:17 pm
Posts: 946
Location: NOR, Perth, W.A.
Kennomini wrote:
That spit is the same design as one of mine. The rear bolts onto the seat belt holes up top, but where dose your bottom section bolt onto?

To be honest, I think it might have been your spit design which I got inspiration from :D The bottom section of the rear piece bolts through the shock absorber holes. I still have to weld some tabs (or holes) to allow the due to be locked into place while it's semi-rotated.

_________________
-Alan
I blame my dad for my love of minis. I think I was conceived in the back seat of one :D
I also blame my Dad for me being 6' 1" - not really the optimum height for driving a Mini.


Top
 Profile  
 
 Post subject:
PostPosted: Sat Jan 09, 2010 10:00 pm 
Offline
848cc
848cc
User avatar

Joined: Fri Jan 13, 2006 11:24 am
Posts: 404
Location: Mandurah, WA
Looks like a pretty good shell for the project, cant wait to see the progress.

_________________
68 Mini
70 Moke


Top
 Profile  
 
 Post subject:
PostPosted: Sun Jan 10, 2010 1:04 am 
Offline
1275cc
1275cc
User avatar

Joined: Thu May 24, 2007 7:19 pm
Posts: 5370
Location: Yandina,Sunshine Coast,QLD
Yeah the spit attaches the same as mine, I've sat in it grinding and haven't noticed any flexing in the shell or the spit so IMO it should be fine :wink: Also when your done with the donor clubby nose you can convert it into a BBQ 8) .

_________________
Respect mine and I'll respect yours.


Top
 Profile  
 
 Post subject:
PostPosted: Sun Jan 10, 2010 8:28 pm 
Offline
1275cc
1275cc

Joined: Sun Apr 02, 2006 2:38 pm
Posts: 2210
Location: Huon Valley, TAS
Looks Good Alan, and loved reading the blog too.

Your link above has a dot in the wrong place so doesnt work properly (the dot after the .com).

http://mearcatmini.blogspot.com/ should work though.

Cheers,

Dicko


Top
 Profile  
 
 Post subject:
PostPosted: Mon Jan 11, 2010 10:42 am 
Offline
998cc
998cc
User avatar

Joined: Tue Nov 13, 2007 4:17 pm
Posts: 946
Location: NOR, Perth, W.A.
A few little things have also happened on the side in the last couple of months as well...

I got a set of 5 12x5" Performance Superlite mags second hand, suffering from a bad case of gutter rash and various scratches. These were cleaned up, sanded back where necessary and esnt off for sandblasted and powdercoating. I asked for a bright silver powdercoat and got a primer grey colour instead! :shock: :evil:
Image
Image

Needless to say, a few whines and whinges later and he knocked $50 off the price. Which I promptly spent on new paint for them. Some final light sanding to get some dust & crud out of the powdercoat, a few coats of paint and few coats of clear and here they are in a Ford Machine Effect silver (has a slight blue pearl through). They sparkle once out in the sun (but not like those stupid Twilight movie vampires :D )
Image


I also purchased a set of Metro brakes (I actually bought these before I even had the Mini!), replaced the Metro hubs with Mini hubs and got them all sandblasted, painted in high-temperature enamel silver (calipers) and satin black enamel (hubs, drive flange etc). New stainless steel pistons and a seal kit were put through them last weekend. I have also created a How To for installing the seal kit
http://www.ausmini.com/forums/viewtopic.php?t=60165

The Metro hubs in this pic were sold and replaced with Mini disc hubs
Image
Image

_________________
-Alan
I blame my dad for my love of minis. I think I was conceived in the back seat of one :D
I also blame my Dad for me being 6' 1" - not really the optimum height for driving a Mini.


Top
 Profile  
 
 Post subject:
PostPosted: Mon Jan 11, 2010 11:36 pm 
Offline
998cc
998cc
User avatar

Joined: Tue Nov 13, 2007 4:17 pm
Posts: 946
Location: NOR, Perth, W.A.
Now that the Mini is on the rotisserie, it gave me a better chance to spin the whole shell around tonight, lock it in place (there is a bolt goes through the end frame & front tube piece), and check for any more rust underneath. All is well with the floorpan. The battery box has a hole in it which will have to replaced. The rear valance box section in the RHS corner was completely rusted out and covered in bog. Some dodgy bugger had stuffed the area with newspaper and bogged over the top! I managed to find a date on the "West Australian" newspaper - Saturday 13 December 1997. Merry Xmas - here's some bog for the festive season. Not hugely important I know, but it's interesting to know it's been in Western Australia for at least half it's 31 year life.

Image

Image

The top side of the valance was dented and the seam also full of bog so I just bought a new panel to replace it later. I plan to get the boot bum deseamed also. Next step - hit the underside it with a heat gun, wire wheel and get all the underbody sealer off. Time to get dirty!

_________________
-Alan
I blame my dad for my love of minis. I think I was conceived in the back seat of one :D
I also blame my Dad for me being 6' 1" - not really the optimum height for driving a Mini.


Top
 Profile  
 
PostPosted: Mon Jan 18, 2010 3:55 pm 
Offline
998cc
998cc
User avatar

Joined: Tue Nov 13, 2007 4:17 pm
Posts: 946
Location: NOR, Perth, W.A.
I've been working on the shell over the weekend and scraping off the underbody sealer and other areas (readying for media blasting) and have revealed more rust and some repair attempts.

The right hand half the rear valance is being completely held on by bog. I also found the rear of both front wheel arches have had some sheet metal welded over (but not fully sealed) some rust. I grabbed the grinder and cut away the sheets that were welded in the wheel arches and found some pretty big holes!

Before & After (The shell is upsidedown in these pics).

Image Image

_________________
-Alan
I blame my dad for my love of minis. I think I was conceived in the back seat of one :D
I also blame my Dad for me being 6' 1" - not really the optimum height for driving a Mini.


Top
 Profile  
 
 Post subject:
PostPosted: Mon Jan 18, 2010 10:34 pm 
Offline
1275cc
1275cc
User avatar

Joined: Fri Apr 25, 2008 2:34 pm
Posts: 2002
Location: Brisbane
That is a pretty large hole. Im glad im starting out with a clean shell.
Can you buy a replacement panel for that? or is it going to be custom?
(and you should put the pictures upside down and see what people say about a floating angle grinder)

_________________
Simplify and add lightness


Top
 Profile  
 
 Post subject:
PostPosted: Tue Jan 19, 2010 12:01 am 
Offline
998cc
998cc
User avatar

Joined: Tue Nov 13, 2007 4:17 pm
Posts: 946
Location: NOR, Perth, W.A.
blue_deluxe wrote:
That is a pretty large hole. Im glad im starting out with a clean shell.
Can you buy a replacement panel for that? or is it going to be custom?

It was a shock when I found it because you just couldn't see the plates welded over the big hole until I scraped the thick layer of body sealer off. I didn't even notice it when I thoroughly checked over the car when I bought it. The rest of the shell is actually pretty good (he says before the shell is blasted :?)

Yes you can buy the inner A panel for both sides (eg. http://www.minisport.com.au/prod894.htm) which replaces the hinge reinforcement area which has rusted away completely, but it involves lining up the door mount holes properly. Since I'm getting it deseamed at the same time, it may be easier to weld in the replacement panel vs custom work. I'll find out which way is easier when I get to the panel beater ... hopefully in a few months

_________________
-Alan
I blame my dad for my love of minis. I think I was conceived in the back seat of one :D
I also blame my Dad for me being 6' 1" - not really the optimum height for driving a Mini.


Top
 Profile  
 
 Post subject:
PostPosted: Tue Jan 19, 2010 9:54 pm 
Offline
998cc
998cc
User avatar

Joined: Sat Jan 03, 2009 10:26 pm
Posts: 550
Location: Perth, Western Australia
Holy crap and I thought the hole in Hetty was big.. Nice progress your making there Alan..


Top
 Profile  
 
 Post subject:
PostPosted: Thu Jan 21, 2010 8:10 pm 
Offline
1275cc
1275cc
User avatar

Joined: Thu Jun 03, 2004 2:56 pm
Posts: 3981
Location: Brisbane
Hey Alan, good progress.

What are you using for a jig to make the subframe? I have made the mistake of using a mini front cut - I wouldn't recommend it.

_________________
But he's thriving and striving and hugging the turns.


Top
 Profile  
 
Display posts from previous:  Sort by  
Post new topic Reply to topic  [ 413 posts ]  Go to page 1, 2, 3, 4, 5 ... 28  Next

All times are UTC + 10 hours


Who is online

Users browsing this forum: No registered users and 10 guests


You cannot post new topics in this forum
You cannot reply to topics in this forum
You cannot edit your posts in this forum
You cannot delete your posts in this forum
You cannot post attachments in this forum

Jump to:  

cron

© 2016 Ausmini. All garage work involves equal measures of enthusiasm, ingenuity and a fair degree of irresponsibility.