Ausmini
It is currently Sun Apr 28, 2024 1:17 am

All times are UTC + 10 hours


Post new topic Reply to topic  [ 413 posts ]  Go to page Previous  1 ... 3, 4, 5, 6, 7, 8, 9 ... 28  Next
Author Message
 Post subject:
PostPosted: Thu Jul 22, 2010 11:13 am 
Offline
ET 13.457 seconds , OH YEAH !!!!
User avatar

Joined: Sun Sep 19, 2004 8:35 am
Posts: 7826
Location: Somewhere Around Sydney
JC wrote:
Hey alan the motor looks great.

Just spied the factory exhaust manifold. Not sure if you've mentioned it to date but are you replacing it?


Last bit under the pic ;)

Mearcat wrote:
The standard (restrictive) manifold will be kept for until it's registered and then replaced with a tubular manifold.

_________________
Image
Starlet Conversion:
http://www.ausmini.com/forums/viewtopic.php?t=15484


Top
 Profile  
 
 Post subject:
PostPosted: Thu Jul 22, 2010 11:20 am 
Offline
998cc
998cc
User avatar

Joined: Tue Nov 13, 2007 4:17 pm
Posts: 946
Location: NOR, Perth, W.A.
That's what I said. However...

I have already purchased a tubular exhaust manifold (in mild steel, not stainless) and split/divorced dump pipe.

With the recent debates over here in Perth about the very expensive and badly implemented IM240 emissions testing policy on modified vehicles that the government had tried to implement over the last year or so, I WAS going to keep the exhaust setup as close to stock as I can for registration. However I discovered yesterday that as of a few weeks ago, the govt has backflipped on the regulations and so will be fitting the new manifold & dump pipe straight away (they will both be ceramic coated too).

For those in Perth/WA interested, see the bulletin here : http://www.transport.wa.gov.au/mediaFiles/lic_IB_124F_Changes_to_Emission_Testing_Light_Vehicles.pdf

_________________
-Alan
I blame my dad for my love of minis. I think I was conceived in the back seat of one :D
I also blame my Dad for me being 6' 1" - not really the optimum height for driving a Mini.


Top
 Profile  
 
 Post subject:
PostPosted: Mon Aug 09, 2010 11:24 am 
Offline
998cc
998cc
User avatar

Joined: Tue Nov 13, 2007 4:17 pm
Posts: 946
Location: NOR, Perth, W.A.
I recently bought a second hand split dump pipe off austarlet forums. It's a direct replacement for the factory catalytic converter but I had to modify the mount for it so it bolts onto the lower engine block and that the weight of the dump pipe & exhaust is not hanging directly off the turbo.

The only thing I'm not sure of is whether the separate wastegate pipe will foul against the front valance panel as it sits quite a bit further forward than the turbo. I (may) get the shell back in the coming weeks so I'll soon find out when I begin work on the subframe.

Image

Image

EDIT : 6 weeks later, I've started the front subframe customisation and found this dump pipe doesn't fit :( Specifically, the separate pipe for the wastegate is too far forward and fouls against both the front subframe bar.So I'll sell it and get another dump pipe later.

I also picked up my clutch which was rebuilt with a new organic heavy duty lining and a new pressure plate (with 2000lb clamping pressure, ~40% upgrade over standard). Flywheel was also machined and a new thrust bearing installed.
Image

Image

_________________
-Alan
I blame my dad for my love of minis. I think I was conceived in the back seat of one :D
I also blame my Dad for me being 6' 1" - not really the optimum height for driving a Mini.


Top
 Profile  
 
 Post subject:
PostPosted: Mon Oct 11, 2010 11:22 pm 
Offline
1275cc
1275cc
User avatar

Joined: Fri Apr 25, 2008 2:34 pm
Posts: 2002
Location: Brisbane
Just read the latest blog for this build.

Definitely going to be a show stopper. Looks brilliant so far.

_________________
Simplify and add lightness


Top
 Profile  
 
 Post subject:
PostPosted: Tue Oct 12, 2010 12:19 am 
Offline
998cc
998cc
User avatar

Joined: Tue Nov 13, 2007 4:17 pm
Posts: 946
Location: NOR, Perth, W.A.
My shell has been away getting rust repairs and deseaming done for a while and after many delays, I picked it up on the weekend. It had been gone for a day short of 6 months :shock: I didn't really want to start building the front subframe until I had the shell back, because a new front valance had to be fitted and you can never be 100% certain that location of the old subframe mount holes will be exactly the same as the new valance.

I'm currently juggling attending (too many) weddings, bucks day/nights, birthdays and dinners with seemingly minimal Mini-time, but I hope to make some good progress on the subframe and (fingers crossed) finish it in the coming couple of weeks.

Until then, here are some pics of the shell. New panels fitted were front valance, rear bumper section, both sills and both footwells. Small rust repairs were numerous. A & C pillars and rear bumper have been deseamed. Unfortuantely, at closer inspection, I'm not really happy with the average quality of the welds (gasless MIG was used), finishing and rust repairs so if you want to know who not to take your shell to, just PM me.

Image

Image

Image

Image

_________________
-Alan
I blame my dad for my love of minis. I think I was conceived in the back seat of one :D
I also blame my Dad for me being 6' 1" - not really the optimum height for driving a Mini.


Last edited by Mearcat on Sat Mar 19, 2011 7:08 pm, edited 1 time in total.

Top
 Profile  
 
 Post subject:
PostPosted: Tue Oct 12, 2010 6:02 pm 
Offline
848cc
848cc

Joined: Thu Nov 08, 2007 7:48 pm
Posts: 67
Location: Sydney
You will be busy.... go for it and get it done!!!

Cheers, Michael

_________________
Motivate me to get this done... back in Sydney again...


Top
 Profile  
 
 Post subject:
PostPosted: Tue Oct 12, 2010 6:43 pm 
Offline
848cc
848cc
User avatar

Joined: Wed Mar 14, 2007 3:50 pm
Posts: 404
Location: MORNINGTON PENINSULA
Good work Al
Must be good to have the car back and making some
progress :D

Cheers Hallsey


Top
 Profile  
 
 Post subject:
PostPosted: Tue Oct 12, 2010 9:52 pm 
Offline
848cc
848cc

Joined: Mon Aug 07, 2006 9:23 pm
Posts: 191
Location: Adelaide... RADelaide!
Nice on Al... good to see some progress with the shell.

It just so happens i'm doing bodywork at the moment too! Does anyone have suggestions as to what sort of paint removal method to use? Pros and cons for Soda blasting, bead blasting, sand/garnet blasting, acid dipping etc etc..

I know acid dipping removes all of the sealant and I believe is more work than it's worth.

I'd like to get the paint removal done to reveal all bog and rust areas and then spend some days patching where the rust is, place new panels and then get the prime done.

What are your moves (re: bodywork) from here Al?

_________________
Answer the Question....
BUT always Question the Answer


Top
 Profile  
 
 Post subject:
PostPosted: Tue Oct 12, 2010 10:51 pm 
Offline
998cc
998cc
User avatar

Joined: Tue Nov 13, 2007 4:17 pm
Posts: 946
Location: NOR, Perth, W.A.
amos wrote:
It just so happens i'm doing bodywork at the moment too! Does anyone have suggestions as to what sort of paint removal method to use? Pros and cons for Soda blasting, bead blasting, sand/garnet blasting, acid dipping etc etc.
What are your moves (re: bodywork) from here Al?


There's plenty of discussion around on pros & cons of blasting type on the forum - just search.

My next move on the shell is to strip back the replacement boot/bumper section that was welded in - to check if there's any worse rust (or holes) under that paint. The I need to organise to complete the welding that wasn't finished when I picked the shell up. After that, most of the "development" work will be done on my guinea pig front cut I have.

_________________
-Alan
I blame my dad for my love of minis. I think I was conceived in the back seat of one :D
I also blame my Dad for me being 6' 1" - not really the optimum height for driving a Mini.


Top
 Profile  
 
 Post subject:
PostPosted: Sun Oct 17, 2010 10:24 pm 
Offline
998cc
998cc
User avatar

Joined: Tue Nov 13, 2007 4:17 pm
Posts: 946
Location: NOR, Perth, W.A.
I don't normally post minor parts of the build here, but I thought this may be handy for others while trying to position the engine in the correct spot.

It's been mentioned in a few other builds that the engine needs to be tilted forward a bit to stop the intake manifold from fouling against the bulkhead, and after some lateral thinking of how to get the engine correctly positioned without the use of a heap of jacks or stands, I came up with this. I measured how high I wanted the CV cups and drilled a hole at that height in a 100mm square block of pine so that a long bolt passes through the block and into another piece of wood that was cut (like the shape of a tri-bearing) and put into the CV cup.

Image

Image

Image

I was then able to drop the crane height and the engine rotated around the axis of the driveshaft and so easily tilted forward.

A little bit of tweaking the position back & forth and I now have the engine in it's final position so I can fabricate the engine mounts.
Image

_________________
-Alan
I blame my dad for my love of minis. I think I was conceived in the back seat of one :D
I also blame my Dad for me being 6' 1" - not really the optimum height for driving a Mini.


Top
 Profile  
 
 Post subject:
PostPosted: Mon Oct 18, 2010 9:33 am 
Offline
998cc
998cc
User avatar

Joined: Tue Sep 19, 2006 8:58 pm
Posts: 614
Location: Wyndham Green, Vic!
Nice idea! 8)

_________________
-James.

Toyota 4EFTE Powered Minivan.
102 Kw @ The Front Wheels....Oh What a Feeling!


Top
 Profile  
 
 Post subject:
PostPosted: Mon Oct 18, 2010 3:33 pm 
Offline
848cc
848cc
User avatar

Joined: Wed Mar 14, 2007 3:50 pm
Posts: 404
Location: MORNINGTON PENINSULA
Brilliant idea Al

That would save a lot of stuffing around

nice work :D :D

Cheers Hallsey


Top
 Profile  
 
 Post subject:
PostPosted: Tue Oct 19, 2010 2:47 am 
Offline
1275cc
1275cc
User avatar

Joined: Fri Jun 17, 2005 10:31 am
Posts: 3183
Location: Burpengary, Queensland - Home of Tricky Performance Engineering
Up there for thinking.... :D

_________________
"Not Speeding Officer..........Qualifying"


Top
 Profile  
 
 Post subject:
PostPosted: Sat Feb 05, 2011 7:24 pm 
Offline
998cc
998cc
User avatar

Joined: Tue Nov 13, 2007 4:17 pm
Posts: 946
Location: NOR, Perth, W.A.
A milestone has been achieved (finally). I have quite distracted since October since so many friends have been getting married, and too many friends and family have been wanting their cars serviced or repaired. The last one left the garage this morning and have said no more until I get a solid few weeks of Mini work.

I have made slow progress on the subframe and as of today, have completed the engine mounts :D :D So this is what's been happening in the last 3 months...

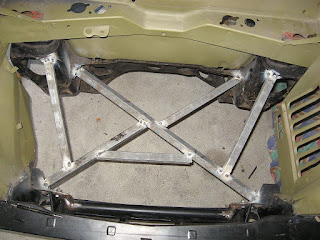
The front brace bar (this is before the valance was fitted to the shell) was fabricated.
Image

Image


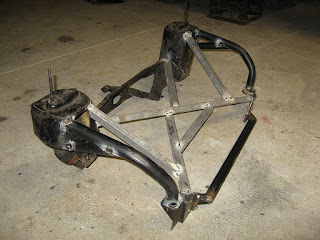
As usual, the front of original subframe was cut away and a frame was tacked together to enforce the subframe position.
Image

Spars (using 32mm OD tube w/ 3mm wall thickness) have been bent up and welded in place, ensuring that the drivers' side spar did not foul against any pulleys or future belts.
Image

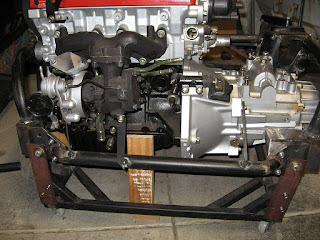
The engine was positioned in the engine bay (with subframe fitted) and I measured some key distances from the engine to subframe. Those measurements were then replicated with the subframe and engine in the JIG and then the engine was bolted/welded in place using some steel bar front & back with wood holding the CV cups up as well.

One bar on either side of the turbo and one on the gearbox
Image

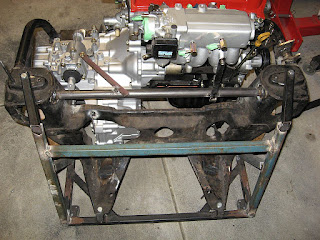
One bar on the gearbox, one on the intake manifold and one on the equaliser driveshaft bracket (if you look carefully)
Image

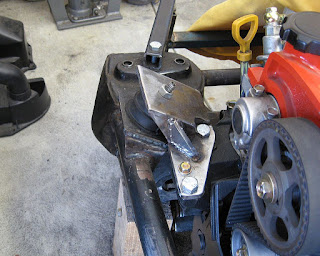
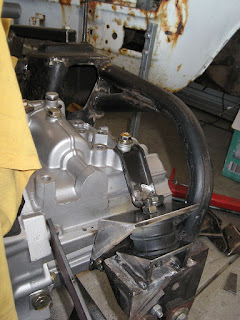
Now here is the major difference in my subframe compared to those done so far. I am using rubber "cotton-reel" type mounts from a V8 Land Rover for the front & side mounts. They are much more compact than the Starlet mounts and given they are designed for a V8, they will be more than strong enough for this engine. I put the idea of using these mounts past my engineer and he saw no problem with it.

This was my first attempt - mounted at a 45 degree angles, but then after talking to a local Land Rover workshop, I relalised the correct angle used in the V8's is 30 degrees, but I don't have a pic of the correct one.
Image

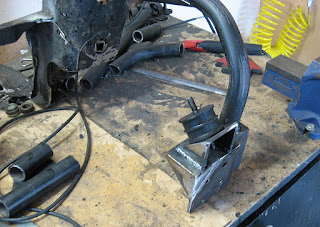
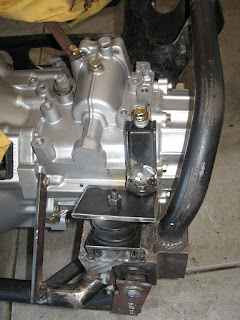
The side mount was was made from some shaped steel plate (all plate used was 6mm) contoured around the spars.
Image

Image


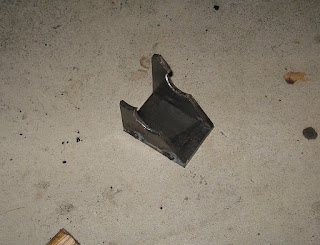
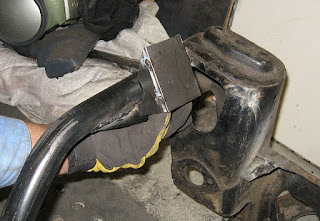
The side engine mount bracket ended up looking like this. Due to the position of one of the bolts, I had to cut away the corner of the angled plate and weld in section of tube so that the bolt could still be used.
Image
Image


The front engine mount used not only a custom section, but the brace that was used in the original Starlet mount was cut and re-welded to bolt to the custom bracket with a blind nut, so that it provides some additonal support between the bracket and the top of the gearbox.
Image
Image


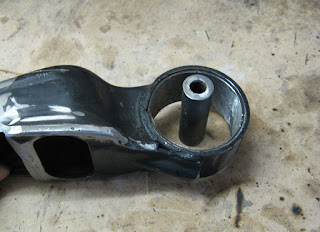
Using a Land Rover V8 mount for the rear engine mount was going to make fitting the engine a bit tricky due to the bolts cast in the rubber mount all pointing inward, so I decided to use the Starlet mount and have the rubber (which was cracked and perished anyway) recast in Polyurethane.

I trimmed down the stock mount.
Image

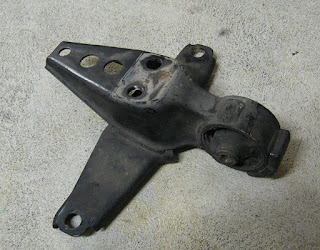
cut off the "wings", added some 3mm plate and made a type of box section as well as adding a third bolt hole.
Image

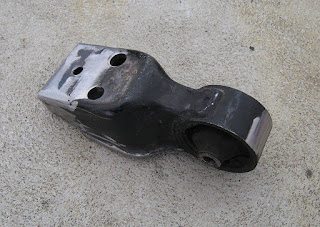
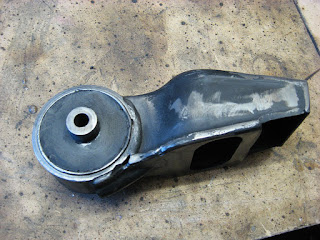
The rubber was badly cracked in the mount so using a chisel and dremel, it was all cut out
Image

Image

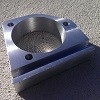
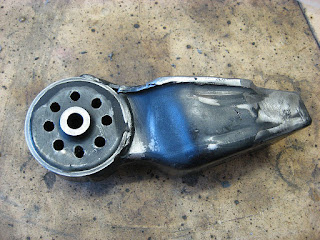
The new polyurethane cast - in Shore 65 hardeness. This is still quite hard for the mount so as per suggesstion of the casting company, I drilled a series of 8mm holes to provide some further flexibility
Image

Image

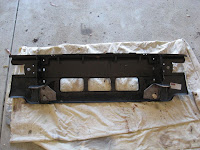
So to figure out where to bolt this, some 5mm plate was cut to fit between the wings for the mount to bolt to (only tack welded for now)

Image

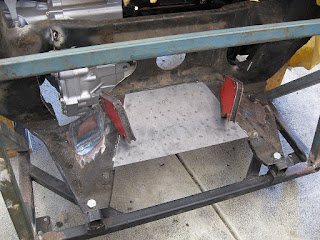
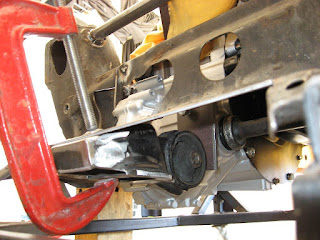
The mount was clamped into the final position, which gave enough clearance to the to the engine bracket (you can see the single piece of plate bolted to the rear of the gearbox in this pic). The remainder of the bracket was measured and built around the position of the clamped mount
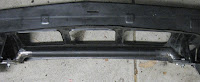
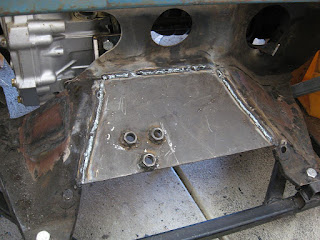
Image


The final design
Image

I marked, drilled some holes, welded some M12 nuts in place and that's that. The engine can now sit freestanding :D :D
Image

_________________
-Alan
I blame my dad for my love of minis. I think I was conceived in the back seat of one :D
I also blame my Dad for me being 6' 1" - not really the optimum height for driving a Mini.


Last edited by Mearcat on Sat Feb 05, 2011 9:37 pm, edited 3 times in total.

Top
 Profile  
 
 Post subject:
PostPosted: Sat Feb 05, 2011 7:55 pm 
Offline
Give Ash some flowers Nick .
User avatar

Joined: Wed Aug 09, 2006 1:22 pm
Posts: 10149
Location: Toowoomba Region, QLD
Very nice. Looks like you are making some good progress.

Just make sure you keep those blasted other car's out of your garage now!

_________________
"In two years time your car will be like a lady's clothes, out of date, my car will still be in fashion when I am dead" - Sir Alec speaking to Pininfarina


Top
 Profile  
 
Display posts from previous:  Sort by  
Post new topic Reply to topic  [ 413 posts ]  Go to page Previous  1 ... 3, 4, 5, 6, 7, 8, 9 ... 28  Next

All times are UTC + 10 hours


Who is online

Users browsing this forum: No registered users and 106 guests


You cannot post new topics in this forum
You cannot reply to topics in this forum
You cannot edit your posts in this forum
You cannot delete your posts in this forum
You cannot post attachments in this forum

Jump to:  

© 2016 Ausmini. All garage work involves equal measures of enthusiasm, ingenuity and a fair degree of irresponsibility.