Ausmini
It is currently Sun Apr 28, 2024 3:02 am

All times are UTC + 10 hours


Post new topic Reply to topic  [ 413 posts ]  Go to page Previous  1 ... 4, 5, 6, 7, 8, 9, 10 ... 28  Next
Author Message
 Post subject:
PostPosted: Sun Feb 06, 2011 12:06 am 
Offline
998cc
998cc
User avatar

Joined: Mon Jan 16, 2006 1:15 pm
Posts: 678
Location: Melbourne
Very neat job as usual Mearcat.

Where did you source the polyurethane for the bush? I have quite a few that could sue that treatment....

Madmorrie


Top
 Profile  
 
 Post subject:
PostPosted: Mon Feb 07, 2011 11:10 am 
Offline
998cc
998cc
User avatar

Joined: Tue Nov 13, 2007 4:17 pm
Posts: 946
Location: NOR, Perth, W.A.
madmorrie wrote:
Very neat job as usual Mearcat.

Where did you source the polyurethane for the bush? I have quite a few that could sue that treatment....

Madmorrie


Cheers. In the last year I have probably had 4 or 5 of my friends (including a friends' girlfriend :shock: ) tell me "If you ever need any help, just give me a call and I'll come over", but I'm just so slow and methodical about the whole thing and wanting to make everything neat and proper, I doubt many of those friends would stick around watching me potter around and make eg ONE engine mount in a whole day :)

As for the casting, I got a local company here in Perth that soley fabricates polyurethane and got them to cast the single rear mount. Alternatively, Powerflex make replacement bushes for the Starlets and with the current exchange rate, makes for an attractive price : http://store.powerflexusa.com/toyota-starlet-turbo-ep82--ep91-urethane-bushings-p1135.aspx

_________________
-Alan
I blame my dad for my love of minis. I think I was conceived in the back seat of one :D
I also blame my Dad for me being 6' 1" - not really the optimum height for driving a Mini.


Top
 Profile  
 
 Post subject:
PostPosted: Mon Apr 04, 2011 8:26 pm 
Offline
998cc
998cc
User avatar

Joined: Tue Nov 13, 2007 4:17 pm
Posts: 946
Location: NOR, Perth, W.A.
I have finally had time to finish my subframe (with the exception of minor items like welding on tabs for things like brake/fuel lines). I have bent up some (27mm OD, 2.5mm wall) tube and welded it between the front of the subframe and under the towers. This will help to prevent any compression or tension forces that would normally occur with a frame that only has the front & rear of the subframe connected by a single upper "hanging" tube. It also allows me to make some stronger tie rod mounts.

I welded some 5mm steel plate on the bottom of the towers to strengthen the rear end of the brace tubes, and some more 5mm bar between the towers to stiffen the frame a little.
Image

I had previously made up some templates that replicate the factory position of the tie rod mounts and used those as a reference point when bending the tube, so that the tube ran close to the mount.
Image

Image

Image

The tie rod mount is a weak point on some 4EFTE subframes I've seen where the design involves simply rewelding the original mount piece underneath the front subframe section with no decent bracing back to the subframe. I've got the mount welded to the lower brace bars with a 5mm thick gusset so that the forces are transferred towards the front subframe mount. There should be no issues with this moving under heavy braking.
Image

The final product :
Image

Image

As for the rest of the Mini, after I got the shell sandblasted a while ago, it was sent off to a guy to get the rust repairs done but it came back with some pretty average welding (pinholes everywhere, sloppy pigeon-poo welds from a gasless MIG) and bad panel repairs (gaps left between panels, alignment issues between panels, new fill in sheet sitting proud of original panels, leaving a big chunk of rust in the rear beaver closing panel, replacing the part of the boot & bumper opening with another one that had had a rear push with thick thick bog around the hinges). It's now been has been dropped off to another place to get many of those previous repairs and welding redone. I won't publicly name names on this thread but it was an expensive lesson to use someone who seemed to have a "get it done" attitude, not "get it right". I will get the shell back in a few months (?) Until then, I have to get the alternator and water pump tensioner mounts completed, dump pipe tacked up and also take a fibreglass mould of the Starlet dash to begin the custom dash.

_________________
-Alan
I blame my dad for my love of minis. I think I was conceived in the back seat of one :D
I also blame my Dad for me being 6' 1" - not really the optimum height for driving a Mini.


Top
 Profile  
 
 Post subject:
PostPosted: Tue Apr 05, 2011 9:46 am 
Offline
1098cc
1098cc
User avatar

Joined: Thu Sep 30, 2004 3:12 pm
Posts: 1461
Location: Brisbane
I feel your pain bud, I was stung big time recently and it makes everything else way too difficult

_________________
If you want more inches, stroke it
Life's a garden.... Dig It!
http://www.ausmini.com/forums/viewtopic.php?t=20746


Top
 Profile  
 
 Post subject:
PostPosted: Sun May 15, 2011 11:17 pm 
Offline
998cc
998cc
User avatar

Joined: Tue Nov 13, 2007 4:17 pm
Posts: 946
Location: NOR, Perth, W.A.
After having to take the shell to another guy to get the bad workmanship (of guy No.1) repaired, I picked it up over the weekend. He has done a pretty good job to fix what he could considering the sh!t he had to start with.

I thought I'd post some pictures of the worst repairs that were performed, even though (further to these photos) what also had to be fixed was multiple other panel fills that had to be cut off and redone, bad panel alignments that had be redone and many many crappy welds that had to be ground back and redone - not to mention the large number of pinholes in welds. I was and still am shocked to think that anyone would think this kind of workmanship is acceptable. Just email me if you want to know who NOT to work on your car.

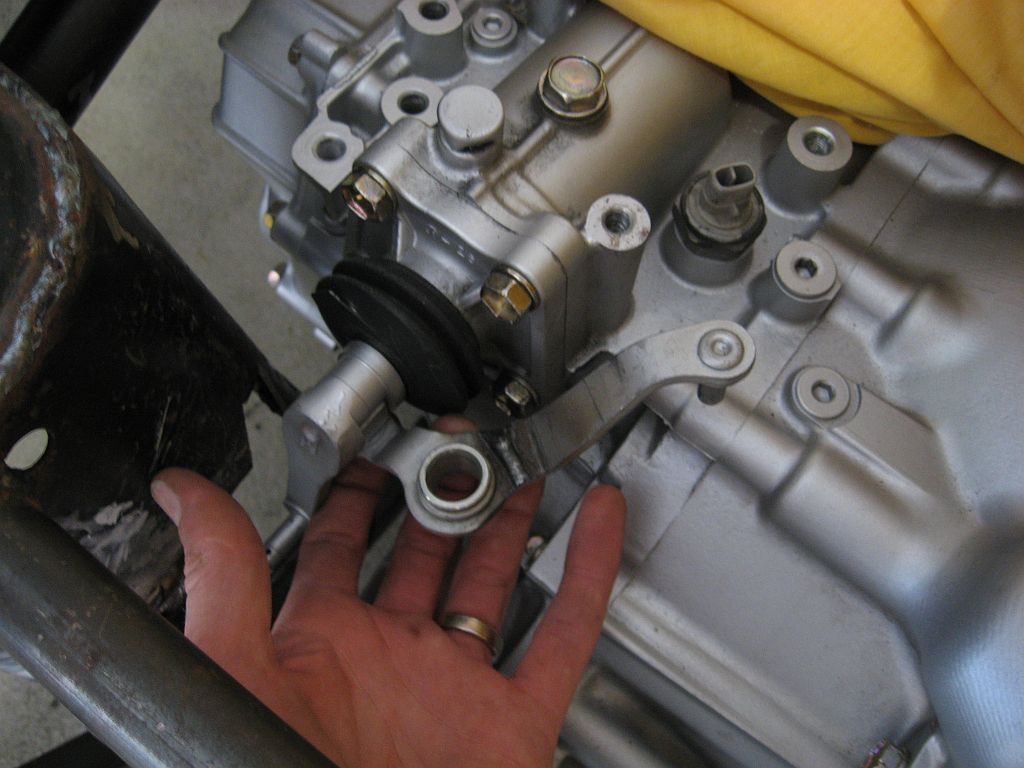
On a good note though, my engineer has inspected the completed subframe and is satisfied with the customisation, bracing work and quality of the welds. His first words after checking it over was "It's all very good... yeah, you won't have any issues with this holding the engine"

Alignment of rear boot opening panel
Image

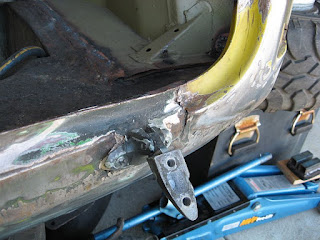
More misalignment and you can see the panel overlap (not welded) in the boot area over the subframe bolt holes. This overlap was so bad that it caused the rear subframe trunnion to not sit flat when bolted on. The difference in height between the two trunnion bolt holes was 6mm :shock:
Image

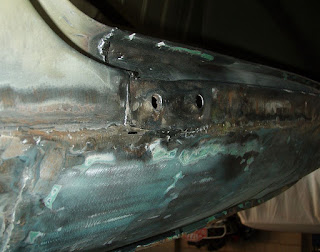
Patches on the rear valance (as it turned out, the patches were welded straight a previous dodgy repair)
Image

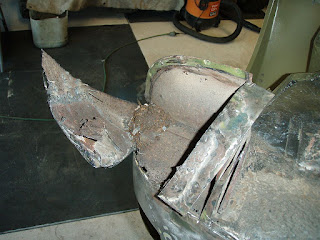
More misalignment, and replacement boot opening panel was really badly dented and full of bog.
Image

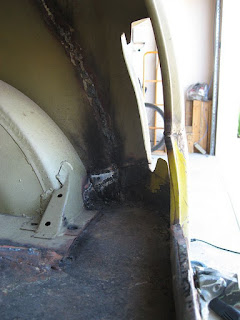
The rusty rear valance and closing panels that were welded back on
Image

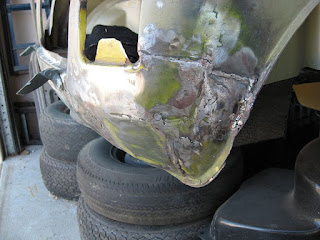
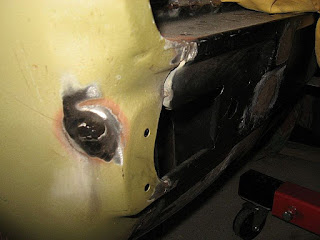
Bad Front valance alignment
Image

_________________
-Alan
I blame my dad for my love of minis. I think I was conceived in the back seat of one :D
I also blame my Dad for me being 6' 1" - not really the optimum height for driving a Mini.


Top
 Profile  
 
 Post subject:
PostPosted: Mon May 16, 2011 7:11 pm 
Offline
848cc
848cc
User avatar

Joined: Wed Mar 14, 2007 3:50 pm
Posts: 404
Location: MORNINGTON PENINSULA
Gee AL
Isnt it frustrating relying on other people that let you down
anyway the shells back and its full steam ahead

Look forward to seeing it come together

Cheers Hallsey


Top
 Profile  
 
 Post subject:
PostPosted: Mon May 16, 2011 8:56 pm 
Offline
998cc
998cc
User avatar

Joined: Tue Sep 19, 2006 8:58 pm
Posts: 614
Location: Wyndham Green, Vic!
ouch. You said it was bad, but wow!
I'm not a good welder and would never weld someone else's car, but I think I could have got those panels better than that. :? :shock:

Good to see its on track now.

Righto, enough computering. Back to the shed Al! :lol:

_________________
-James.

Toyota 4EFTE Powered Minivan.
102 Kw @ The Front Wheels....Oh What a Feeling!


Top
 Profile  
 
 Post subject:
PostPosted: Tue May 17, 2011 4:33 am 
Offline
1275cc
1275cc
User avatar

Joined: Fri Jun 17, 2005 10:31 am
Posts: 3183
Location: Burpengary, Queensland - Home of Tricky Performance Engineering
hallsey wrote:
Gee AL
Isnt it frustrating relying on other people that let you down
anyway the shells back and its full steam ahead

Look forward to seeing it come together

Cheers Hallsey


Yep, sure is Hallsey!!

Hello from Venice everyone, still keeping tabs on my favourite site.
Dont be discouraged Al, keep going mate!!

Cheers,
Tricky

_________________
"Not Speeding Officer..........Qualifying"


Top
 Profile  
 
 Post subject:
PostPosted: Wed Jun 29, 2011 12:24 am 
Offline
998cc
998cc
User avatar

Joined: Tue Nov 13, 2007 4:17 pm
Posts: 946
Location: NOR, Perth, W.A.
No big news to report from recent work....

I've taken a 2-section fibreglass mold of the top of the Starlet dash and gauge cluster surround and am about to glass them together so I can then modify it to integrate 2 gauges (Stewart Warner oil pressure & boost) and a sequential shift light http://www.ecliptech.com.au/index.php?option=com_content&view=article&id=59&Itemid=109. The custom fibreglass dash replica will hold the factory gauge cluster so it looks nice and neat.

But for now, the dump pipe has been completed. I've chosen to use a 2.25" exhaust from turbo back since I will be using the standard CT9 turbo and not going for big HP. A few mandrel bends and about 4 hours :shock: of carefully shaping, moulding some pieces around the flange opening resulted in a really nice smooth bellmouth off the turbo flange.
Image

and then measuring a tacking together another mandrel bend and a flange. This will all be TIG welded soon. A flex pipe will be mounted directly after the dump pipe flange.
Image
Image

As for clearances, I had about 5mm between the dump pipe and front brace bar :shock: It's not much, so I cut & welded in a piece of exhaust pipe to form a small scallop to give a total of 10mm clearance.
Image

Image

_________________
-Alan
I blame my dad for my love of minis. I think I was conceived in the back seat of one :D
I also blame my Dad for me being 6' 1" - not really the optimum height for driving a Mini.


Top
 Profile  
 
 Post subject:
PostPosted: Fri Aug 12, 2011 12:27 am 
Offline
998cc
998cc
User avatar

Joined: Tue Nov 13, 2007 4:17 pm
Posts: 946
Location: NOR, Perth, W.A.
Latest update...

Alternator mount/tensioner has been done. Because my main spar leading from the subframe tower to the front bends inwards at the front, the belt was fouling against it, so I used a standard 50mm flat idler pulley to adjust the path of the belt around the engine mount. This extra pulley could have been avoided by planning a little more ahead of time, but it was an easy fix.

Image

Image

Image

Then the gear selector linkages were modified. There is only one lever that needs modifying - the lever that moves the selector in/out of the gearbox when you move the (in-cabin) gear shifter left/right.

The lever is disassembled, cut and rewelded upside-down
Image

Image

Before the arm is rewelded though, it is important to ensure that there is about 25mm clearance of movement back & forth and that the clevis pin is high enough above the gearbox to be able to fit the cable back on. The new configuration is then mounted on the opposite side of the factory position (but still retains the correct direction of movement of course)

Image

Image

I also made some solid brake lines for the rear subframe and radius arms. The 3/16" brake line ("Bundy tube") comes in large rolls and I had a hard time in straightening the line out really well so I made my own straightener - this is based on professional ones you can buy (for around $300!) Using some roller door rollers (~$8ea) and some scrap angle steel I had, and bolted the rollers so that the tube would only JUST fit between the rollers so by working the back and forth and twisting it, it forms it straight. It's not perfectly straight, but it's pretty damn good and alot better than I ever got by hand

Image

Image


So then I managed to do this last week. I rolled my ankle and the ligament pulled a piece of bone off the top of my talus (heel) bone. It doesn't look like much, but the fracture is 9mm wide looking from the top, hurts a lot and for it to heal properly I have to have a cast, then later on a moon boot on for 6 weeks in total. This means no driving, crutches until I get the boot and then no excess movement. Any progress on the Mini in that time will be rather difficult thanks to my wife who has promised to ban me from workshop for the 6 weeks to ensure it heals :(

Image

_________________
-Alan
I blame my dad for my love of minis. I think I was conceived in the back seat of one :D
I also blame my Dad for me being 6' 1" - not really the optimum height for driving a Mini.


Last edited by Mearcat on Mon Oct 30, 2017 11:56 am, edited 3 times in total.

Top
 Profile  
 
 Post subject:
PostPosted: Fri Aug 12, 2011 10:01 am 
Offline
998cc
998cc
User avatar

Joined: Tue Sep 19, 2006 8:58 pm
Posts: 614
Location: Wyndham Green, Vic!
The fabrication work looks great Al. Good to see it coming together! :D

Shame to hear about the ankle though. :(
Good luck on a quick recovery. Get some rest and just think how much longer the days will be in 6 weeks! :wink:

_________________
-James.

Toyota 4EFTE Powered Minivan.
102 Kw @ The Front Wheels....Oh What a Feeling!


Top
 Profile  
 
 Post subject:
PostPosted: Fri Aug 12, 2011 7:25 pm 
Offline
1275cc
1275cc
User avatar

Joined: Fri Apr 25, 2008 2:34 pm
Posts: 2002
Location: Brisbane
Its all looking really good, have been following your blog.

And shame about the ankle, lets hope it heals quickly. You could always use the time to organise everything and get things together ready to go.

_________________
Simplify and add lightness


Top
 Profile  
 
 Post subject:
PostPosted: Fri Aug 12, 2011 7:31 pm 
Offline
848cc
848cc
User avatar

Joined: Wed Mar 14, 2007 3:50 pm
Posts: 404
Location: MORNINGTON PENINSULA
Yep looks the goods Al,mighty fine work

Damn same about the ankle, that is soooo frustrating,all the best for a quick recovery and back into the mini

Cheers Hallsey


Top
 Profile  
 
 Post subject:
PostPosted: Fri Aug 12, 2011 8:31 pm 
Offline
998cc
998cc
User avatar

Joined: Tue Nov 13, 2007 4:17 pm
Posts: 946
Location: NOR, Perth, W.A.
blue_deluxe wrote:
You could always use the time to organise everything and get things together ready to go.

Well I have already convinced my wife to be able to do some work on the Starlet wiring loom. Since I don't need to stand up for this, I have her permission to spread the loom out over our games room floor to start documenting all the wiring & connections, and then cut out the components that aren't needed (i.e. air con, power windows etc)

The week I did my ankle, I was just about to go out a buy a Lincoln 180C MIG welder but now that purchase must of course have to wait. It would have been so much more frustrating having just bought a nice MIG and not being able to use it for 6 weeks!

_________________
-Alan
I blame my dad for my love of minis. I think I was conceived in the back seat of one :D
I also blame my Dad for me being 6' 1" - not really the optimum height for driving a Mini.


Top
 Profile  
 
 Post subject:
PostPosted: Sat Aug 13, 2011 10:20 pm 
Offline
848cc
848cc

Joined: Mon Aug 07, 2006 9:23 pm
Posts: 191
Location: Adelaide... RADelaide!
Nice work on the new parts Al.. Pity about the ankle. The lincoln 180 is what I have and its awesome! I'm just doin work on shifter bellcranks too. Obviously your engine is further over than mine though cos I'm goin to have a custom one for the rotation selector. I like the custom 4PK idler, the smallest avail (75mm I think) barely fits!

Lucky ya dont have to stand up for work I guess!! :)

_________________
Answer the Question....
BUT always Question the Answer


Top
 Profile  
 
Display posts from previous:  Sort by  
Post new topic Reply to topic  [ 413 posts ]  Go to page Previous  1 ... 4, 5, 6, 7, 8, 9, 10 ... 28  Next

All times are UTC + 10 hours


Who is online

Users browsing this forum: No registered users and 131 guests


You cannot post new topics in this forum
You cannot reply to topics in this forum
You cannot edit your posts in this forum
You cannot delete your posts in this forum
You cannot post attachments in this forum

Jump to:  

© 2016 Ausmini. All garage work involves equal measures of enthusiasm, ingenuity and a fair degree of irresponsibility.