Mearcat wrote:
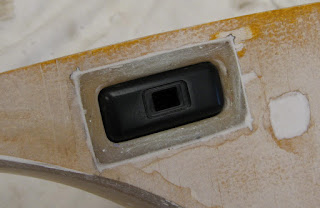
The problem with this button is that the thin semi-transparent (for backlighting) fascia piece has fallen off at some point (has the hazard symbol on it) Can anyone suggest a solution on what I could do to make a new one?
| ausmini https://www.ausmini.com/forums/ |
|
| Mearcat 4E-FTE Clubman Build (Latest update 3-03-24 Pg 28) https://www.ausmini.com/forums/viewtopic.php?f=23&t=60133 |
Page 23 of 28 |
| Author: | braad [ Tue Jan 28, 2020 2:40 pm ] |
| Post subject: | Re: Mearcat 4E-FTE Clubman Build (Latest update 28-01-20 Pg |
You have great attention to detail Alan! |
|
| Author: | Mearcat [ Wed Jan 29, 2020 8:18 pm ] |
| Post subject: | Re: |
Mearcat wrote: The problem with this button is that the thin semi-transparent (for backlighting) fascia piece has fallen off at some point (has the hazard symbol on it) Can anyone suggest a solution on what I could do to make a new one? |
|
| Author: | fuzzy-hair-man [ Wed Jan 29, 2020 9:50 pm ] |
| Post subject: | Re: Re: |
Mearcat wrote: The problem with this button is that the thin semi-transparent (for backlighting) fascia piece has fallen off at some point (has the hazard symbol on it) Can anyone suggest a solution on what I could do to make a new one? My mercedes sprinter van has a huge hazard light button you could chop up to the correct size, the Landcruiser ones are relatively large or just wander round the wreckers looking for likely candidates? |
|
| Author: | Stuwey [ Thu Jan 30, 2020 8:17 am ] |
| Post subject: | Re: Mearcat 4E-FTE Clubman Build (Latest update 28-01-20 Pg |
Can you just order a new switch from Toyota spare parts? |
|
| Author: | madmorrie [ Fri Jan 31, 2020 7:15 pm ] |
| Post subject: | Re: Mearcat 4E-FTE Clubman Build (Latest update 28-01-20 Pg |
Looking great Alan. |
|
| Author: | Mearcat [ Mon Feb 24, 2020 10:42 am ] |
| Post subject: | |
Some of you may have seen the electric rear window openers that are available from Japan (See video https://www.youtube.com/watch?v=w-NSu7e0HJU), well I sourced details of the kit but it was obvious that the kit wouldn't work on Australian Minis without a few modifications to the C-pillar and rear parcel shelf. To add to this, the kit was over AUD$300 for what looked like a relatively basic set of parts so you know where this is going ... it's custom time The setup was based around a high torque worm geared motor attached to a shaft and a lever arm. 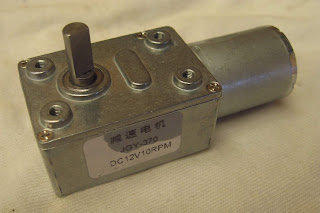 The first step was to drill out and remove the two pins in the window latch with a 5mm drill bit 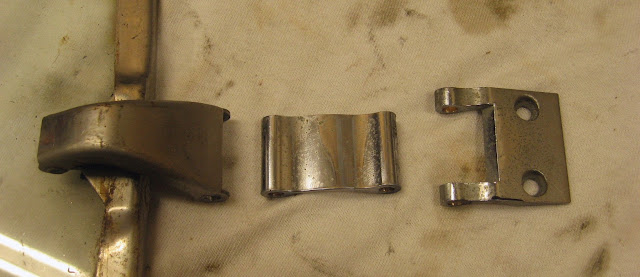 I machined some stainless pins to replace the ones drilled out (and they match the chrome colour too) 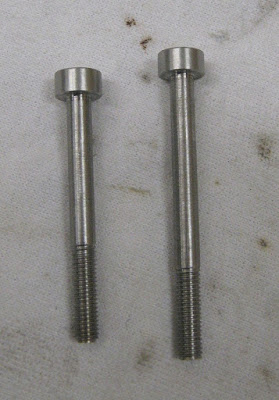 For the shaft between the latch and motor I purchased a 1/4" flexible extension shaft  I cut this shaft apart to use the flexible core under the main sheath and then machined some small steel couplers for the ends of the shaft. Then using a small piece of steel plate I made a lever arm for the top of the flexible shaft and it was all silver brazed together. 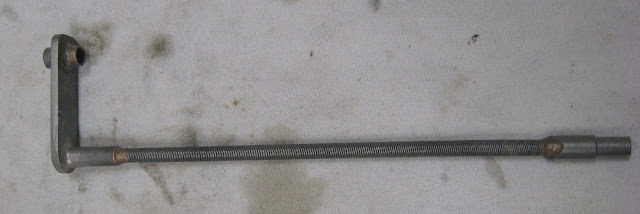 This piece slides over the custom latch pins and allow the shaft to rotate on the same axis as the outer latch pin 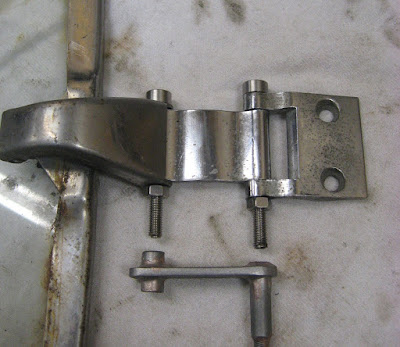 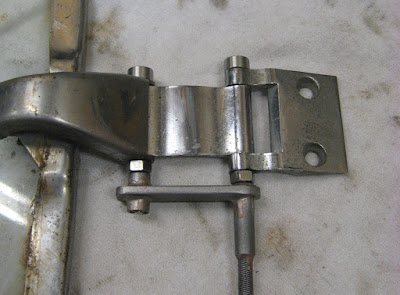 The motor was to be mounted to the rear parcel shelf via a custom bracket and positioned so the flexible shaft did not rub on the rear seat or the window rubber. 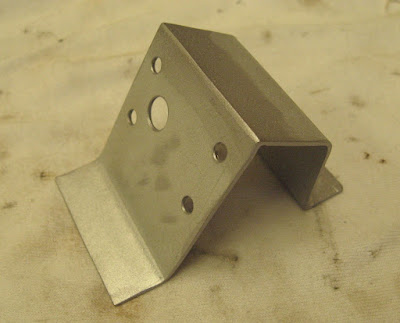 ...and with some of the original sheath trimmed and put back over the flexible core, it neatens up the look 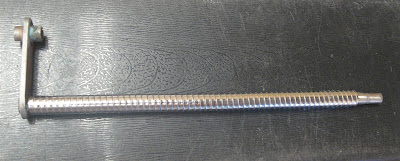 Once the parts were put together, it all looked like this (photo taken through the rear window opening). The black piece at the base of the shaft is a 6mm rubber flexible coupling to join the shaft to the motor. 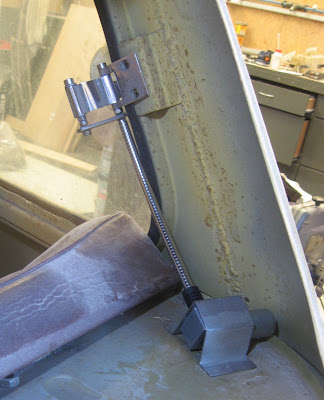 The worm gear motor is DC, so wiring would be a simple job via a couple of DPDT switches. I used a 10RPM motor which takes approx 3 seconds to open/close the window and would give enough time to predict when the window is completely open/closed and not damage the mechanism by keeping the motor powered on for too long - as there is no auto-stop function. Here's the bad news ... after spending something like 35-40 hours on this with multiple prototypes and fabricating (I did make all the parts for both windows), I actually decided against installing these openers but thought I'd post the pics in case someone gets inspired and wants to make a set. |
|
| Author: | Mearcat [ Mon Mar 09, 2020 12:13 pm ] |
| Post subject: | |
There was an interesting discussion on a Mini Facebook group recently in regards to some of the adjustable Hi-Lo trumpets being sold for the classic Mini and their suitability for rubber cones. The commonly sold alloy Hi-Lo's are designed with coil springs in mind and not the rubber cones. Compared to the factory trumpets with a rolled edge, these alloy Hi-Los are a slightly larger diameter and have a flat mating face (no radius machined) for seating the coil springs. 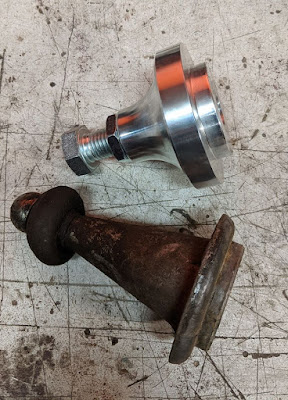 I'd already purchased a set of Hi-Los a few years ago so I decided to modify them to match the factory trumpets. Firstly, I drilled a series of holes around the outer edge of the Hi-Los so I can insert a rod and stop it from rotating when adusting the nut (whilst all fitted in the car). Note that I've previously had the Hi-Los anodised in a black colour 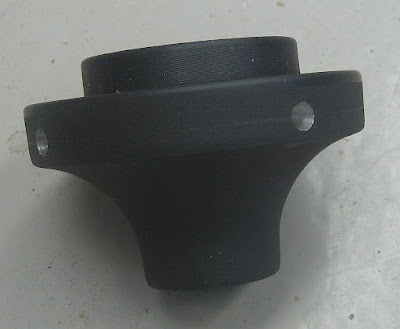 I then machined down the diameter from approx 88mm to 82mm (same as the factory trumpet)  Then I formed the radius to be close to the factory trumpet. 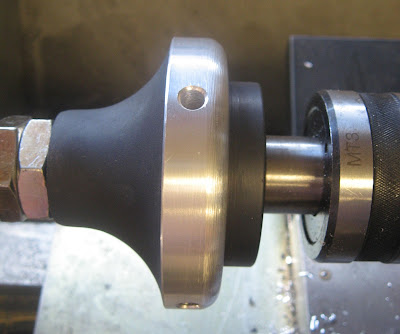  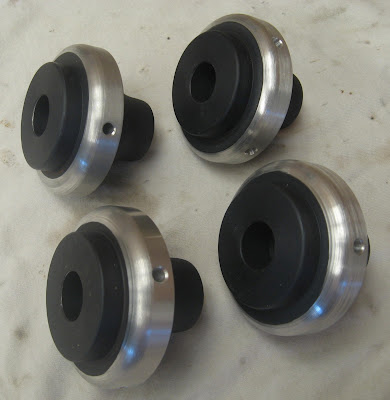 With the diameter reduced and radius machined into the Hi-Los, the spring rate will be closer to a factory set up Before :  After : 
|
|
| Author: | Mearcat [ Mon Mar 23, 2020 11:55 am ] |
| Post subject: | |
In my previous Mini Clubman, I often had an issue with lack of space and how bulky the heater box was and how easy it was to kick and damage the heater duct near my feet. So I decided to add to my work by making a full custom heater box and boy did it take some time to prototype and finish it! Made from fibreglass, it re-uses the factory Mini heater core but instead of the bulky squirrel cage fan, I've used a high flow 150mm PC case fan - The fan I chose flows a hefty 138CFM at 12V and with a noise level of 48dB, it's not intrusively loud. 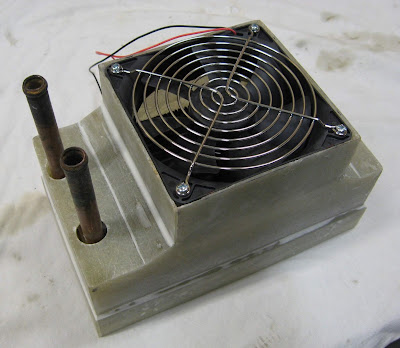 With some foam glued around the perimeter of the core, the factory Mini heater core was used and fits snugly into the box.  There is no longer room in the engine bay for the fresh air duct so that function has been deleted, as well as the air direction flap between windscreen/footwell. This makes the custom box as small as possible. I've made the second half of the box a fixed split of airflow between the windscreen outlets and footwells.  I then hand-made some 50mm duct bends and some mounts to use the factory mount points. 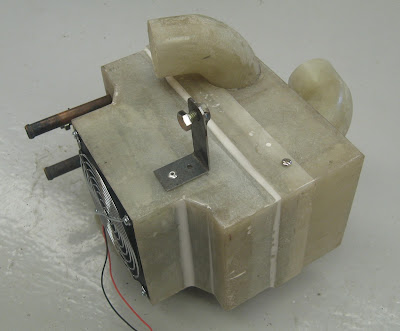 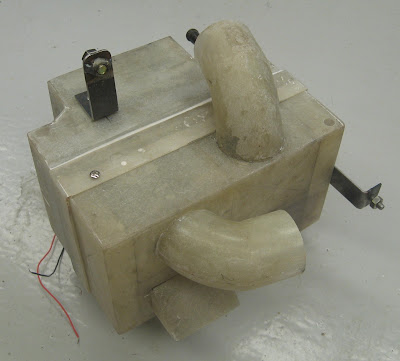 Airflow to footwells is via some rectangular outlets (one is removable to make it easier to sand and paint) 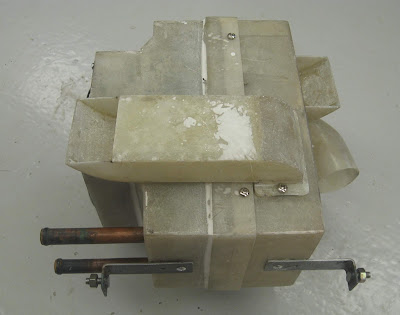 The size difference between the factory Mini heater box and my custom heater box is substantial 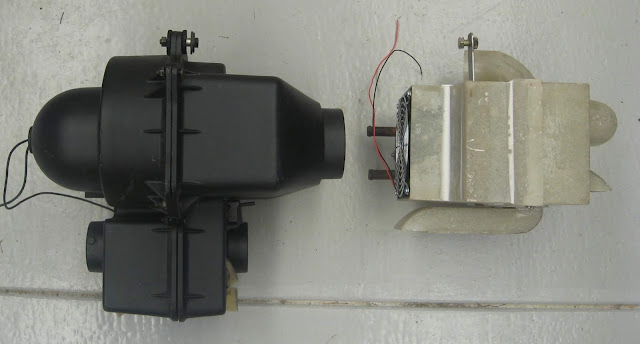 With the demister outlets to the windscreen at the top of the custom box, the tubes are no longer exposed to contact from your feet 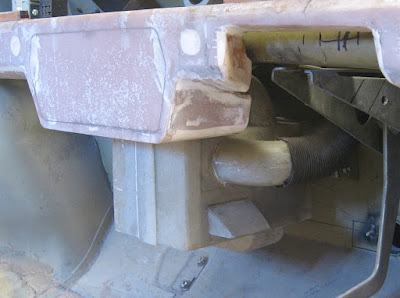 I was going to use a new right angle 1/2" heater tap under the dash but after some discussion with some local Mini guys, I was advised that a lot of the new 1/2" Mini taps are of average quality so I fitted 1/2" hose between the bulkhead adapter & the heater core under the dash without a tap. 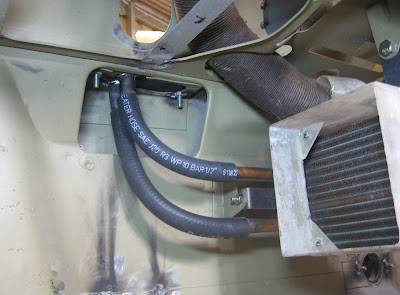 I purchased a universal 16mm heater tap to match the Starlet coolant system. This was fitted in the engine bay coolant line, between the engine block and the custom 16mm-1/2" bulkhead adapter.  
|
|
| Author: | winabbey [ Mon Mar 23, 2020 12:57 pm ] |
| Post subject: | Re: Mearcat 4E-FTE Clubman Build (Latest update 23-03-20 Pg |
Amazing fabrication work. Keep it going and please keep posting. It's good to have something enjoyable to take our mind of the current doom and gloom. |
|
| Author: | Kennomini [ Tue Mar 24, 2020 9:35 am ] |
| Post subject: | Re: Mearcat 4E-FTE Clubman Build (Latest update 23-03-20 Pg |
Very nice fiberglass work, is it just a hobby or do you have a work background with the stuff? |
|
| Author: | Mearcat [ Wed Mar 25, 2020 12:42 pm ] |
| Post subject: | |
Kennomini wrote: Very nice fiberglass work, is it just a hobby or do you have a work background with the stuff? Just a hobby(ish). I used to have a really small side business making fibreglass gauge pods for imports & performance cars but nothing that serious. It lets me look at design solution in a different way now and choose between fabricating in steel or fibreglass. The air filter box, dash panels, heater box, centre console in this Mini are all based around using fibreglass - it's a very versatile product. |
|
| Author: | Mearcat [ Tue Apr 14, 2020 10:32 am ] |
| Post subject: | |
Now that the custom heater box was done, I had to make a new heater control panel as the factory one wasn't suitable. Since I fitted the heater tap in the engine bay, the control cable will pass through a grommet in the firewall and rather than get a cable commercially made, I custom made one using a generic lawn mower throttle/control cable 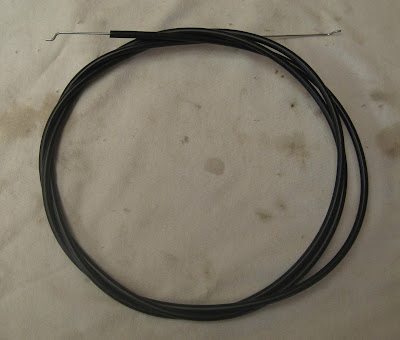 By wrapping the cable core around a small mandrel, I formed at eyelet one on end for the heater tap  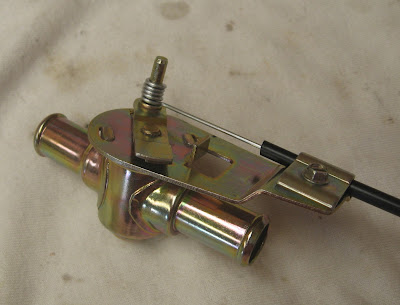 In the cabin, I cut out a single DIN sized opening for the stereo, below which will be the heater control panel 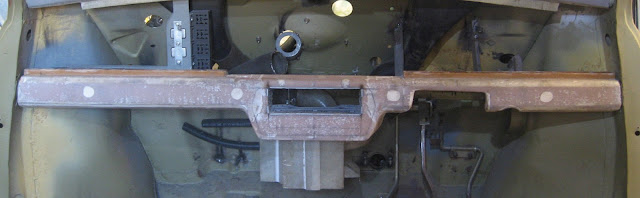 This is where the really detailed work started and yes, it took far too many hours to prototype and make this... I fabricated a new assembly to hold the hot/cold lever and fan power switches. The heater control assembly was designed as a single piece  The heater adjustment lever was designed to have a 30mm stroke required by the heater tap and it was held onto a 5mm pin with some 1mm brass shims and a push on retaining clip (aka starlock washer). I also added a custom brass saddle to prevent any vertical movement, and limit the horizontal movement of the lever  The other end of the mower control cable was trimmed and another eyelet hand-formed. This cable is held in place with a same simple clamp - the same as as on the heater tap 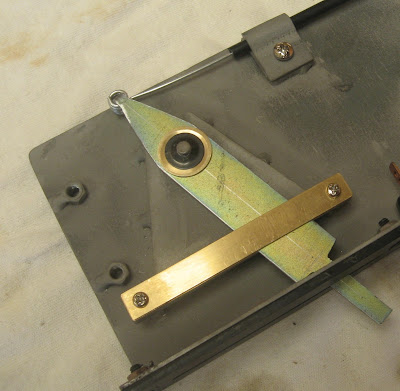 Instead of the original single speed fan, I have an on/off switch and adjustable fan speed for the heater fan. This circuit board (off the shelf item) controls the fan speed by providing a linear range of 1.5-12 Volts to the fan. 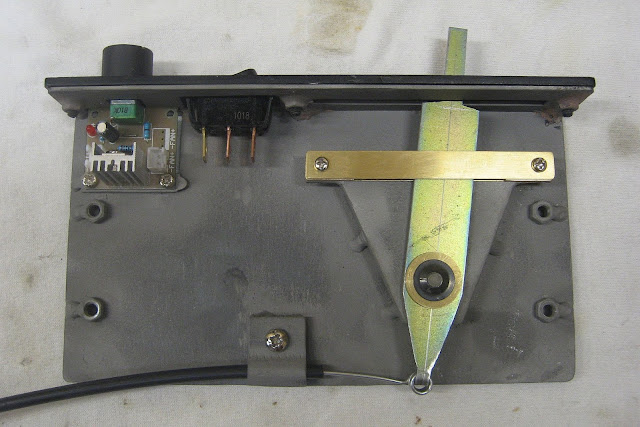 For the new fascia, I created a CAD design for a fascia and I got a local trophy shop to cut a piece of 3mm laminate, engrave the labels and paint fill the text. The stereo is obviously pretty old but it'll get replaced with a new one later. 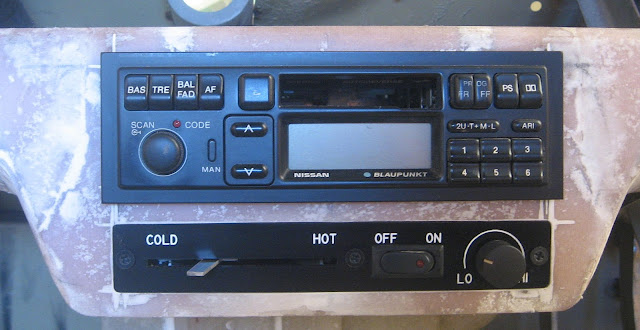
|
|
| Author: | Kennomini [ Wed Apr 15, 2020 6:29 pm ] |
| Post subject: | Re: Mearcat 4E-FTE Clubman Build (Latest update 14-04-20 Pg |
Silly question but do you still use cassettes? Why not a CD, Bluetooth etc modern head unit (or a duel tape and cd unit). |
|
| Author: | Mearcat [ Wed Apr 15, 2020 6:44 pm ] |
| Post subject: | Re: Mearcat 4E-FTE Clubman Build (Latest update 14-04-20 Pg |
Kennomini wrote: Silly question but do you still use cassettes? Why not a CD, Bluetooth etc modern head unit (or a duel tape and cd unit). I said in the post that "The stereo is obviously pretty old but it'll get replaced with a new one later", but yeah I'll be getting a new digital media (non-CD) unit during final assembly - this one was used just for sizing/test fitting |
|
| Author: | Kennomini [ Fri Apr 17, 2020 2:50 pm ] |
| Post subject: | Re: Mearcat 4E-FTE Clubman Build (Latest update 14-04-20 Pg |
Oh, I'm an idiot (I skimmed over that bit). |
|
| Page 23 of 28 | All times are UTC + 10 hours |
| Powered by phpBB® Forum Software © phpBB Group http://www.phpbb.com/ |
|