Ausmini
It is currently Mon Apr 29, 2024 7:16 pm

All times are UTC + 10 hours


Post new topic Reply to topic  [ 113 posts ]  Go to page 1, 2, 3, 4, 5 ... 8  Next
Author Message
PostPosted: Thu Apr 10, 2008 9:11 pm 
Offline
848cc
848cc

Joined: Thu Mar 27, 2008 6:53 pm
Posts: 99
Location: Adelaide
Hi all, first time posting after reading for a couple of years :lol:

I will post pics and full details of my bulid over the next couple of days, but just as a hint to why its going to b a slo998 :roll: : it involves a SC12, a Swiftune camshaft, an A+ 12g940 head with swiftune valves, ATB diff, a Haltech E8 ECU, four coils and lots more cool stuff. :twisted:

It is running atm with some of the things listed the rest is in a box waiting on little things or the time to put it in.

I am trying to work out atm about the new head, i want to put the 1275 head on but need to sort a couple of things out. The main problem i have is working out the size of the chambers, I want around 8.5:1 comp. I have a std bore 998 with a+ flat-top pistons. I think they wolud need to be around the 26cc mark?

The next problem is pocketing the block, the head has 36mm inlets and 30mm EX valves. Do i just flow the 998 head gasket line on the block and go 2.5mm deep? Then run a 1275 head gasket or is there a lot more to it? :oops:

Thanx Nathan.


Last edited by Slo998 on Tue Jul 08, 2014 10:31 pm, edited 16 times in total.

Top
 Profile  
 
 Post subject:
PostPosted: Thu Apr 10, 2008 9:47 pm 
Offline
1275cc
1275cc
User avatar

Joined: Sat Nov 19, 2005 1:37 pm
Posts: 2495
Location: Vegus, Brisvegus
Welcome!

I think we had an Adelaide guy with your ID as his number plates. Went off & bought a family car for some reason.

Let us know how the injection goes. I chickened out on an injection project when it got too hard.

M


Top
 Profile  
 
 Post subject:
PostPosted: Thu Apr 10, 2008 10:15 pm 
Offline
848cc
848cc

Joined: Thu Mar 27, 2008 6:53 pm
Posts: 99
Location: Adelaide
Yes that was willy, i know him well :roll: :lol:

The injection side of things is getting to a fun stage now with just about everything ready to go on :o But it has been a hard thing to get right! The Haltech is very nice to work with and if any ECU will get it running proply then im sure it will be it. The best part is that that is only a part of what it will be controling :twisted:

Nathan.


Top
 Profile  
 
 Post subject:
PostPosted: Thu Apr 10, 2008 10:26 pm 
Offline
848cc
848cc

Joined: Sun Oct 15, 2006 4:41 am
Posts: 384
Location: Adelaide
Maybe after all these additions you'll be able to keep up with that slo 850 that I've heard some top sparky has..

Seriously though, that sparky has his block bored 0.040" and runs a RE13T, and the block pocketing is quite a bit deeper than 2.5mm. I'd be checking lift and clearance with your cam and head combo and go from there.

_________________
Carl
Previous Owner & Driver of 1 Morris "It's not a Cooper!!" 850


Top
 Profile  
 
 Post subject:
PostPosted: Thu Apr 10, 2008 10:54 pm 
Offline
998cc
998cc
User avatar

Joined: Sun Dec 18, 2005 10:54 am
Posts: 529
Location: Adelaide, SA
Glad to see you finally made it nathan ... and welcome


Now get this bloody thing running so you can come and lap at the sametimes as me :lol:

How much is that other block of yours pockeded... i vote to just take big chunks out of the block within reason of course how much lift do you have ???

Beanie

_________________
I am the son of the STIG

HOTBRICKS
http://hotbricks.org.au/

'65 NCF MINI.....
'69 MINIMATIC.... 9 year resto still on the go


Top
 Profile  
 
 Post subject:
PostPosted: Fri Apr 11, 2008 6:58 am 
Offline
religious status
religious status
User avatar

Joined: Fri Mar 19, 2004 6:19 pm
Posts: 39643
Location: near Baulkham Hills, NSW
re the head pocketing depth-
you need to measure from the exhaust valve heads to head face, take away the total valve lift, add the gasket thickness, then see what the result is. Cut the pockets deep enough to allow at least 1.0mm clearance between valve and block at full lift. Check with plasticine before engine assembly.

BTW I reckon your valves are too big for a 998, I would have used 33mm/29.4mm ones.... :wink:

_________________
DrMini- 1970 wasaMatic 1360, Mk1S crank, 86.6HP (ATW) =~125 @ crank, 45 Dellorto (38 chokes), RE282 sprint cam, 1.5 rockers, 11.0:1 C/R. :mrgreen:


Top
 Profile  
 
 Post subject:
PostPosted: Fri Apr 11, 2008 1:22 pm 
Offline
848cc
848cc
User avatar

Joined: Tue Apr 19, 2005 1:19 pm
Posts: 338
Location: Adelaide
Hi Nath
Your pocket should only be the depth required as the Doc says if too deep the top piston ring will end up going into it and that is not good. When I pocketed my block I marked out using a 998 head gasket in the valve area then fitted a 1275 gasket just make sure you don't cut outside of the fire ring otherwise it will never hold a head gasket. Probably a good idea to check by placing a 1275 gasket on before cutting.

_________________
4efte powered Clubman
supercharged 998 race car


Top
 Profile  
 
 Post subject: Progress photos
PostPosted: Sat Apr 12, 2008 12:02 am 
Offline
848cc
848cc

Joined: Thu Mar 27, 2008 6:53 pm
Posts: 99
Location: Adelaide
Regarding valve size, I can see your point for a N/A 998, but with forced induction intake air velocity shouldn't be too much of an issue---so the bigger the better :P

Thanks for the advice about pocketing, I'll have to do some measurements.

Still need to work out how to calculate the chamber size to get down to around 8.5:1 so I can get the head finished and on the car :)

Here are some photos of bits and pieces for the build.

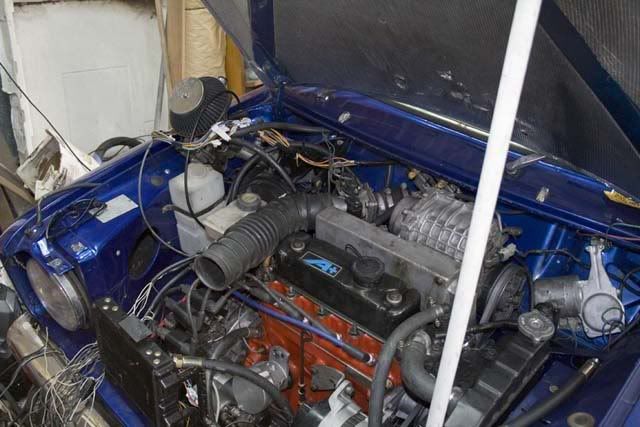
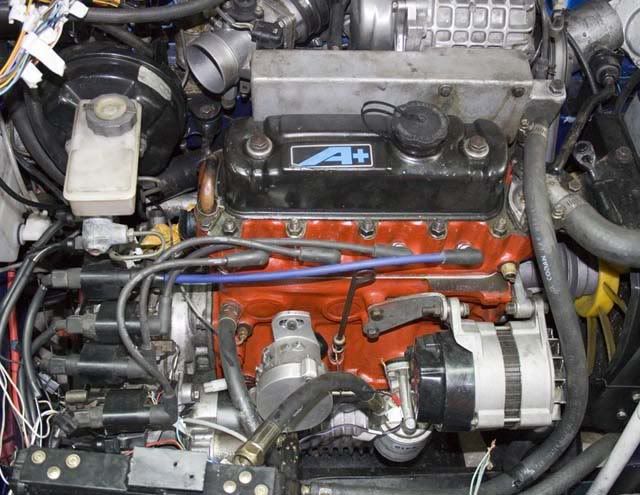
Engine bay with throttle body, injection manifold, supercharger, cam angle sensor and coils fitted (coil per cylinder). A+ 998 head with mild porting on atm.
Image

Image

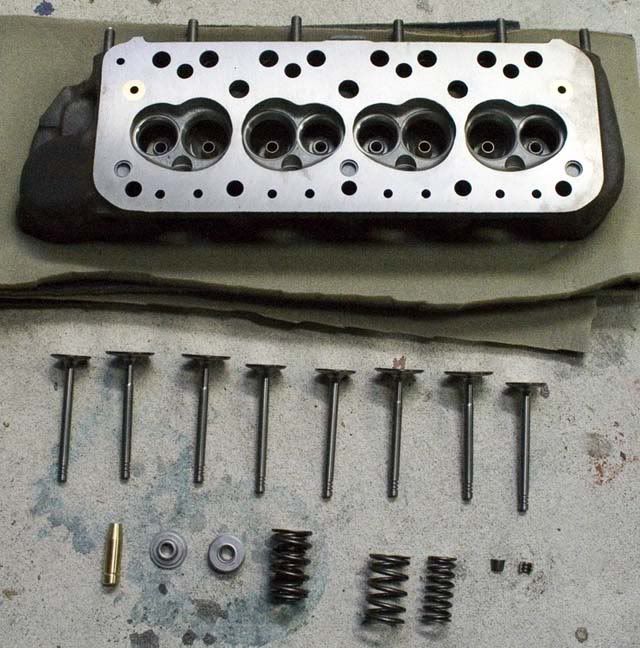
The 12G940 head, with the new valves, two (double) valve springs, retainer and collet. Bronze guides like the one shown have been installed for the inlet valves, while the exhaust guides were k-lined.
Image

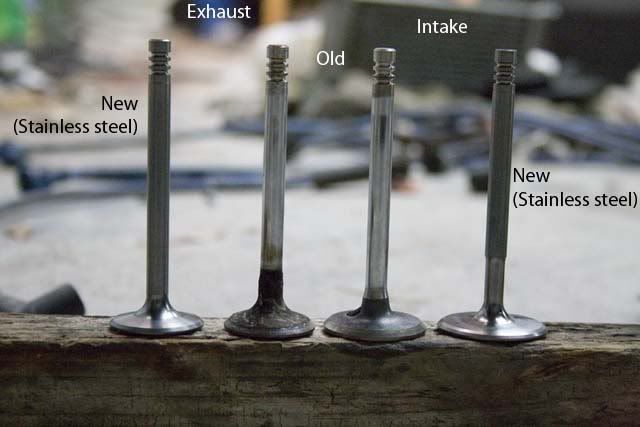
Comparison of new and old valves. 21-4N stainless steel from Swiftune. Note the narrowed stem near the head of the intake valve.
Image

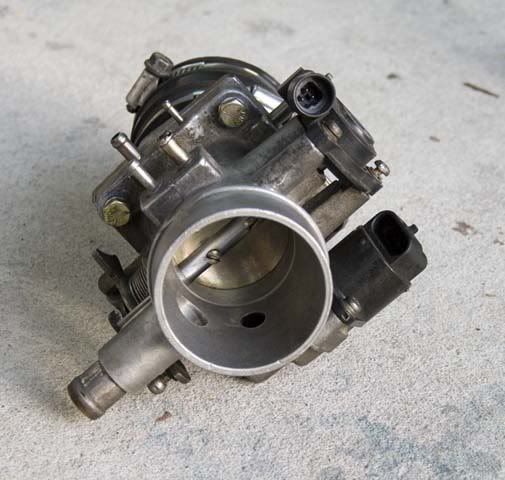
Throttle body from 2.0L JE camira, with TPS and IAC.
Image

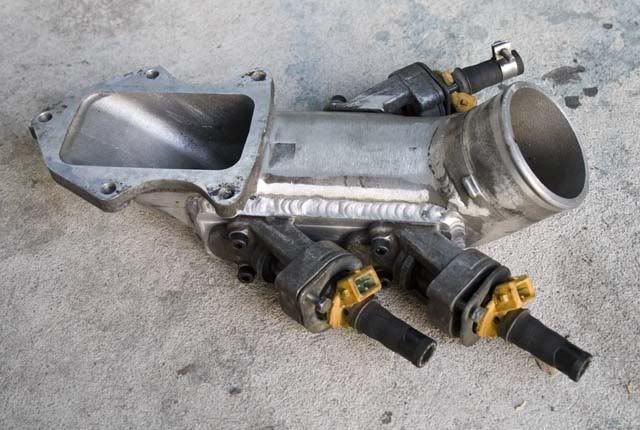
Injection manifold with 3 injector bosses. 3x550 cc/min RX7 injectors will be fitted. Injection will be staged sequential controlled by the Haltech E8.
Image

I'll upload some photos of the rest of the setup soon.

Nathan


Top
 Profile  
 
 Post subject:
PostPosted: Sat Apr 12, 2008 12:12 am 
Offline
Milatsmadmini
User avatar

Joined: Mon Nov 12, 2007 6:57 pm
Posts: 6273
Location: the inner west of sydeney!
snap! :shock:


ill be keeping an eye on this one....

great work mate, keep it coming!

_________________
Here am I sitting in my tin can far above the Moon
Planet Earth is blue and there's nothing I can do...


“A turbo: exhaust gasses go into the turbocharger and spin it, witchcraft happens and you go faster.” - Jeremy Clarkson


Top
 Profile  
 
 Post subject:
PostPosted: Sat Apr 12, 2008 7:08 am 
Offline
the King of Bling
User avatar

Joined: Thu Jun 03, 2004 11:11 pm
Posts: 19858
Location: Baulkham Hills
very interesting must say I'll be watching the progress also.
Whats witht the coils attahced to the sparkplugs and the dizzy blanked off :shock:

camira :?

_________________
Stop Licking the Dog...I Don't Care Who Started It


Top
 Profile  
 
 Post subject:
PostPosted: Sat Apr 12, 2008 10:49 am 
Offline
1360cc
1360cc

Joined: Mon Nov 01, 2004 4:36 pm
Posts: 7673
good to see you posted some stuff up, i'm looking forward to seeing your car in action (in my rear view mirror). and i'll be sending my box in for repairs soon... :lol:


Top
 Profile  
 
 Post subject:
PostPosted: Sat Apr 12, 2008 11:49 am 
Offline
Bimmer Twinky
User avatar

Joined: Mon Sep 06, 2004 4:36 pm
Posts: 8606
Location: Brisbane
Gaf, he`s using a crank angle sensor to trigger the computer to let it know when each cyl requires to fire the spark , by the looks of it that crank angle sensor is inside the distributor & it tells the computer (through low tension wires) when to fire the coils,,, so there`s no need for a conventional dist cap or rotor anymore... Those 4x seperate coils do the job for each plug


I`m using a similar set up on my Bimmer Twinkys but i`m using what`s called "Coil over ignitors" ontop of each plug, so i don`t have any high tension leads at all-->

Image
You should just be able to see the coil over ignitors in the valley of the cam cover, each plug has it`s own coil.

_________________
No offence intended here but--> anyone writing a book about minis 30 years ago may not have experienced such worn or stuffed-with components as we are finding these days.

You should put your heart & soul into everything you do.


Last edited by TheMiniMan on Tue Mar 03, 2009 10:49 pm, edited 2 times in total.

Top
 Profile  
 
 Post subject:
PostPosted: Sat Apr 12, 2008 11:58 am 
Offline
1275cc
1275cc
User avatar

Joined: Wed Mar 30, 2005 8:54 pm
Posts: 2008
Location: Greenhill, SA
Spaceboy wrote:
(in my rear view mirror)


How about we keep our opinions to ourselves about speed until yours can stop breaking things, yeah? Nathan is running 12psi, and its nuts as it is.

Nathan is putting in a huge effort here and i don't think you need to bag him just yet. At least wait until its done, and you HAVE beaten him around the track before you go slagging him off.

:roll:

Nice work Nath, i'm always impressed by projects that don't follow the 'standard' route like everyone else. 10 points for effort. :wink:

_________________
Cheap, Fast, Reliable. Choose two.


Top
 Profile  
 
 Post subject:
PostPosted: Sat Apr 12, 2008 12:35 pm 
Offline
Yay For Hay!
User avatar

Joined: Wed Sep 08, 2004 9:27 pm
Posts: 15870
Location: Wodonga - Vic/NSW border
Stuwey wrote:
Spaceboy wrote:
(in my rear view mirror)


How about we keep our opinions to ourselves about speed until yours can stop breaking things, yeah? Nathan is running 12psi, and its nuts as it is.

Nathan is putting in a huge effort here and i don't think you need to bag him just yet. At least wait until its done, and you HAVE beaten him around the track before you go slagging him off.

:roll:

Nice work Nath, i'm always impressed by projects that don't follow the 'standard' route like everyone else. 10 points for effort. :wink:


I think Ryan was just going for friendly banter with that comment... let it slide - Ryan, you too ;)

nice work Nathan, very cool :D

_________________
did I tell you that I won a trophy?


Top
 Profile  
 
 Post subject:
PostPosted: Sat Apr 12, 2008 1:28 pm 
Offline
848cc
848cc

Joined: Thu Mar 27, 2008 6:53 pm
Posts: 99
Location: Adelaide
Spaceboy wrote:
(in my rear view mirror)

I sure hope so, considering Spaceboy has a 1360 bigblock compared to my 'small' 998! Nothing worse than a broken box though :P

TheMiniMan wrote:
Gaf, he`s using a crank angle sensor to trigger the computer to let it know when each cyl requires to fire the spark , by the looks of it that crank angle sensor is inside the distributor & it tells the computer (through low tension wires) when to fire the coils,,, so there`s no need for a conventional dist cap or rotor anymore... Those 4x seperate coils do the job for each plug

Spot on MiniMan. Its a modified Toyota distributor, with a blanking cover. I'll post up some pics of the inside when I next take it out.


Top
 Profile  
 
Display posts from previous:  Sort by  
Post new topic Reply to topic  [ 113 posts ]  Go to page 1, 2, 3, 4, 5 ... 8  Next

All times are UTC + 10 hours


Who is online

Users browsing this forum: No registered users and 57 guests


You cannot post new topics in this forum
You cannot reply to topics in this forum
You cannot edit your posts in this forum
You cannot delete your posts in this forum
You cannot post attachments in this forum

Jump to:  

© 2016 Ausmini. All garage work involves equal measures of enthusiasm, ingenuity and a fair degree of irresponsibility.