Ausmini
It is currently Fri Nov 01, 2024 9:58 am

All times are UTC + 10 hours


Post new topic Reply to topic  [ 1864 posts ]  Go to page Previous  1 ... 118, 119, 120, 121, 122, 123, 124, 125  Next
Author Message
PostPosted: Sat Nov 08, 2014 4:07 pm 
Offline
1098cc
1098cc
User avatar

Joined: Thu Sep 30, 2004 3:12 pm
Posts: 1461
Location: Brisbane
Nice!

_________________
If you want more inches, stroke it
Life's a garden.... Dig It!
http://www.ausmini.com/forums/viewtopic.php?t=20746


Top
 Profile  
 
PostPosted: Sun Nov 09, 2014 10:34 am 
Offline
1360cc
1360cc
User avatar

Joined: Mon Aug 23, 2004 10:07 pm
Posts: 10650
Location: SE Melbourne
Archangel007 wrote:
Got the driveshafts back this week, from AGM Engineering. Its been 10 months since we sent them, not sure if we will ever use AGM again. I think I will try and find someone local. However on the plus side the workmanship is top-rate.


Thats funny - I had the opposite experience - when I ordered a batch of shafts for my suzuki kits they did the whole lot in less than a month turn around, the shafts fit and work but they put the circlip grooves in the wrong spot so extra shim spacers were required when they were assembled.


Top
 Profile  
 
PostPosted: Sun Nov 09, 2014 10:54 am 
Offline
1275cc
1275cc
User avatar

Joined: Fri Jun 17, 2005 10:31 am
Posts: 3183
Location: Burpengary, Queensland - Home of Tricky Performance Engineering
Hi Harley,

I think at the time that I put in the order - 3 sets - they just got a big order from a big Mining company or something. So the small return jobs kept getting pushed back and back. I must have phoned Anthony at least 8-9 times, and every time it was the same answer - 4-6 weeks. When you have paying clients that is unnaceptable!

**End of rant**

_________________
"Not Speeding Officer..........Qualifying"


Top
 Profile  
 
PostPosted: Sun Nov 09, 2014 11:52 am 
Offline
1360cc
1360cc
User avatar

Joined: Mon Aug 23, 2004 10:07 pm
Posts: 10650
Location: SE Melbourne
It is because when the big jobs gone its the small ones that keep you going.
Do you guys just run standard mini CVs with the toyota engines?


Top
 Profile  
 
PostPosted: Tue Nov 18, 2014 9:12 pm 
Offline
1275cc
1275cc
User avatar

Joined: Fri Jun 17, 2005 10:31 am
Posts: 3183
Location: Burpengary, Queensland - Home of Tricky Performance Engineering
Hi Guys,

Another quick update - I know, its becoming a habit!! :shock:

Decided to keep working in the engine bay and try and finish that off before moving onto the cab. Still quite a few things to finish off in the engine bay though - some major and some minor. The oil catch can still needs to be plumbed, as does the oil cooler itself, some electrical still to do and the engine cooling circuits need to be completed. As long as I keep a checklist going in my head, I should be ok!

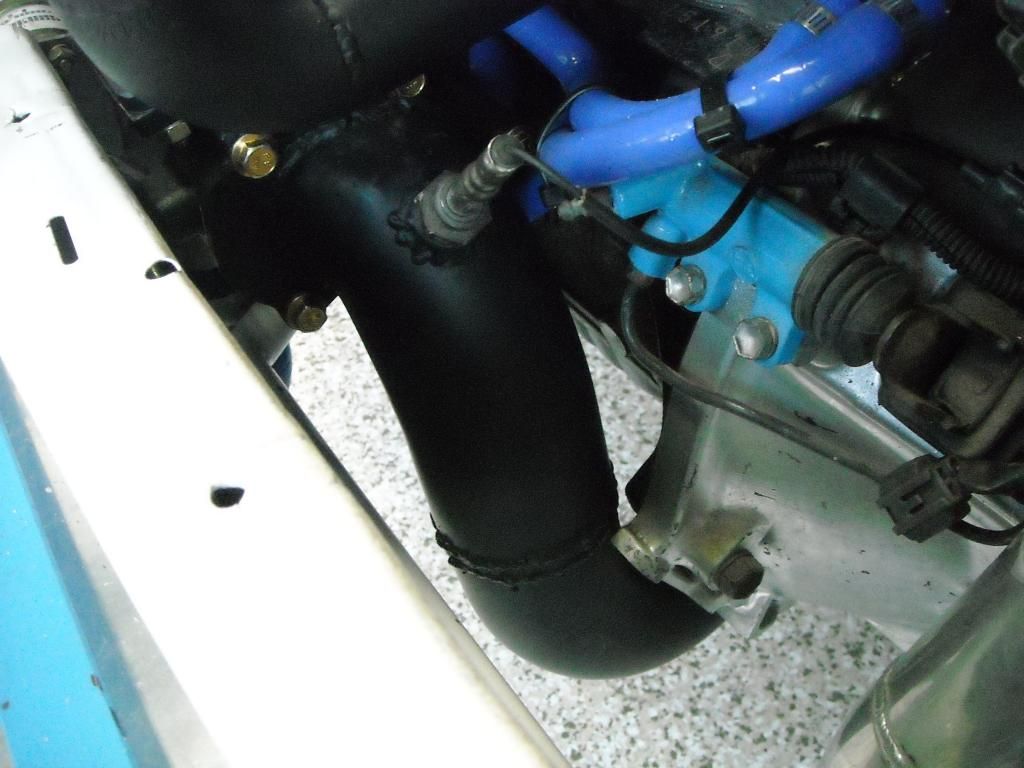
Now that the exhaust manifold and turbs were mounted, it was time to install the dump pipe, O2 sensor and catalytic converter. This was a fairly easy process as it had all been pre-fit before, and just needed bolting up. I did have to slit one of the dump mounting holes though to get the bolt into position to be able to be screwed into the turbo, but that was an easy fix. Not a huge amount of room with a 3" dump in there:
Image

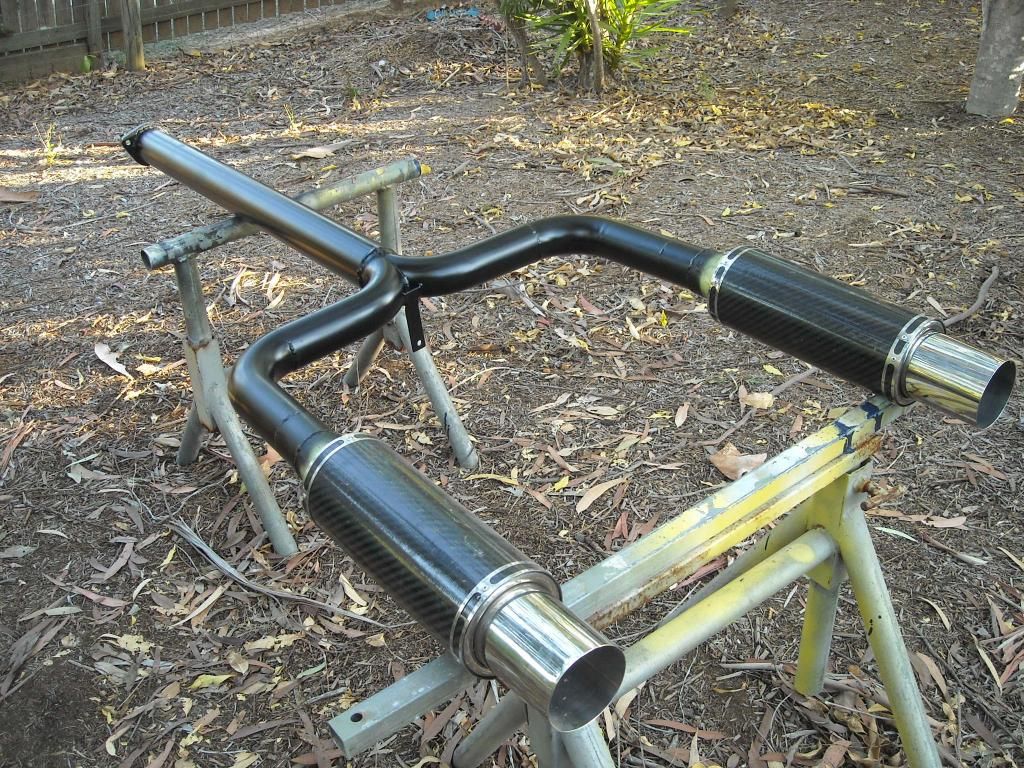
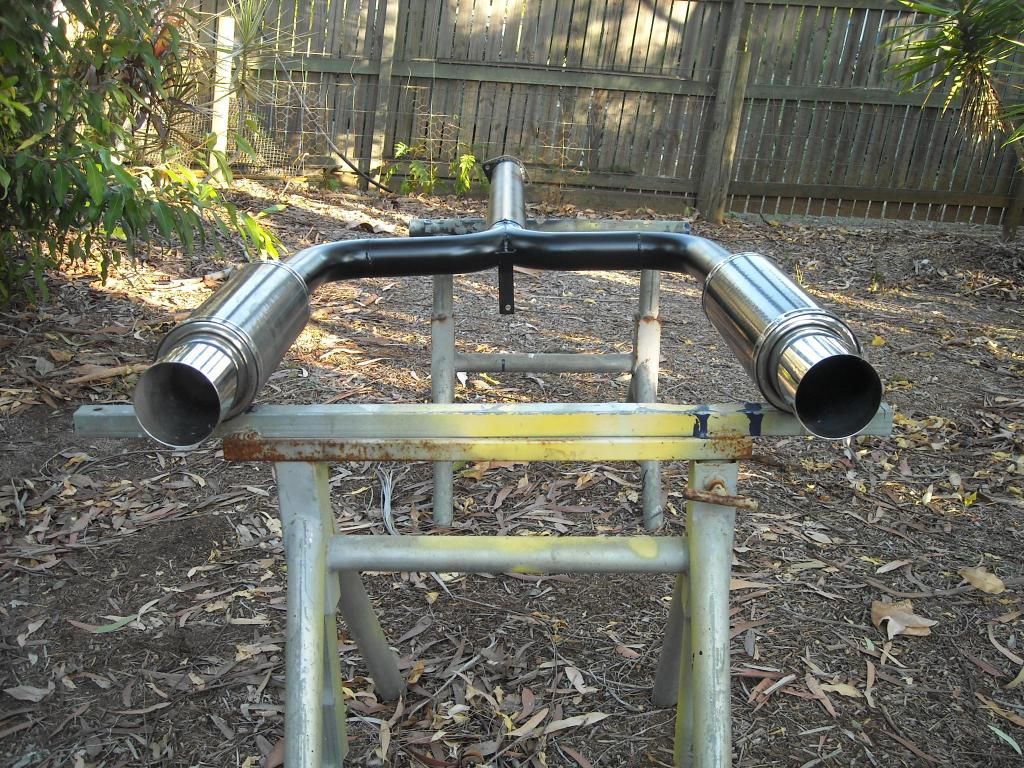
While this was going on, I decided to paint the rest of the exhaust to match the dump and exhaust manifold. I grabbed a can of Killrust Heat-proof wood stove paint (not the exact name, but you get the drift) which I have used on other exhausts to excellent results. Unsure of the formulation, but this stuff is excellent, far superior to virtually any other heat-proof paint I have used - including VHT stuff. Anyway, I set up the exhaust on some stands, masked off the two rear cannons, and went to town:
Image

It went on smooth, thick and even:
Image

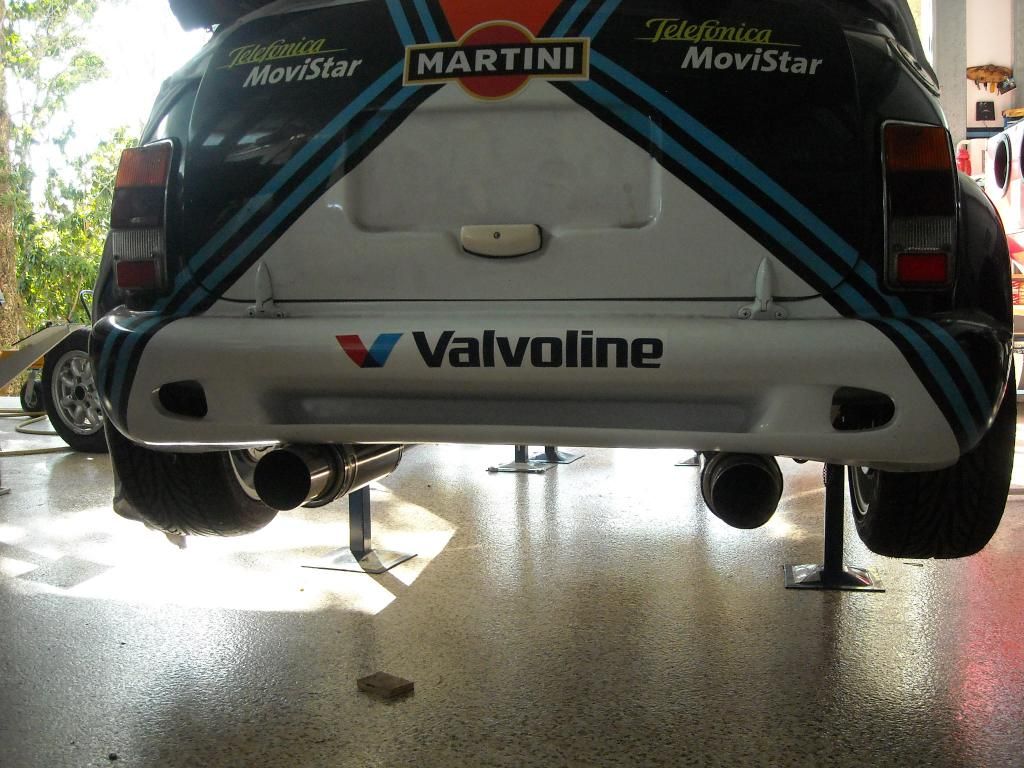
I let that dry overnight and then installed it the next day. Took a bit of grunting but I got there in the end - being one-piece it is quite heavy to lift up into position by yourself, laying on your back, but in it went:
Image

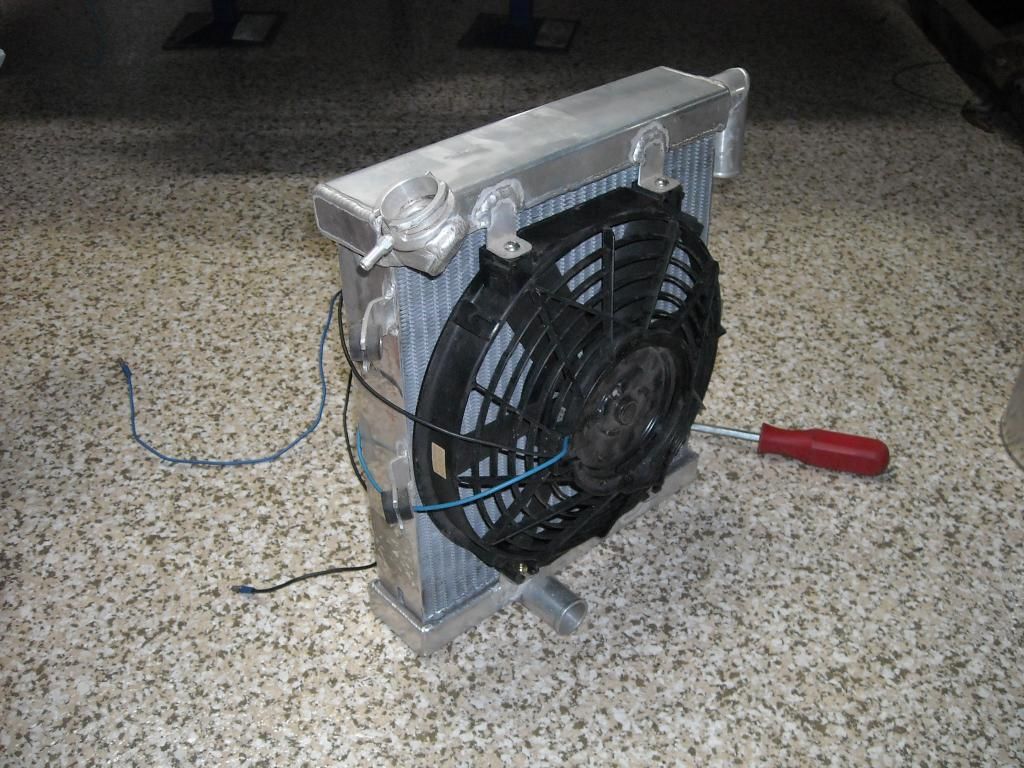
I then turned my attention to the radiator. It needed to be cleaned from the 5 year old masking tape still on it and have its thermo fan installed. The fan connector needed to be changed over from the spade connectors that were on it to the Toyota OEM connector in the loom. Quick wave of the soldering iron and heat gun and hey presto, it connects to the standard connector - its lucky I kept the original Starlet thermo fan. Then I mounted the fan onto the rad with some stainless 6mm domed Allen bolts and it was done:
Image

I gave it a test fit and all seems to be ok. I will get around to permanently installing it as soon as I source some radiator hoses in the correct diameter and contour.

Other jobs completed this weekend was the bleeding of the clutch (needs to be done before the radiator goes in as the rad obscures the bleed nipple) - and I was glad that the clutch hydraulic circuit had no leaks. Also changed over the TPS connector from the newer type which was on mine, to the older type which was on my replacement TPS (seeing as I had smashed mine at one time during the many install and removals of the engine).

So, all in all a productive few hours on The Cat. Next week I am hoping to finish off the oil cooler hoses (waiting on a few Earls fittings) and permanently install the oil cooler. Plumb the oil catch can and finish that off, plug and oil gallery and install the turbs oil feed line and permanently install the radiator if I can find the right hoses.

Also on the list is to grab a bleed nipple for the VH44 booster and then bleed all the brake lines (might buy a PowerBleed for that I think!!) and also to fit up the new driveshafts and make sure they are the right length (hope so!). Then the entire front end suspension assembly can be permanently bolted up and aligned.

Cheers,
Tricky

_________________
"Not Speeding Officer..........Qualifying"


Top
 Profile  
 
PostPosted: Tue Nov 18, 2014 10:07 pm 
Offline
848cc
848cc
User avatar

Joined: Wed Jun 05, 2013 1:54 am
Posts: 405
Location: Jimboomba
Wow this is going to sound awesome...what power are you expecting from this thing?

_________________
Why Drink And Drive When You Can Smoke Dope And Fly!?


Top
 Profile  
 
PostPosted: Wed Nov 19, 2014 8:06 am 
Offline
1275cc
1275cc
User avatar

Joined: Fri Jun 17, 2005 10:31 am
Posts: 3183
Location: Burpengary, Queensland - Home of Tricky Performance Engineering
Unsure Phil but I would say 220fwhp (160kW) might be the target...!!

I would be happy with 200fwhp though. Unsure how the viscous LSD would handle high HP anyway!

Cheers,
Tricky

_________________
"Not Speeding Officer..........Qualifying"


Top
 Profile  
 
PostPosted: Wed Nov 19, 2014 6:20 pm 
Offline
848cc
848cc
User avatar

Joined: Wed Jun 05, 2013 1:54 am
Posts: 405
Location: Jimboomba
Man this is gonna be a little monster!

_________________
Why Drink And Drive When You Can Smoke Dope And Fly!?


Top
 Profile  
 
PostPosted: Sat Nov 22, 2014 4:34 pm 
Offline
1275cc
1275cc
User avatar

Joined: Fri Jun 17, 2005 10:31 am
Posts: 3183
Location: Burpengary, Queensland - Home of Tricky Performance Engineering
Not too much of a monster I hope Phil!! :roll:

Another quick Update..... :shock:

Decided I would try and close out some of the major outstanding stuff that is still yet to be done. Seeing as my order from Earls is yet to land on my doorstep (my issue, not theirs!), I decided to install the driveshafts this weekend, the airbox inlet and do the brake system bleeding.

The driveshafts had arrived a couple of weeks ago now and it was high time that we tested them to see if they fit. I had three sets to choose from so one of them must have been close!! My set fitted perfectly in terms of length. I pushed the try pot joints on virtually by hand and gave them a slight tap with a soft hammer to seat them, then installed the circlip - good fit so far.

Then came the shaft to CV engagement - it seemed like they had been machined too large for the CV's and there was no way they were going in by hand. Using the shop press, I ended up pressing them in with about 7-8 tonnes on the guage - I thought that was a bit excessive for an machined fit, as they aren't supposed to be an interference fit. Anyway, on the went.

Fitting them up to the car was basically straightforward, so we wont go into that detail. Thats one major job I have ticked off my list. Passenger side:
Image

And drivers side:
Image

While I had the wheel off the passenger side, and the wheel arch empty, I decided to fit on the silicon elbow for the forced-air intake coming from the front spoiler:
Image

That was it for the underside of the car. I had a bit of a clean-up, and while I still had some time spare, decided to test fit the oil cooler on the top of the engine bay. This will get force-fed cool air from the Starlet bonnet scoop in the same fashion as the Toyota TMIC did:
Image

I thought it looked pretty groovy, and the heat-proof black complimented the headers nicely.

I turned my attention to bleeding the brake lines, only to find that my new, unopened bottle of brake fluid wasnt so 'unopened'. Not taking any chances with moisture, and brake fluid being hydroscopic I decided not to take any chances. I binned it, and will pick up some new Valvoline fluid tomorrow.

Tiny steps but steps none-the-less!! 8)

Cheers,
Tricky

_________________
"Not Speeding Officer..........Qualifying"


Top
 Profile  
 
PostPosted: Tue Nov 25, 2014 4:24 pm 
Offline
1275cc
1275cc
User avatar

Joined: Thu Jun 03, 2004 2:56 pm
Posts: 3981
Location: Brisbane
Cool

_________________
But he's thriving and striving and hugging the turns.


Top
 Profile  
 
PostPosted: Tue Nov 25, 2014 8:28 pm 
Offline
848cc
848cc
User avatar

Joined: Wed Mar 17, 2004 6:05 pm
Posts: 310
Location: Kallangur, Brisbane
Awesome mate, can't wait to see this thing finished.

_________________
72 Clubbie - Current project - Vauxhall C20XE 2000cc 16v 150hp.
78 Clubbie - Future project.
Image


Top
 Profile  
 
PostPosted: Sat Nov 29, 2014 3:41 pm 
Offline
1275cc
1275cc
User avatar

Joined: Fri Jun 17, 2005 10:31 am
Posts: 3183
Location: Burpengary, Queensland - Home of Tricky Performance Engineering
Thanks guys appreciate the comments.

Yep, finished Cam, that's the plan!

_________________
"Not Speeding Officer..........Qualifying"


Top
 Profile  
 
PostPosted: Thu Dec 18, 2014 10:43 am 
Offline
848cc
848cc

Joined: Wed Oct 24, 2012 12:06 pm
Posts: 28
Jeez, am chomping at the bit to see this thing running. Am about to start rebuilding my 4efte motor, just have to locate some braided lines for my CT9 turbo


Top
 Profile  
 
PostPosted: Sat Dec 27, 2014 9:00 am 
Offline
1275cc
1275cc
User avatar

Joined: Fri Jun 17, 2005 10:31 am
Posts: 3183
Location: Burpengary, Queensland - Home of Tricky Performance Engineering
Yeah, me too Ryan. Still working on these brakes atm!!

Cheers,
Tricky

_________________
"Not Speeding Officer..........Qualifying"


Top
 Profile  
 
PostPosted: Sun Dec 28, 2014 8:40 am 
Offline
1098cc
1098cc
User avatar

Joined: Sat Feb 22, 2014 10:13 am
Posts: 1362
Just read the whole thread in a day - nice work, the mini and the shop you've built look great!

_________________
Build thread for Supercharged 1275 1967 Deluxe Resto
Build thread for Mini ute conversion 998cc Turbo


Top
 Profile  
 
Display posts from previous:  Sort by  
Post new topic Reply to topic  [ 1864 posts ]  Go to page Previous  1 ... 118, 119, 120, 121, 122, 123, 124, 125  Next

All times are UTC + 10 hours


Who is online

Users browsing this forum: No registered users and 3 guests


You cannot post new topics in this forum
You cannot reply to topics in this forum
You cannot edit your posts in this forum
You cannot delete your posts in this forum
You cannot post attachments in this forum

Jump to:  

© 2016 Ausmini. All garage work involves equal measures of enthusiasm, ingenuity and a fair degree of irresponsibility.