Here goes nothing....
I’m probably going to live to regret this

.... but this is how I do them... works for me... not saying that anyone elses method is wrong just saying this is what I do.. Its a amalgamation of some of the stuff I've learnt and practices of my own that I have developed.
All I set out to do here is outline how, I, do a basic rebuild on a standard motor.... I use some different practices on hotter motors... I'm not talking about intial start up, or run in, or any of that... Just how I put the pieces together.
I AM NOT CLAIMING TO BE ANY KIND OF GURU... So if you spot anything I've missed, or anything you think is blatently wrong go for it. Tell us what you do differently

Treat this as a platform that other (more)knowledgeable people can add to. I'm hoping to learn something out of this too
*slips into flame proof suit before he starts*
One thing I do with everyone of my engines is log everything in a spec sheet as I measure it, torque, time it... And yeah I do have obsesive compolsive disorder
but in all seriousness, it comes very handy later down the track if you need to remember what it was when you put it together.
You might think I go overboard with some of my deburing and block prep... but I have 2 reasons for it.....
1. A burr kicked up the wrong way can stop two faces mating properly
2. As an apprentice, anytime you give a machined job to your foreman with burrs on it, he grabs your hand and presses your fingers into it and runs your fingers over the burr... you only forget a few times
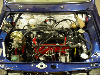
Block prep
DO NOT UNDER ANY CIRCUMSTANCE PLACE BLOCK ON ANY SURFACE EXCEPT MAYBE CARDBOARD OR A SOFT PILE OF RAGS WITH THE GASKET FACE FACING DOWN OR YOU WILL MOST LIKELY DAMAGE IT.
Any thing with a thread in it, I just run the appropriate tap thru it to clean it up just incase.
1. Before you clean the block inspect it. Starting on the deck, have a look at your stud holes. I counter bore them using a drill just 1-2mm larger in diametre than the hole... if you use a proper counter bore you will end up with the hole at the surface too large. All I seek to do is remore the first 3-4 threads so that when the head is torqued up, its pulling from below the surface. This stops you pulling the gasket surface up around the stud hole and creating a high spot and potential leak point... This is a trick I picked up from working with my old man. I then
lightly counter sink the stud holes, and deburr all the other holes... don’t go overboard deburring, you’re just taking the sharpe edge off... on some engines (other than A series) you’ll have problems if you go crazy with it and countersink these holes as some may come past the firing rings.
2. Using an oil stone, I rub down the deck using a figure 8 pattern. Make sure you cover the whole deck evenly, and apply even pressure. Whipe and clean off deck. Then using a straight edge and feeler gauges, check it for flatness. I do it like this..... run the straight edge along the deck, down the center then try and poke a feeler gauge under it ANYWHERE... you're looking for as close to absolute flatness as possible and no more warpage than the allowable amount (again check manual). Repeat this procedure 5mm from either edge, then on a diagonal then the other diagonal
3. At either end of the block, (transfer housing face and water pump end) give it the same treatment, deburr all holes and give it a rub down with the oil stone.
caution with the recess for the oil pump, do not countersink any of these holes as you may affect the way the pump seals... I’m probably parnoid, but I don’t do it and I’ve never had a problem
4. Flip the block over. Same deal, deburr, stone. WITH THE MAIN CAPS AND HOLES FOR THE MAIN CAPS IN THE BLOCK, make sure the dowell holes are countersunk at least 0.5mm (0.020”)... In
ANYTHING where dowells are used as a
RULE the dowell holes must be counter sunk. This eleminates (or greatly reduces) a shear effect that can take place... Its not something that I've seen mentioned in Automotive circles but any Fitter Machinists or Toolmakers reading this would should be familiar with what I'm reffering too. Also have a look at the edges of the bearing tunnels and make sure there are no burrs... if there are, just polish out the bur with a needle file being careful not to touch the area where the shell sits. While you’re down here, you may like to deburr the bottom of the edge of the bores.... the reason I do, is so when I’m cleaning I don’t cut my precious hands
... I then run the stone over the gasket face on the sump rail just to clean it more than anything.
Block clean up
5. Clean out oil ways and water jacket on block. I use special nylon pipe cleaners for all the drillings. I use Kero in my parts cleaner, other people use Disease-al or even petrol, your choice use what makes you happy. Be thorogh and take your time. If you’ve had your block chemically cleaned do not assume it doesn’t have sediment sitting in places, be just as thorough. Let the “cleaning agent of your choice” drain out as much as posible. Don’t forget to clean out all the threaded holes too.
6. Place in engine stand (or on a clean bench). Using a clean rag whipe of any kero you may have missed. Then, the fun part. Cleaning all the honing residue out of the bores
*YAY* so what I do here is using ya mums finest paper towells, I put a bit of clean engine oil on them and scrub the bores.... after about 10 seconds you’ll have a look at the paper towell and see its black as the ace of spades. That black stuff is Carborundum... its what the honing stones are made out of and is incredibly abrassive.... so
GET RID OF IT ALL or it will turn your oil into lapping paste and wear your honing out in minutes maybe hours Don’t stop scrubing till the towells are coming out as clean as they went in.. THEN repeat using Thinners instead of oil. You might ask why I don’t do it dry? Well, have a look for yourself, get it as clean as you can dry, then oil one up and rub it again and see how clean they really are... you’ll be suprised.... I've also seen people do it using hot soapy water, infact its what Grant Piston Rings recomend. I've done that too... but I preffer using oil and then thinners to clean it out, I'm personally just nervous about putting water in a freshly machined bore (I know, call me stupid
)
7. Clean and dry all bearing tunnels. Do not leave any oil or kero on the face of these.
measuring time
Clean crank up with the same vigor you attacked the block with. I use the same nylon pipe cleaners in the crank oilways.. and I made a tap (you might be able to buy one) for cleaning the crap out of the threads on the ends of the crank.
Measure up the journels. Please do this with a micrometer. Please check that it has been zero’d correctly.
1. Measure the journels on at 4 planes (think union jack pattern) and log the sizes so you a) know what size it was and b) can check for obvious ovality. Be careful around the oil holes our you might end up reading 0.040” ovality
make sure its on spec with what ever grind you were up to.
2. Check the crank for any bending. I do this using a Dial gauge and a pair of V blocks. If you don’t have V blocks, you’ll probably get away with loading the main bearing shells into block and sitting the crank with some oil on them. Set your Dial gauge ove the centre main, zero it and slowly turn the crank. The Clock should stay on zero. Refer to the workshop manual to see what the acceptable amount of bend is (there is a tolerance on everything) and if there is a bend, make sure its within spec
3. Check your bearing shells thoroghly. Make sure there is no dags on them and that back and bearing faces are clean and smooth.
4. Have a look at the main shells (big ends are the same), you’ll see they have a tang. If you look at the cap and tunnel, you’ll see that there is also a seat for the tang. IT PUTS THE TANG IN THE TANG HOLE. The shells are a tight fit into the tunnels so don’t be to worried, and just be carefull that you don’t scrape some of the backing off when sliding it into the tunnel or the material scraped off will sit just on the edge of the shell and stop the cap mating properly. Do not put any oil on the back of the bearing shell (for obvious reasons, but I watched a mate of mine do it once).
5. With the shells in the block and in the caps, oil the bearing face’s like its going out of fashion, then place the crank in the block and give it a spin. Should spin so freely that when you flick your wrist it spins for half a sec longer under its own inertia. While your here, squirt a couple of drops of oil down the oil drillings in the crank.. why not
6. Drop the thrust bearings into the centre main, again there is one side with a tang, so think about where you are installing what.
7. Oil up the bearing in the caps and put them on. You should have dowells to locate the caps before you run the bolt into them. Don’t forget the thrust bearings for the center cap.... and as to what way around the caps go.. have a look at the tang in the shell, the tang should go on the same side as the tang in the shell in the block. Starting at main number 1, torque up one bolt and spin. It should still spin just as freely. The torque up the other bolt and spin again. It should still spin freelly. Continue this all the way to the 6th bolt on the third cap. If at any point it stops spining freely stop, disassemble and check your crank for journel size and straightness again. If its fine but still wont spin freely check you do infact have the right bearing shells. Where bearing clearance is concerned, the easiest way to measure it is using a product called plastigauge, flow the instructions in the packet and you’ll be able to measure the running clearance. I use it to log all my crank clearances.
8. Then after all the caps are tight, check bearing crush. To do this, I back off one of the bolts on each main, and slide a feeler gauge under the cap. Check the manual for correct bearing crush. You measure the crush amount with a feeler gauge.. so if its 0.004”, you’ll only get a 0.004” strip in there... make sense?
9. Then check your end float. You can do this by pushing your crank all the way into the thrust washers and sliding a feeler gauge into the gap between the trust and trust face on the crank (the loose side).... or the way I do it, is stand the engine on end, using a dial gauge I take a measurement then slide the crank up (or down) into a trust face and take a reading off the dial gauge.
I know it sounds wanky, but I do it that way because the thrust seats in the block aren’t always square.. you’ll see that if you look at a worn thrust bearing. So you’ll get 30 different measurements with a feeler gauge and none of them will be a true endfloat.
10. Clean up your pistons and rods.
11. Assemble pistons onto rods. Depending on what you have, the gudgeon pin might be held in with circlips or they might be pressed into the little end. Once assembled make sure you can rock the piston back and forth freely. It should literally go “clunk cluck” back and forth, if there is any resistance stop and work out why.
12. Rings. Place each of your compression rings into a bore, and using a piston (turned upside down) I push them down square into the bore by about 20mm. Then using a feeler gauge I check the gap in the ring. Check the work shop manual for what the tolerance in ring gaping is to make sure its on spec
13. Once all gaps are checked I assemble the rings onto the pistons, starting with the oil control rings. Make sure all the gaps are offest. I try to avoid lining up the gaps with either the left or right side of the motor (front or back in a mini) so that the piston isn’t thrusting on them.. another habit I inherited from my dad
14. I fit in the bore ( before I compress the rings and slide them right in). Place each piston into its bore and measure the piston to bore clearance with a feeler gauge. Make sure its within
the piston manufacturers spec as in the guys that made the piston. Different brands of piston expand at different rates and amounts so they will all have their own specifications. It is critical its within spec for warranty and also to make sure you don’t end up with stupid blow by or a seized motor.
15. Put the piston in the ring compressor (and oil the inside of the compressor). Make sure you don’t spin the rings acccidently while tightening it up. Get it firm in your hands, then slide the rod and piston down the bore till the compressor is touching the deck, then gently tap the edge of the compressor all the way around the edge to make sure it is sitting flat. THEN push the piston into the bore using the butt of a mallet handle. If it stops, don’t force it, you could snap the rings , so you’ll need to pull it out and start again. If you have a lot of trouble, after you tap down the compressor, just lift the whole lot out of the bore by a couple of mm and squirt a load of oil around the edge of the piston. Sometime the chamfer at the top of the bore will catch the rings, so the oil helps “fill the gap”
16. Get one piston in at a time and put the cap on it with oil, exactly the same as with the mains, (as in how to put the shell in, and oiling and check bearing crush etc)
17. Bolt on engine plate with gasket
18. Bolt oil pump on with gasket
19. Insert cam followers with a slather of oil
20. Insert cam.... Cam end float is something that gets asked about at bit... Cam lobes (at least in these engines) are ground wit a slight angle on them (as in the faces are not parralell to the core) and this spins the followers... due to the spining action, it thrusts the cam against the thrust plate on the engine plate,,, so while the engine is running, the cam will never thrust the otherway... so don’t worry about cam endfloat...
21. If new cam followers are being used or a new cam (in which case get new followers anyway), get some “cam run in lube” on the lobes... if you can’t find any, I know people that have used CV grease for the same job and gotten away with it nooooo worries
A big thing with most steels is that after they are ground, they do not readily except oil, and with fresh followers and cams they need lube... but the splash from the crank doesn't cut it until they are run in... there are processes for making steels except oil after they're ground (like acid etching for one) but most new cams (or re grinds) won't have this... so having lube on there helps them out while they run in.
22. Bolt cam thrust plate to engine plate
23. Push timing sprockets onto the cam and crank (little one on crank, big one on cam)... push them all the way down. Now, push the cam back and forth into the thrust plate making sure its not stuck, it should still slide either way. Now push cam into thrust plate, put a straight edge across both sprokets and make sure that they are on the same plane... if there are any gaps under the straight edge, measure with feeler gauges and shim the low sprocket accordingly.
24. Remove sprokets. Place chain over sprockets and line up the two dots on the sprokets.... GUYS I KNOW THIS ISN’T A GARENTEED 110 DEGRESS (As per timing for most std cams) but I’m not going to spend another hour righting a how to on dialing in cams
... for most std road applications lining up the dots is fine... and then push back onto crank and cam
25. Put timing chaing cover on with gasket... make sure the lower bolts down’t poke thru the engine plate far enough to stop the gear box going on
head prep
I don’t want to start a fight about whether or not you should lap valves.... so I’ll skip that part.... I do it, I think Matt does too... but I know its one of
those “taboo” topics in some automotive circles so I’ll leave that one alone.
DO NOT UNDER ANY CIRCUMSTANCE PLACE HEAD ON ANY SURFACE EXCEPT MAYBE CARDBOARD OR A SOFT PILE OF RAGS WITH THE GASKET FACE FACING DOWN OR YOU WILL MOST LIKELY DAMAGE IT.
1. As was the case with the block, lightly debur all holes, and touch up all threads with a tap. With the combustion chambers I run a file over the edge of them to get rid of any burr and ever so slightly round the edge off to remove any potential "Glow plugs" (I just mean hot spots that can cause pinging). Then oil stone the gasket face in a figure 8, even pressure and cover the whole face.
2. I wash it just like the block, every nock and crany, don’t forget threaded holes
3. Let it drain off. Then using a straight edge and feeler gauges, check it for flatness. I run the straight edge along the deck, down the center then try and poke a feeler gauge under it ANYWHERE... you're looking for as close to absolute flatness as possible and no more warpage than the allowable amount (again check manual). Repeat this procedure 5mm from either edge, then on a diagonal then the other diagonal
4. Get your valves and place into guides with a smear of oil over the stems. Flick them open and closed a few times to make sure they are free in the guides.
5. Place the valve stem seal over the valve stem and hard into the guide,, then place bottom retainer over valve guide, then spring(s), then top retainer.. Then using a valve spring compressor (or press) push the valve springs down and place the tappered locking keepers into the top of the top retainer and slowly release. They will lock themselves into the goove in the valve stem and the tapper in the top retainer
And that is your head assembled.
Putting the head on the block
1. Run head studs into the block with a bit of oil on the threads finger tight... some like to use loctite down here... I don’t personally, just my choice, I just do them up finger tight.
2. Have a final look at the deck and make sure its clean
3. Place WHAT EVER BLOODY HEAD GASKET MAKES YOU HAPPY
over the studs correct way up etc I would suggest applying it dry, but there are sealers specially designed for head gaskets if you preffer.... JUST DON'T USE SILASTIC OR SOMETHING like one of my mates Dads was trying to do with his truck today

4. Drop the head on it
5. Run your rocker post studs into the head
6. Drop push rods into their holes
7. Place rocker gear on head (after its pulled apart and washed)
8. Tighten up the rocker studs that are not also head studs
9. Start torquing down the head.... NOW....
..... there are a million different opinions on how to do this... this is how I do it and my logic.. you do it how ever makes you happy
...... oil the threads.... run the nuts on and before they hit the head, squirt a bit of oil under them.... starting with the stud in the middle on the distributor side, torque it down to 10ft/Ibs... then the one on the back just left of center down to 10ft/Ibs... the one in the back row just right of center 10ft/Ibs.. now the one in the front row right of center... the one front row left of center... basically in a spiral patteren all the way out to the either end of the head. Once they’re all at 10ft/Ibs repeat the same pattern down to 20ft/Ibs... then 30ft/Ibs... then 35ft/Ibs then to what ever the specified torque is for the studs you’re using.... then back them off half a turn and do them back up to the final loading.
I picked this method up from a good friend of mine who is a Motorcylce Mechanic. I find it easier than trying to remember what number stud to do next
What ever pattern you tighten it in, start from the center and work outwards. And I personally wouldn't recomend reefing it down to full tention in one hit.
After that, all you need to do is bolt on your water pump,, Gearbox and transfer houseing.... clutch/flywheel.... harmonic balancer.... and at that point its just dizzy and ancilaries......oh, and the rocker cover (do it up firm, not tight or the gasket will leak)..
OH and if you’ve had plugs out of the block... make sure they’re the first thing to go back in
Alright guys.... what have I missed? What do you do different? Thoughts? Ideas.... I spent 2 hours writing this so I expect some good bashing here
Alex