AEG163job wrote:
Phat Kat wrote:
Hi Guys,
how does 14 hours a day 7 days a week for 2 months grab ya?
Seeing you have nothing to do at the moment PK

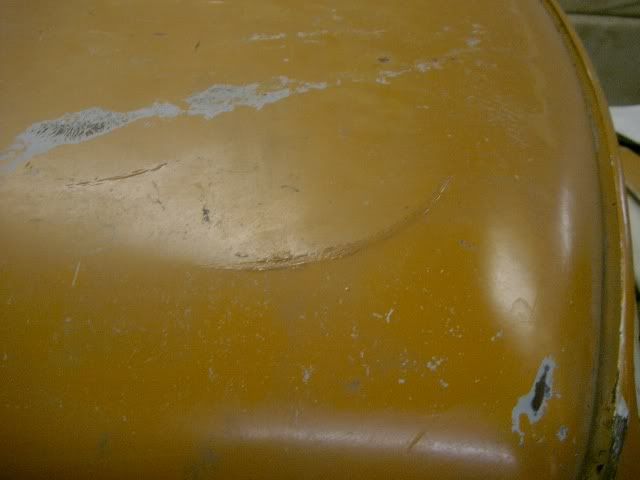
have you any tips on dent removal using the heat shrinking method? I also have some shallow dents in a roof (looks as if someone has bounced a footy on it). Not sure body-filler is the right approach for shallow dents over a wide area. Cheers mate.
Lucky for you I stop for brakefast, lunch and dinner

Yeah, have you done hot shrinking before? I'll just give a quick run down.
You really only need to use hot shrinking on dents where there has been excessive shrinking... To try and draw a picture here, think of a ping pong ball cut in half, if that is the size and shape of the dent, then the metal would have stretched alot to get there.,, Any thing shollower than that, you can get out pretty quickly with cold shrinking.
hot shrinking
Ill continue with the half ping pong ball size dent picture...
1. Heat the highest point of the dent from the convex side with a neutral flame on an oxy. heat it just in that spot (you should do a little circle around it the size of a 5c piece) until it is cherry red.
2. quickly get a dolly under it, that is place the dolly on the concave side of the dent, use a dolly with
less shape than the panel. Only use light pressure with the dolly or you will only stretch the dent further and make more work for yourself.
3. with the right dolly in the right place, start beating it. I prefer to use a wood mallet for this (tinsmens mallet), but some preffer a planishing hammer... I reckon its easier with the mallet. Start beating it at the very edge of the dent, and move towards the center of the dent in a sprialling motion (start at the out side and do laps of the dent getting tighter and thighter each time as you get closer to the middle... Does this make sense?)
4 when you reach the center just give it a quick 6 hits.
5 quench it with with wet rag
Ok sound easy enough?
.... The hard part is that you need to do this whole process while the metal is still cherry red, it is already cooled off before you start hammering, you need to reheat. You may need to do it a couple of times to work it right down flat... Now you with find that if there is any shape in the panel that you will have shrunk it flat in this process so you may need to restore some of its shape again afterwards.
Cold shrinking
Same as above with out the heat. Only difference is that you will need to give it a lot of light hits rather than firm hits. If you strike it to hard it will strecth more, and create a new problem and more work.
bogging
After reading the above your head might be spinning to much to want to even look at a hammer
So it you are going to use bog a couple of tips I will give you are
1 make sure you have stripped off all paint and old bog
2 once you hit bare metal make sure you do not touch it and do not put any chemical of any kind on it, if you do you will only get 7 years at best out of the bog before it cracks off. The metal should be sanded (keyed) with 30 grit sand paper..
3 make sure you expose an area 2/3 the size of the dent and spread the bog out that far so that you can feather the edges properly and avoid and hard lines or ripples.
4 sand the bog dry, do not use water because it will suck it up like a sponge and rust the panel out from under the bog
5 sand using the longest block you can to make sure that the profile matches the body perfectly,,, this is one that people suff up and why you often get "ripples" in newly "fixxed" bodies. You can start with 80 grit and make your way down to 240 if you like, I normally go 80, 120, 240.
Is all that pretty easy to follow? If not let me know and I'll try and write it better
edit> any more than 1/4" of bog is bog abuse!!!! and it won't last well.. ohh and try and leave it as long as you reasonably can before sanding it, because it can take a while for bog to "shrink back"