[quote="Razor"]will take it off and strip clean it
thanks[/quote]
I do NOT want to see you with a can of WD40 in your hand
| ausmini https://www.ausmini.com/forums/ |
|
| Another Tacho Problem - Update with Pics https://www.ausmini.com/forums/viewtopic.php?f=2&t=21897 |
Page 1 of 2 |
| Author: | Razor [ Sun Aug 27, 2006 12:46 am ] |
| Post subject: | Another Tacho Problem - Update with Pics |
Its a '76 Clubman S 3 clock gauge Tacho stays on 10 or 1000rpm but doesnt move at all if engine revs Turn the motor off and its goes down to zero or the lowest point. all wires seems to be attached, connected on the back of the cluster White with blue/black trace goes to the -ve side of the coil Broken tacho gauge? or wiring issue |
|
| Author: | 9YaTaH [ Sun Aug 27, 2006 9:57 am ] |
| Post subject: | Taco |
With nothing else to go on...I would say it is the Tacho innards emselves....some crud could have found its way in there and is causing the movement to stick....remove the unit and give it a gently clockwise flick ....if the the needle zooms around OK then that may have cleared the obstruction (you could then just whack it back in or strip and clean or look at changing any existing electronics for ones that work!! or take it to an instrument shop. |
|
| Author: | Razor [ Sun Aug 27, 2006 10:03 am ] |
| Post subject: | |
will take it off and strip clean it thanks |
|
| Author: | 9YaTaH [ Sun Aug 27, 2006 10:08 am ] |
| Post subject: | Keep it clean..and dry |
[quote="Razor"]will take it off and strip clean it thanks[/quote] I do NOT want to see you with a can of WD40 in your hand |
|
| Author: | Razor [ Sun Aug 27, 2006 10:14 am ] |
| Post subject: | |
oh crap ... how did you know???? Will be extra carefull I'm actually having fun trying to fix little things to the mini. |
|
| Author: | Razor [ Mon Aug 28, 2006 6:30 pm ] |
| Post subject: | |
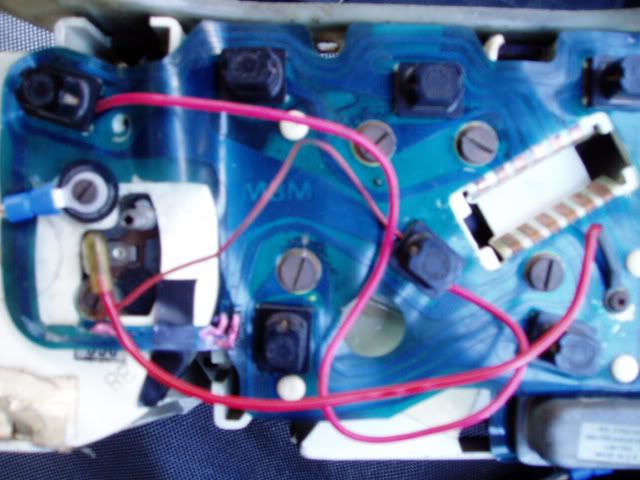
I just noticed the blue-ish bottom ribbon like at the back of the tacho has torn apart found this pic in this forum 
tacho was suprisingly clean and needle swings around fine |
|
| Author: | Razor [ Mon Aug 28, 2006 7:34 pm ] |
| Post subject: | |
is it earth? can I just add another earth wire to the bottom red dot from the pic cos its ripped? |
|
| Author: | 64cooper [ Mon Aug 28, 2006 9:57 pm ] |
| Post subject: | tacho problem |
Rob you could add an earth wire to the red dot but this will not provide an earth to the tacho shown if that is what you are after. Whatever you do , do not put a wire in where the red line is drawn. One end of it is an earthing point of the tacho and the other on the printed citcuit board is actually a battery feed from the ignition and the wire that is under the screw (brown wire) goes on the tag above the red dot on the tacho. If the tacho is of the variety shown in the picture, there should be a tag under the screw that is on the tacho at the end of the red line. From this tag a black wire is run and is screwed to the 'E' socket of the voltage stabiliser (stabiliser removed). This is the earth provided to the printed circuit board. On earlier tachos the earth was provided to the tacho, where the red dot is, by a screw with a spacer fitted under the printed circuit. I can show you when you come to pick up the seat belts. |
|
| Author: | Razor [ Mon Aug 28, 2006 10:05 pm ] |
| Post subject: | |
should I bring the gauges I dont quite get it I'll try to come this week will have to remove them 1st |
|
| Author: | Razor [ Fri Sep 01, 2006 6:17 pm ] |
| Post subject: | |
So do I tap a wire from that black wire to the bottom screw (Red Dot from the photo) to earth the tacho? |
|
| Author: | 9YaTaH [ Fri Sep 01, 2006 7:57 pm ] |
| Post subject: | Hell |
Razor wrote: I just noticed the blue-ish bottom ribbon like at the back of the tacho has torn apart
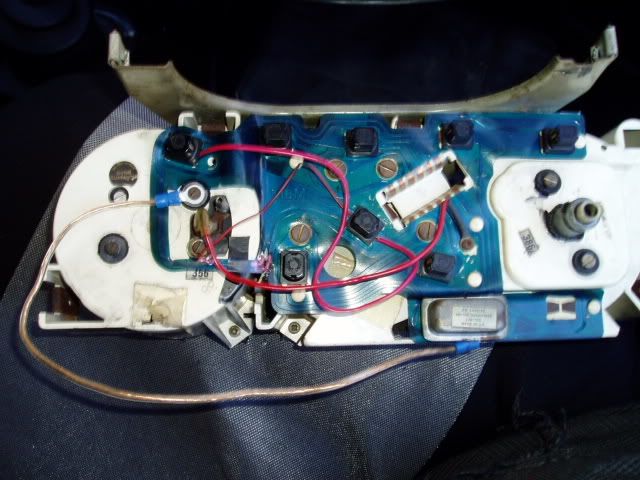
Razor....the blue film is a protective medium for the circuit wiring....you can carefully repair the damage by carefully scraping back the film to expose the tracks (a single sided razor blade maybe). Then solder flat copper strip or insulated multistrand wire to bridge any gaps so long as you make sure the solder joints are good and the original insulation is restored once the tracks are repaired.....all should be fine. |
|
| Author: | Razor [ Sun Sep 03, 2006 2:57 pm ] |
| Post subject: | |
I "repaired" the blue printed circuit and its still doing the same when you start the car the tacho needle points below 10 then when its off goes back to 0 Even followed DWASmith (David) to install another wire from the voltage stabiliser might be the tacho itself then... |
|
| Author: | Razor [ Sun Sep 03, 2006 3:21 pm ] |
| Post subject: | |
here's some photos of my 3 clock gauge 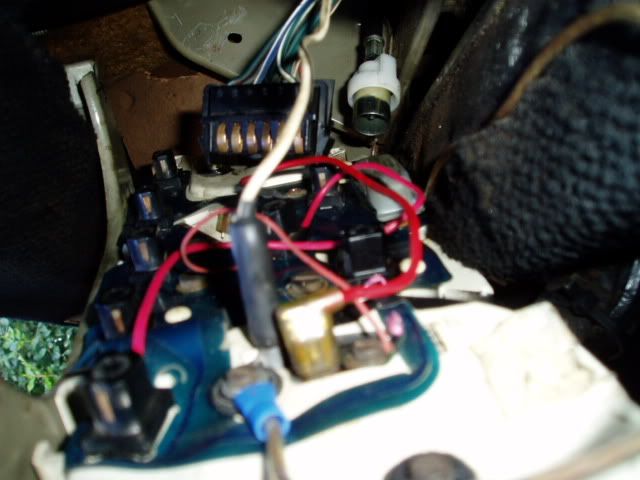
|
|
| Author: | Mick [ Sun Sep 03, 2006 5:33 pm ] |
| Post subject: | |
It's probably then in the works of the tacho itself, a capacitor or resistor might have changed it's value through age, heat and use. There typically isn't much to these old gauges, and they're not terribly accurate so you may be able to simply swap out the components within the gauge with new ones from Dick Smith to effect a repair. I haven't seen a circuit diagram for this tacho, has anyone else seen one? It's easy to replace the components when it is the resistors as you can get the colours off them and work out what value they are, but harder whn it comes to some other components. Capoacitors will usually have the values on them as well. The transistors may be of the Germanium type which is very old school and hard to get sometimes, but you can have a go, you might surprise yourself. |
|
| Author: | Razor [ Sun Sep 03, 2006 5:36 pm ] |
| Post subject: | |
I just want to confirm that the wiring is all correct, I might've installed a wire incorrectly. So if anyone can confirm this then I can move on and plan the next attack. Cheers |
|
| Page 1 of 2 | All times are UTC + 10 hours |
| Powered by phpBB® Forum Software © phpBB Group http://www.phpbb.com/ |
|