ausmini https://www.ausmini.com/forums/ |
|
dash boards https://www.ausmini.com/forums/viewtopic.php?f=2&t=25148 |
Page 1 of 2 |
Author: | shermn [ Tue Nov 21, 2006 5:20 pm ] |
Post subject: | dash boards |
cutting to the chase, i dont like open dashs. they look incomplete... so im after pics and advice of completed dashs, with or without dash pads, but with a dashboard in the middle... im also wanting advice on how to secure it. someone mentioned drilling brackets into the dash and then drilling the dashboard to the brackets... im not 100% sure how do do this so i want opinions and advice and photos and everything people can give moi.. thanks kiddies ![]() |
Author: | _666_ [ Tue Nov 21, 2006 5:27 pm ] |
Post subject: | |
i dont have a pic of it but one way to attach it is to make a chock of wood about 3 inch (or as deep as the dash requires) and glue it the back of the dash.. and have 2 screws comming out of it.... and then have a long metal peice that sits against the inside of the dash.. then screw it to the wooden chock to stop it from commming out.. one on either side is the best... i dont know if you get what i mean but yeah... |
Author: | shermn [ Tue Nov 21, 2006 5:33 pm ] |
Post subject: | |
lol no i dont 100% but from it i can still come up with something similar... so it helps.. everything helps... cheers... |
Author: | Gerard [ Tue Nov 21, 2006 5:49 pm ] |
Post subject: | |
http://www.ausmini.com/forums/viewtopic ... light=dash if this helps |
Author: | nullarbor express [ Tue Nov 21, 2006 5:57 pm ] |
Post subject: | |
This is a pic of my old dash. Its not going back into the car as I am building a new one. There were 3 or 4 small blocks of timber glued to the back of it at the base and into these blocks was a screw that comes from under the dash tray... measure the position of the block... drill a pilot hole and screw a self tapping screw up into the block. The blocks can be any shape but as a rule i reckon make them the same height as the dash and as deep a triangle shape as you can get in the room allowed. This secures the dash in place and also supports the top of it. ![]() Cheers, Bryan |
Author: | shermn [ Tue Nov 21, 2006 7:10 pm ] |
Post subject: | |
cheers NE that dash looks nice, fits in there really well too... but is that a roundy? because i have a clubby, and i've been told that to get my road worthy i need the upper and lower dashpads in there? if this is the case, does anyone with the pads and the board have any pics? lol sorry guys |
Author: | Marvin [ Tue Nov 21, 2006 8:17 pm ] |
Post subject: | |
Will try to get a pic of mine for you in the next couple of days otherwise you can check it out at Mt. Cooper if you like |
Author: | minimetoy [ Thu Nov 23, 2006 8:07 am ] |
Post subject: | |
Here's mine. ![]() Dan |
Author: | Beefa [ Thu Nov 23, 2006 8:13 am ] |
Post subject: | |
Ebay have nice 2 or 3 gauge woodgrains for the Clubbies. They are very sweet looking. |
Author: | slinkey inc [ Thu Nov 23, 2006 9:08 am ] |
Post subject: | |
I've got a roundy but mine will work in a clubby. It's got Rover top and bottem panels, they are the crash pad you speak of I think and they give a nice flat surface to work with. My dash is one of the only ones that doesn't have any visible screws (minus the glove box hinges which is now too late to change). It sits snug in an aluminium strip and is stopped from coming forward by the top Rover panel. With it's tightish fit it doesn't move at all. Wasn't sure if it would work at the time but has been fine. Mine cost about 10 bucks, minus gauges and radio/speakers to make, as the wood was found in shed, left by the last owners of the house, so I'm happy. Do a search I've posted my dash many time and seen other really nice ones too! ![]() |
Author: | Marvin [ Thu Nov 23, 2006 9:52 am ] |
Post subject: | |
Here's my dash ![]() Held in be these brackets (4 in total) ![]() two of these (one at each end) ![]() and two of these in the centre area ![]() these bolts go through the holes and held on by spring washers and wing nuts ![]() to do the bolts above I screwed 4 pieces of wood to the back of the dash from the front then got laminate put on the dash so you can't see and screws from the front. Got 4 smaller bits of wood and drilled holes for the bolts. Then I countersunk the bits of wood already attached to the dash for the bolt heads to sit in and then screwed the bits of wood with the bolts to the bits of wood on the dash. Hope that's understandable ![]() |
Author: | _666_ [ Thu Nov 23, 2006 11:26 am ] |
Post subject: | |
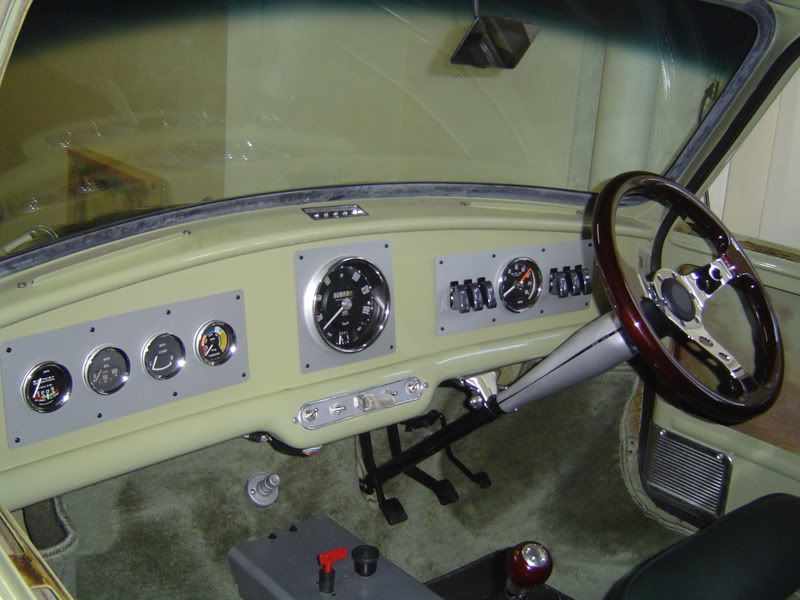
wasabipimpninja thats an awsome interior you have... how long did it take you to make that ? |
Author: | WasabiPimpNinja [ Thu Nov 23, 2006 11:32 am ] |
Post subject: | |
I'd hate to think about how many man hours went into that. Or how much blood from my knuckles ![]() ![]() |
Author: | 1360 LS [ Thu Nov 23, 2006 1:02 pm ] |
Post subject: | |
mighten be a complete length photo but here ya go you get the drift..... ![]() |
Page 1 of 2 | All times are UTC + 10 hours |
Powered by phpBB® Forum Software © phpBB Group http://www.phpbb.com/ |