Ha, I pulled my engine out this arvo aswell
With the angle of the engine it's a lot easer if the lifting point is at the front of the head like this one http://www.ausmini.com/forums/viewtopic.php?t=36503
| ausmini https://www.ausmini.com/forums/ |
|
| First engine is out... https://www.ausmini.com/forums/viewtopic.php?f=2&t=46489 |
Page 1 of 1 |
| Author: | bmacpiper [ Wed Oct 08, 2008 5:21 pm ] |
| Post subject: | First engine is out... |
Thanks to Doogie for the article with photos on engine removal. Pulled the '66 tonight, and it went pretty well overall. Found lots of "unique" features--missing long bolt on the remote housing, loose spicer bolts, missing clutch housing bolts. Glad I didn't take this one to the speedway before I got into it! A small addition to Doogie's article (not sure if it can be updated?): throttle, heater and choke cables needing to be removed at some point. Using the chain hoist (by myself) to raise and then lower the engine (while pulling it sideways past the front of the car) was a significant pain in the ass. I have no idea how I'll get a clean motor into a newly painted engine bay without scratching/denting/chipping. But I guess I'll invite all my Seattle mini friends over and get lots of help... And maybe a proper engine hoist is in order. The '70 motor will come out tomorrow or the next day, and then my body/paint man will be coming by next week to have a look. Will see what the scoop is there. talk soon, bmc |
|
| Author: | Kennomini [ Wed Oct 08, 2008 8:15 pm ] |
| Post subject: | |
Ha, I pulled my engine out this arvo aswell With the angle of the engine it's a lot easer if the lifting point is at the front of the head like this one http://www.ausmini.com/forums/viewtopic.php?t=36503 |
|
| Author: | bmacpiper [ Wed Oct 08, 2008 11:49 pm ] |
| Post subject: | |
Yes, I used that post to make a bracket, although mine is just made of holes and no welded link of chain. Worked like a charm. I think having the two extra bodies in his pictures doesn't hurt either! bmc |
|
| Author: | CPOCSM [ Thu Oct 09, 2008 8:18 am ] |
| Post subject: | |
Well done - you are on the road to ruination as your confidence grows and you explore the innards of a mini motor!! Jokes aside - I am doing the same thing trying to get my Henry back on the road again - have him up on stands 2 feet above the garage floor and getting the wiring sorted - isnt it amazing how much a small job turns into a major PITA!!! "Hmmmm - those wires look dirty, I will clean them..."....BAD MOVE!!! as now I have wiped every mm of wire in the car from front to back with wax and grease remover and retaped them!!! I am now lying under the mini with a bucket of soapy suds and a stiff scrubbing brush removing 31 years of oil and road grime...it is a shite of a job!! All aside - bmc you are doing well - give us some pics of your progress!! Hooroo |
|
| Author: | Wombat [ Thu Oct 09, 2008 10:08 am ] |
| Post subject: | Re: First engine is out... |
bmacpiper wrote: Using the chain hoist (by myself) to raise and then lower the engine (while pulling it sideways past the front of the car) was a significant pain in the ass. I have no idea how I'll get a clean motor into a newly painted engine bay without scratching/denting/chipping.
I'm in a similar situation (fixed overhead lifting point) but I just made sure there was room behind the car and pushed it back clear of the engine. Car moves easy without the weight of the engine - only takes one foot pushing |
|
| Author: | simon k [ Thu Oct 09, 2008 11:07 am ] |
| Post subject: | Re: First engine is out... |
bmacpiper wrote: I have no idea how I'll get a clean motor into a newly painted engine bay without scratching/denting/chipping.
by far the easiest/safest way is to put the engine in the subframe, and lower the body down on to it.... I've done a few cars this way and it's painless - just get the angles right, and it drops down neatly |
|
| Author: | bmacpiper [ Thu Oct 09, 2008 1:36 pm ] |
| Post subject: | |
Quote: by far the easiest/safest way is to put the engine in the subframe, and lower the body down on to it.... I've done a few cars this way and it's painless - just get the angles right, and it drops down neatly What do you use for a lift point on the body? How high do you have to go with it? Are wheels, universals, etc. already in place, or do you add those later? In other words, how do you account for the hydrolastic, brake lines, etc. going to the rear of the car--do you disconnect those, jack the body off the sub, add engine, lower body, reconnect rear stuff? Or is there a simpler way? Quote: I'm in a similar situation (fixed overhead lifting point) but I just made sure there was room behind the car and pushed it back clear of the engine. Car moves easy without the weight of the engine - only takes one foot pushing Seattle=Rain this time of year, so I'm trying to keep everything indoors. I found a 1 ton engine hoist on wheels for US$189 (gotta love Chinese child slave labor...) and will probably order that. Quote: Well done - you are on the road to ruination as your confidence grows and you explore the innards of a mini motor!!
I fear you are correct. I'm already thinking about how I can sell one S, then find a cheap MK2 or similar for mods and fun, while keeping my MK1 S more pristine. My body and paint man: "You HAVE to have two minis. You just have to." Here's a couple of pictures. First one might show the lifting bracket--I wanted a bit thicker steel, but there is no indication of bowing/stretching/tearing/etc. Took all of 15 minutes to make it. 
Second one shows that I'm running out of garage space and starting to get cluttered. I need to pause and organize/put away tools/throw out old stuff/consider my plan. 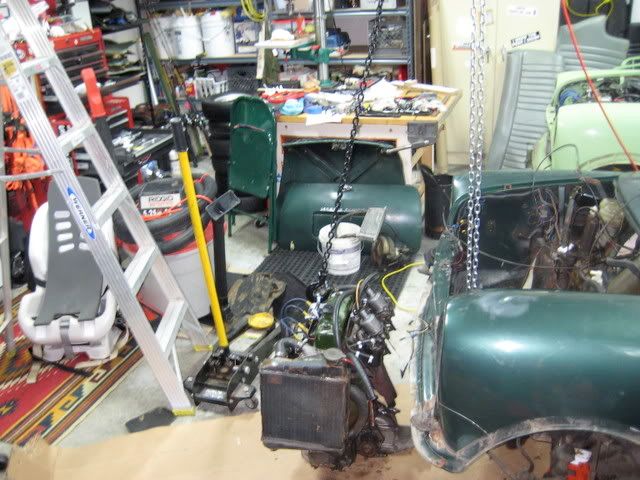
One thing I'm learning about minis already. On old air-cooled VWs, there isn't much you can't do with 8, 10 and 13mm spanners/sockets. On a mini, it seems that 3/8, 7/16, and 1/2 fit this niche also. And I'm (pleasantly) shocked at the engine mounts. Sir Alec was indeed a genius long long before his time. Imagine what he could have done with modern metals and manufacturing. John Britten comes to mind. All best, bmc |
|
| Author: | simon k [ Thu Oct 09, 2008 4:08 pm ] |
| Post subject: | |
bmacpiper wrote: Quote: by far the easiest/safest way is to put the engine in the subframe, and lower the body down on to it.... I've done a few cars this way and it's painless - just get the angles right, and it drops down neatly What do you use for a lift point on the body? How high do you have to go with it? Are wheels, universals, etc. already in place, or do you add those later? In other words, how do you account for the hydrolastic, brake lines, etc. going to the rear of the car--do you disconnect those, jack the body off the sub, add engine, lower body, reconnect rear stuff? Or is there a simpler way? I guess the times I've done it, I've been intending to remove the subframe anyway so wanted to have all that stuff undone. Most times when I've removed the whole assembly from the car, I've left the wheels and steering rack on it - the whole lot comes out as a unit. I actually use a crane to lift the body - I put a strap between the triangular braces above the crossmember - a chain block from the roof would be easier because the legs of the crane get in the way, but my garage doesn't have beams disconnect the hydro lines & brake lines - if you're painting the shell, you'll want the subframe out anyway so you can get under it properly, and you'll want to paint & rebuild the subframe, so everything gets built and goes together in the same order they did it at the factory when I put it back in, I put the back of the car on stands so it's about a foot off the ground (at the subframe), this means the car is more level when you lower it, and the front subframe can be up off the ground. I have a trolley I sit the built subframe on, lift the body up so it clears the rocker cover, wheel it into position, lower the body, and lift the subframe a little with a jack to get the angles right, then just let it slide together. I've got a picture somewhere from when I did my cooper's engine bay and you mean 9/16, 1/2 & 7/16 |
|
| Author: | simon k [ Thu Oct 09, 2008 4:14 pm ] |
| Post subject: | |
bmacpiper wrote: [
Quote: Well done - you are on the road to ruination as your confidence grows and you explore the innards of a mini motor!! I fear you are correct. I'm already thinking about how I can sell one S, then find a cheap MK2 or similar for mods and fun, while keeping my MK1 S more pristine. My body and paint man: "You HAVE to have two minis. You just have to." if you're gonna sell one, I reckon sell the MK1, even though it's such an early example, it's been mucked around with the most - that front grille panel isn't original - easy to tell because theres a cutout at the radiator side going into the wheel well.... Tamarisk green MK2's are super rare |
|
| Author: | 9YaTaH [ Thu Oct 09, 2008 4:47 pm ] |
| Post subject: | people power.. |
simon k wrote: I actually use a crane to lift the body - I put a strap between the triangular braces above the crossmember - a chain block from the roof would be easier because the legs of the crane get in the way, but my garage doesn't have beams
Two strong people can also do the same if you are careful...helps to have a third guiding or putting some bolts/nuts on the tower studs etc |
|
| Author: | bmacpiper [ Thu Oct 09, 2008 11:51 pm ] |
| Post subject: | |
Quote: if you're gonna sell one, I reckon sell the MK1, even though it's such an early example, it's been mucked around with the most - that front grille panel isn't original - easy to tell because theres a cutout at the radiator side going into the wheel well.... Tamarisk green MK2's are super rare
That was just a typo--yes, the mk1 is going to be sold, and the mk2 has found its home already with me. Not only is it rare, but it is in exceptional condition already. As you stated, I believe the whole front end has been replaced on the '66--fenders, nose panel, bonnet; this is when the car was painted the butter cream color we talked about previously. My body guy will fill the extra hole on the nose panel if we can't find the proper panel now. All right then, next steps... bmc |
|
| Page 1 of 1 | All times are UTC + 10 hours |
| Powered by phpBB® Forum Software © phpBB Group http://www.phpbb.com/ |
|