http://www.austinamericausa.com/
(I JUST CUT AND PASTED FROM ABOVE SITE)
I learned about the tractor tire fill valve trick from my friend and long time British car mechanic Peter Jergens. Peter owns "British Sports Cars" here in San Luis Obispo and has been using his homemade grease gun/tractor tire fill valve pump for years. I've borrowed it several times.
Now, thanks to a great tip from Don Cameron in Canada, who sent me an email and photos of the hand pump he'd just built after visiting my site, these assemblies are even easier to make.
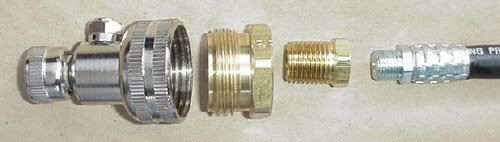
Don used the Tractor Tire fitting from NAPA, part number 90-234. He then went to a Hydraulic shop that sold him a brass fitting that adapted from the garden hose threads on the Tractor fill valve to the 1/8th inch pipe threads on the grease gun flex hose. He says it fit and worked perfectly. The brass adapter was $3. Nice solution Don, thanks!
I made my own grease gun using Don's method. I couldn't find the same adapter that Don used, but with an addition brass "bushing" I was able to step down from 1/4" to 1/8" pipe threads. Again, about $3 for the adaptors and $18 for the Tractor tire valve.
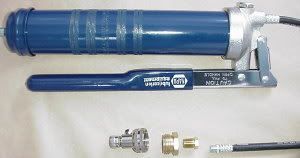
I spent a total of $55 to make this pump out of all brand new parts.
Using the grease gun style pump:
-You can screw this Tractor Tire Valve fitting onto a standard cartridge using hand pump style grease gun with an 18" flexible hose. To use, simply remove the end cover on the grease gun, as if you were going to install a cartridge, turn the gun nose down, and pour the Hydrolastic fluid into the gun. 50/50 anti-freeze and water can be used in lieu of actual hydrolastic fluid, which is still available. Leave the end cover off the gun and keep it turned nose down during the pumping procedure. Basically, the gun is acting as a funnel at this point.
Pumping up the Hydrolastic system:
-If the Hydrolastic system has been opened up for any reason, it will have air inside which must be removed prior to pumping up. To do this you'll need to hook up a vacuum pump and pull the system under a vacuum. Either an electric vacuum pump or a venturi style pump that operates on air from your air compressor will do the job. Once the system has been evacuated, it can be pumped up.
-Harbor Freight sells an air powered vacuum pump for about $10.
-If the Hydrolastic system has not been opened up, but one or both sides are low, you don't need to evacuate the system. Unless you are unsure if someone may have had it opened at one time. For example, a car that is just low because a previous owner thought it would be a good idea to lower the car by simply releasing system pressure. This car won't need to be evacuated. Or a car that has been sitting for a number of years and is "down" on one or both sides. This car won't need to be evacuated either.
-To fill the system, screw the Tractor Tire fitting onto one of the car's schrader valve service ports on the flexible hoses that come up out of the front Displacer Units. Fill the grease gun about half way up with fluid. Now depress the bleeder valve on the Tractor Tire fitting and slowly pump the grease gun handle until fluid runs out of the bleeder. Now you know you won't be pumping air into the system. Release the bleeder and continue slowly pumping the grease gun handle. Pump up each side of the suspension (if you are raising the entire car) alittle at a time. Rock the car once in a while to help the suspension settle. Continue pumping until the suspension is to the correct pressure and height: 220psi and 13-5/8" from the center of the front wheels to underside of front wheel wells. There is no measurement given for the rear wheel well heights, but if the rear is sagging, you'll need to adjust or repair the 2 auxiliary springs fitted to the rear subframe. Your manual will give details on making the rear height adjustment.


