Ausmini
It is currently Sun Jun 22, 2025 9:06 am

All times are UTC + 10 hours


Post new topic Reply to topic  [ 1864 posts ]  Go to page Previous  1 ... 10, 11, 12, 13, 14, 15, 16 ... 125  Next
Author Message
 Post subject:
PostPosted: Thu Feb 08, 2007 7:29 am 
Offline
1275cc
1275cc
User avatar

Joined: Fri Jun 17, 2005 10:31 am
Posts: 3183
Location: Burpengary, Queensland - Home of Tricky Performance Engineering
Yes mate,

Spot on!!

Thought about going the internal hinge route, but then thought hey, its about time to finish it and stop adding stuff - maybe on the next one!

It does have a gas strut though - its off a Toyota Camry I think. It automatically pops open the boot lid when the release is engaged, then opens nice and slowly until full extension which is the same distance as normal boot lids.

Let me know how yours goes...

Cheers,
Tricky

_________________
"Not Speeding Officer..........Qualifying"


Top
 Profile  
 
 Post subject:
PostPosted: Sat Mar 03, 2007 10:51 pm 
Offline
1275cc
1275cc
User avatar

Joined: Fri Jun 17, 2005 10:31 am
Posts: 3183
Location: Burpengary, Queensland - Home of Tricky Performance Engineering
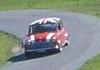
CHAPTER 15 - Still More Bodywork

Hi Everyone,

I guess its time for an update. Work has been progressing slowly but surely on El Gato, and we are still working on the bodywork. It seems never ending. Some friends tell me it might end if I stop adding stuff then I would get it finished quicker - dead right I say!

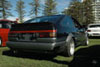
Last Chapter we had the boot lid metalwork all finished. And the end result was quite good. All we had to do was prime, bog, sand and undercoat in readiness for the topcoat. Well all that has been done and the outcome was very satisfying. here is a pic of it sitting in front of the bonnet. Thats JC's 4EFTE powered Morris partly covered up sitting in the shot and 4 Paw sitting in the backgorund.
Image

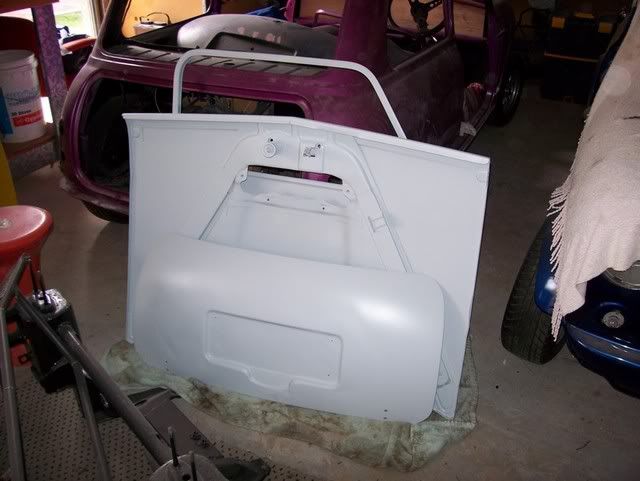
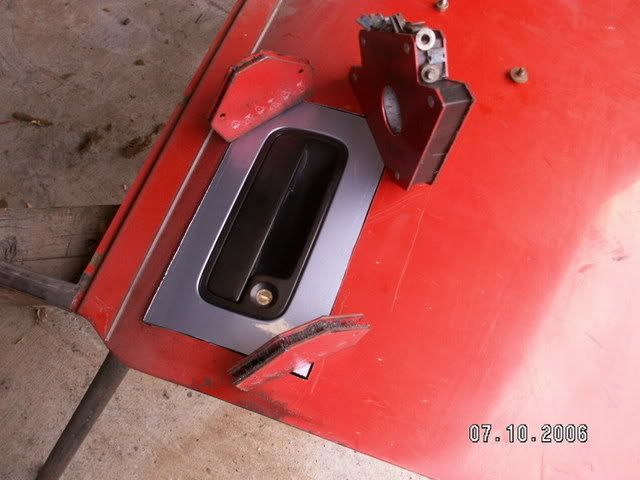
And speaking of doors......They were next. I wanted to do something slightly different with the doors, and something that was not too involved engineering wise - so I decided to utilise the door handles off the donor Honda Civic sitting in the back yard. These Civic door handles are really nice, and flush fitting, which is what I was after.
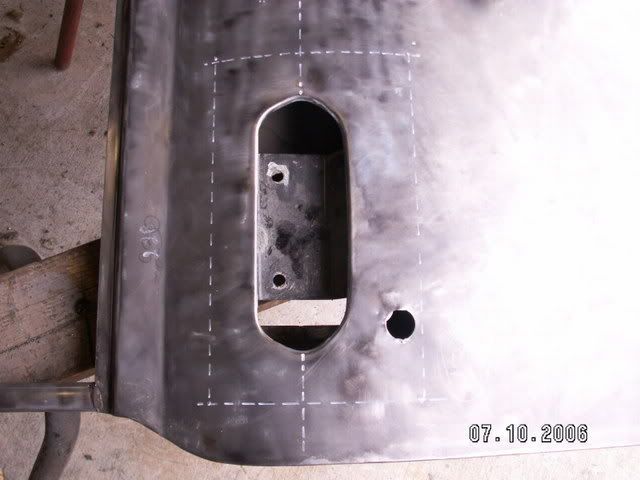
First things first was to remove the handles and the surrounding metal from the Civic doors. It is important to make sure that your cuts here are as square and straight as is possible, so as to make it easier when it comes to welding it into the Mini door.
Image

Then transfer this to the Mini door, and mark the outline of where to make the cuts so it can drop straight in. Like I said before, the straight lines help. And this is what you should end up with - now on with the cutting using an air hacksaw and a lot of patience.
Image

Once the cutting out is complete, and you have followed the lines with precision, this is what you should end up with.
Image

And then we test fit the new panel piece in place and make any adjustments necessary to enable a good tight fit with only minimal gaps (like none!). Notice how nice and flush the Civic door handle is. Painted in the same colour as the car, it should look excellent!
Image.
If your wondering why all of a sudden the door is red, and then its bare metal, its because I ended up using a second door on the drivers side as the red one had some serious cancer reveal itself when we took the door pockets off - but thats another story! (note: lucky I had a spare, thanks Jeff!)

Then once its welded in, it should look something like this.
Image
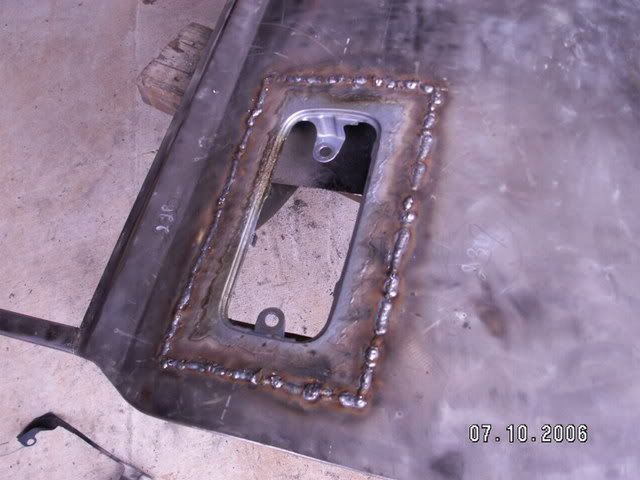
The secret here it to take your time. The way I did it, I spot welded a section, then hit it with an ice cube, then moved onto a different section, spot welded, cooled with ice cube - and so on until all the panel is completely welded in. It is extremely easy to distort a door panel by welding (just ask me, I did it on the other door). And once distorted, it takes some serious panel work to get things anywhere near right again!!!

After grinding off the weld with a flap disk, the end result should be something like this. Voila, nice and flush door handles to customise your Mini. Comes with integral lock mechanism too.
Image

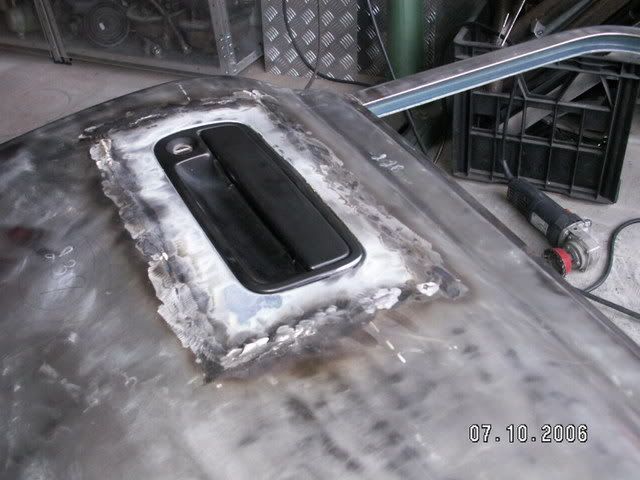
Okay, so another weekend of priming, bogging, sanding and undercoating until the door itself is finished. Here's how it turned out. Not bad if I do say so myself. (smooth as a baby's b#tt!)
Image

With both doors done, and looking sweet, and with the boot totally finished, it was time to move onto the bonnet. Big plans!! I wanted to ultilise the 4EFTE Starlet bonnet scoop on the Mini bonnet, save bonding on an aftermarket one, which to me, never look anywhere near as good as the factory scoops.
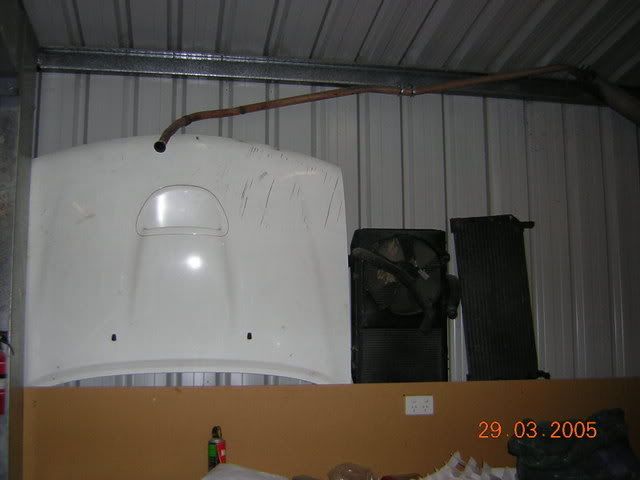
So firstly, we cut the bonnet scoop out of the Starlet bonnet. I was blessed with my halfcut in that it came with a bonnet that was in pretty good nick. Here is the bonnet before being cut out - all we want is the intake part, with not much else.
Image

So the cutout looked something like this. You can see that I followed the rounded profile of the front of the scoop and did not leave on too much metal - this is because I wanted to ensure that the front of the clubman bonnet, with the profile, remained intact. It would be much harder anyway to weld the new piece in following the curve at the front (no thanks!
Image

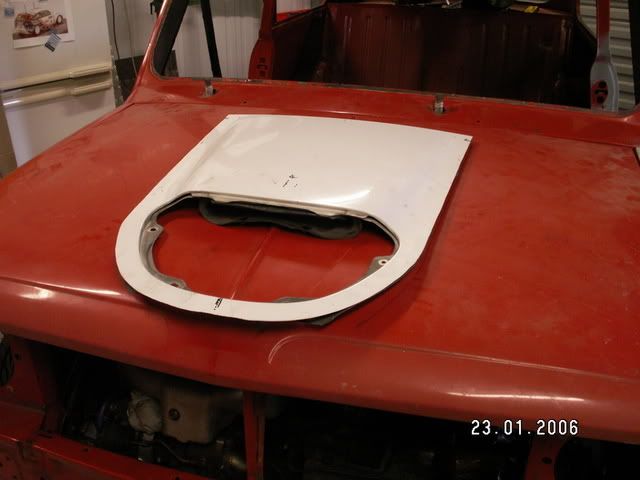
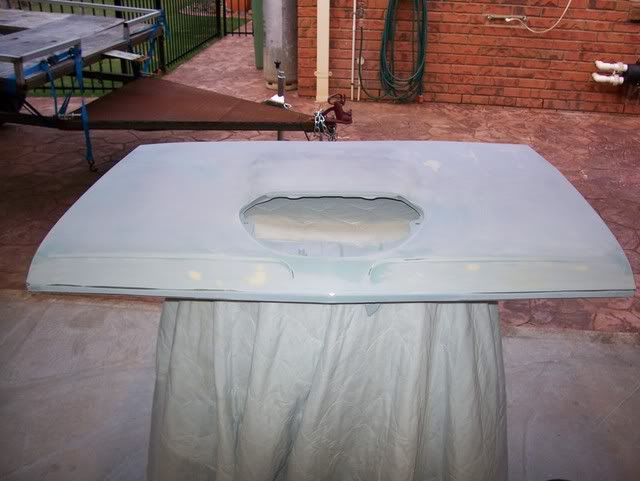
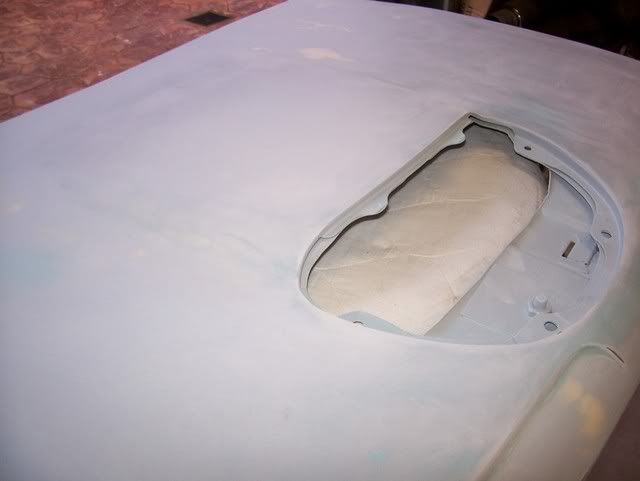
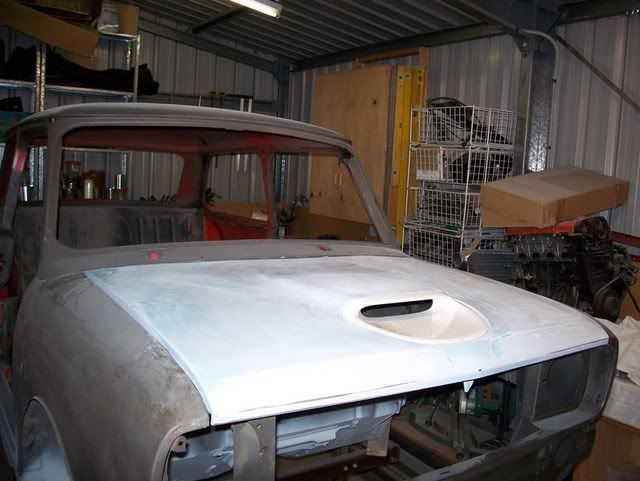
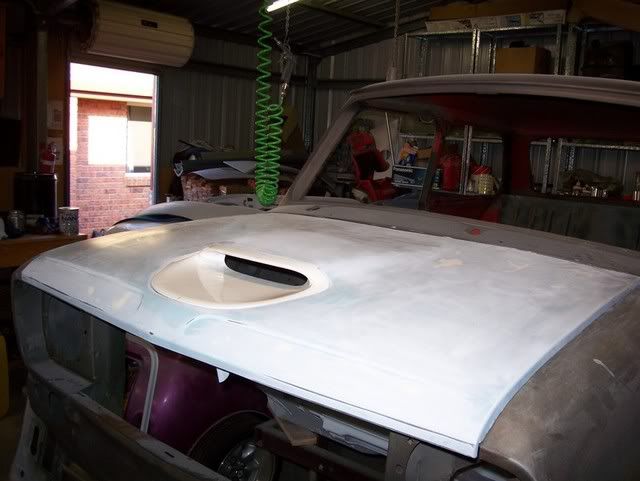
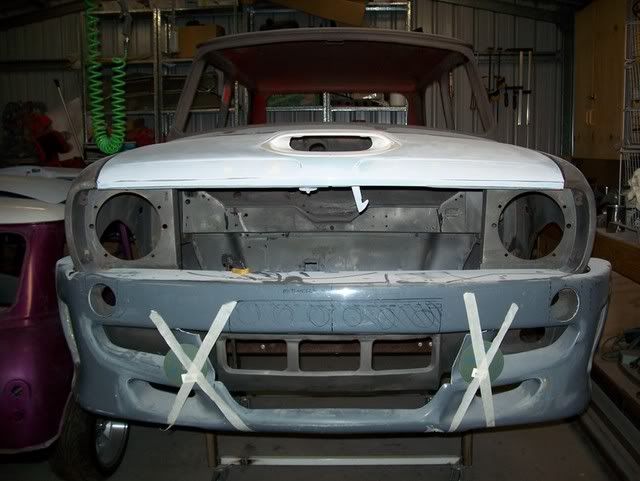
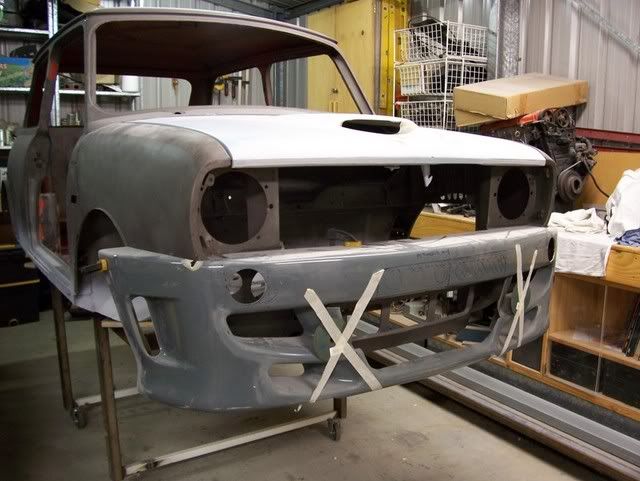
Okay, so we follow the same procedure. Overlay the new piece onto the bonnet (as in the shot above), gauge where to cut minus a bit for trimming, cut it out. (side note: After a lot of measuring and aligning, I found out that the scoop could be located dead-centre on the mini bonnet because of the offset rubber apron underneath. This means it should seal the oil cooler just like the factory Starlet bonnet sealed the top mount intercooler). Then trim till the new piece fits like a finger in a bum, and then tack it in - simple!! After a weekend (yes another weekend!) on priming, sanding, bogging and undercoating, this is how the bonnet came out. A mate of mine commented that it is one of the toughest Mini bonnets he has ever seen, and I have to agree. Mind you, theres about 20 hours work in that bonnet. Here is some pics after bogging and sanding but before the undercoat.
Image

Image

Image

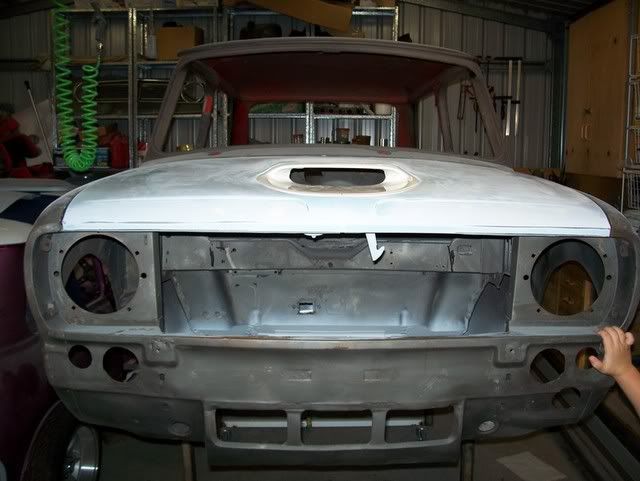
I then decided I would get a little ahead of myself. After I had undercoated the bonnet and rubbed it down, I installed the little front scoop part and test fit the whole bonnet assembly onto the car to see how it would look. And in my opinion it looks bloody good!
Image

Image

Here is shot of the apprentice (Mitchell) holding up the front of the car. He's a great help (sometimes!)
Image

Image

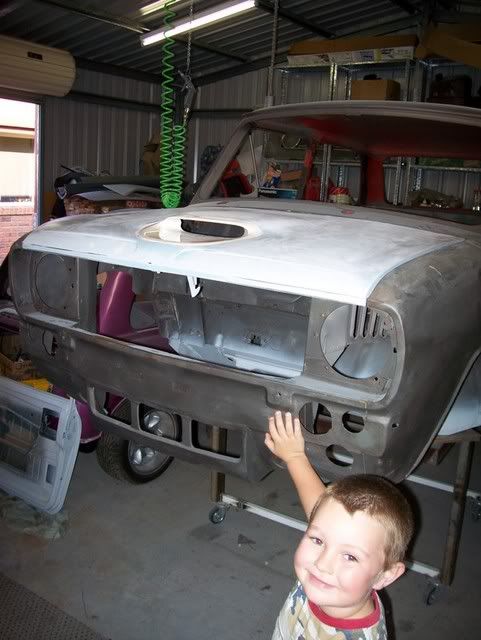
And I just had to see how the scoop would blend in the the rest of the front - namely the Zeemax spoiler. To me, they both compliment each other extremely well and I can help but think of the word 'tough' when Iook at it.
Image

Image

Join us next time as we get the shell sandblasted and find out what a mistake that was. And then of course theres more bodywork to be done.........

_________________
"Not Speeding Officer..........Qualifying"


Top
 Profile  
 
 Post subject:
PostPosted: Sun Mar 04, 2007 8:46 am 
Offline
998cc
998cc
User avatar

Joined: Mon Oct 25, 2004 7:17 pm
Posts: 1121
Location: Bundaberg, QLD
GOD DAM YOU ARE GOOD!

_________________
Baracade
Relationships! The only time you get to sleep with the enemy!
1972 US Export Moke in Bundaberg QLD


Top
 Profile  
 
 Post subject:
PostPosted: Sun Mar 04, 2007 9:05 am 
Offline
the King of Bling
User avatar

Joined: Thu Jun 03, 2004 11:11 pm
Posts: 19858
Location: Baulkham Hills
Reading about your work makes me want to larn to pannel beat and weld that much mor.

Great job and I love your idea's 8)

_________________
Stop Licking the Dog...I Don't Care Who Started It


Top
 Profile  
 
 Post subject:
PostPosted: Sun Mar 04, 2007 9:05 am 
Offline
This space for rent
User avatar

Joined: Thu Feb 08, 2007 12:40 pm
Posts: 5455
Location: Melbourne
What he said. DAMN. This thing is incredible.


Top
 Profile  
 
 Post subject:
PostPosted: Sun Mar 04, 2007 9:19 am 
Offline
998cc
998cc
User avatar

Joined: Thu Aug 03, 2006 9:00 pm
Posts: 536
Location: Sydney
Just something for you to think about archangle. When you used ice to cool the panel you are distorting it. You are much better to let it cool of with out the aid of ice. You see when you apply to much heat and dont wait for the welds to cool, the panel stretches and buckels yes. (distortion) When you let the panel cool off on its own it will shrink, this is why you see panel beaters (good ones atleas) planish the weld as it cools down (helps with shrinkage).
Now if you add ice to the weld you shrink the weld way to fast and it actually shrinks more then letting it cool by itself, and there is no chance of plannishing as it cools. And you will also get distortion it will just go the other way. When I weld things like rust patches in doors at work, I only stitch it in with welds about 5-7mm at a time, I let it cool right off so there is no heat in the panel at all before I weld on opposite side. When you get a few welds on the panel you can then weld one grind one weld one grind one. Be carefull when grinding to you get distortin from that aswell.

You might think it takes longer but you have none of this stuffing around after trying to get some shape back in the panel.

Hope this helps some people out.
Mike

_________________
If it cant be fixed with a hammer it cant be FIXED!!


Top
 Profile  
 
 Post subject:
PostPosted: Mon Mar 05, 2007 12:21 pm 
Offline
1275cc
1275cc
User avatar

Joined: Fri Jun 17, 2005 10:31 am
Posts: 3183
Location: Burpengary, Queensland - Home of Tricky Performance Engineering
Thanks Mike,

Yes we could always use the advice of others if they are more skilled in that area.
Had more success though with the ice-cube technique than with any other.
But any advice you may give will be duly noted.

Thanks everyone else for their kind words - not long to go now!

Cheers,
Tricky

_________________
"Not Speeding Officer..........Qualifying"


Top
 Profile  
 
 Post subject:
PostPosted: Mon Mar 05, 2007 1:44 pm 
Offline
1360cc
1360cc
User avatar

Joined: Thu Feb 03, 2005 1:41 pm
Posts: 12311
Location: Rockingham - Collie WA
Before I even read your comments, as soon as I saw the pics I though
"That looks tough"

It really will be worth all the hard work & hours you have put into it.
Keep it up!

_________________
Too many cars, and too little time.


Top
 Profile  
 
 Post subject:
PostPosted: Tue Mar 06, 2007 8:19 pm 
Offline
1275cc
1275cc
User avatar

Joined: Mon Jun 27, 2005 9:09 pm
Posts: 2529
Location: S.A
i never thought of usin the starlet bonnet scoop very clean :wink: its somthin for me to think about 8)

good work mate its comin along

_________________
Current Ride : Toyota Trueno AE86

mini parts for sale http://www.ausmini.com/forums/viewtopic.php?t=42247


Top
 Profile  
 
 Post subject:
PostPosted: Fri Mar 09, 2007 5:24 pm 
Offline
1275cc
1275cc
User avatar

Joined: Fri Jun 17, 2005 10:31 am
Posts: 3183
Location: Burpengary, Queensland - Home of Tricky Performance Engineering
Thanks awdmoke, thats the exact phrase that came to my mind as well - "that looks tough!!"

Glad to see we are of the same opinion.

SS - thanks for the kind words, should be complete in a few months time. Definately before the QB long weekend which is the QLD Mini Muster.

Cheers,
Tricky

_________________
"Not Speeding Officer..........Qualifying"


Top
 Profile  
 
 Post subject:
PostPosted: Fri Mar 09, 2007 6:06 pm 
Offline
1275cc
1275cc
User avatar

Joined: Wed Jun 14, 2006 9:45 pm
Posts: 4031
Location: Adelaide, SA
Wow, you are awesome! Your car is awesome!

_________________
1964 Morris 850, 1330 Supercharged - 81.8hp atws.
1975 Leyland Mini S 1100S powered - Nice and reliable.
1977 Leyland Mini LS - Project LS-T 8)


Top
 Profile  
 
 Post subject:
PostPosted: Fri Mar 09, 2007 6:50 pm 
Offline
1275cc
1275cc
User avatar

Joined: Fri Jun 17, 2005 10:31 am
Posts: 3183
Location: Burpengary, Queensland - Home of Tricky Performance Engineering
Thanks slinkey!

And thanks to sgc and gafmo too, its always nice to know your peers appreciate the time and effort that you have to put in.

We are now officially counting down.......... :wink:

Cheers,
Tricky

_________________
"Not Speeding Officer..........Qualifying"


Top
 Profile  
 
 Post subject:
PostPosted: Sat Mar 10, 2007 12:08 pm 
Offline
This space for rent
User avatar

Joined: Thu Feb 08, 2007 12:40 pm
Posts: 5455
Location: Melbourne
Archangel007 wrote:
Thanks slinkey!

And thanks to sgc and gafmo too, its always nice to know your peers appreciate the time and effort that you have to put in.

We are now officially counting down.......... :wink:

Cheers,
Tricky


Hey, I'll be in Morayfield in a few weeks, feel like a visitor or three? Smegger (my brother) is frothing at the mouth over your conversion :lol: :lol:

_________________
Simon

The adventures of an owner builder in the Tallarook Ranges

Image


Top
 Profile  
 
 Post subject:
PostPosted: Sat Mar 10, 2007 2:44 pm 
Offline
1275cc
1275cc
User avatar

Joined: Fri Jun 17, 2005 10:31 am
Posts: 3183
Location: Burpengary, Queensland - Home of Tricky Performance Engineering
sgc,

Absolutely, feel free to come around!

Its due to go to the spray painters in a coupple of weeks time to get the top-coat done, so let me know when and I will make do. :wink:

Cheers,
Tricky

_________________
"Not Speeding Officer..........Qualifying"


Top
 Profile  
 
 Post subject:
PostPosted: Sat Mar 10, 2007 3:54 pm 
Offline
This space for rent
User avatar

Joined: Thu Feb 08, 2007 12:40 pm
Posts: 5455
Location: Melbourne
Archangel007 wrote:
Its due to go to the spray painters in a coupple of weeks time to get the top-coat done, so let me know when and I will make do. :wink:

Cheers,
Tricky


Ooohhh.. :drools: If the paint is anywhere near the quality of the rest of your work, I can't wait to see it :D

Looks like it'll be the week spanning Easter at this stage..

--s

_________________
Simon

The adventures of an owner builder in the Tallarook Ranges

Image


Top
 Profile  
 
Display posts from previous:  Sort by  
Post new topic Reply to topic  [ 1864 posts ]  Go to page Previous  1 ... 10, 11, 12, 13, 14, 15, 16 ... 125  Next

All times are UTC + 10 hours


Who is online

Users browsing this forum: No registered users and 8 guests


You cannot post new topics in this forum
You cannot reply to topics in this forum
You cannot edit your posts in this forum
You cannot delete your posts in this forum
You cannot post attachments in this forum

Jump to:  

© 2016 Ausmini. All garage work involves equal measures of enthusiasm, ingenuity and a fair degree of irresponsibility.