ausmini
https://www.ausmini.com/forums/

Madlockie- Diahatsu Siron 3 cyclinder-(engine mount shagged)
https://www.ausmini.com/forums/viewtopic.php?f=23&t=64283
Page 1 of 2

Author:  Lockie91 [ Fri Jul 09, 2010 6:08 pm ]
Post subject:  Madlockie- Diahatsu Siron 3 cyclinder-(engine mount shagged)

Went to accelerate quite hard off at some lights, and didn't get past 2nd gear when everything went sloppy. Clutch came out after second gear, and straight away I knew the engine was rocking like baby in a craddle :cry:

This was the end result... completely shagged rear engine mount...

Spent the whole day running around all the auto shops, 6 shops in total trying to figure out what mount she was, as their was no knowledge of this mount, and which car it was out of. Finally found it, though no one had one in stock, nor could they get it, nor had they sold one in 2 yrs... :( Finally managed to find one but obviously won't be here till monday afeo..


Image

Image

Image

Image

Image

Image :cry:

Author:  Harley [ Fri Jul 09, 2010 6:39 pm ]
Post subject: 

Sounds like 3 cylinders of raw power is too much for your foot!
I don't know what I'm looking at there but make sure you check the condition of where the mount attaches to the block and subframe too.
:D

Author:  JC [ Fri Jul 09, 2010 6:52 pm ]
Post subject: 

Just fill it full of a hard rubber compound. That's what just about every GT Starlet owner has to do at some point.

Author:  Lockie91 [ Fri Jul 09, 2010 7:09 pm ]
Post subject: 

JC wrote:
Just fill it full of a hard rubber compound. That's what just about every GT Starlet owner has to do at some point.


hmm, it crossed my mind this afeo to do that, if I couldn't get another new mount, but I'd prefer not to do that if I can help it :wink:

Author:  JC [ Fri Jul 09, 2010 8:25 pm ]
Post subject: 

Some guy even went and got a rubber mallet and cut it size and drilled a whole in the center! Agricultural but effective.

Author:  Lockie91 [ Fri Jul 09, 2010 9:24 pm ]
Post subject: 

JC wrote:
Some guy even went and got a rubber mallet and cut it size and drilled a whole in the center! Agricultural but effective.


thats stupid...

In the position that this mount is in, I wouldn't be doing something that I didn't think would last everyday driving. I took me a long time just to get this mount out, so wouldn't like to be replacing it anytime soon!! Not much room around the place inside the bay

Author:  Mearcat [ Sat Jul 10, 2010 1:05 am ]
Post subject: 

This is not really an option if you're in a hurry, but you can get them recast with polyurethane and is normally about half the price of a new OEM mount.

Author:  JC [ Sat Jul 10, 2010 9:33 am ]
Post subject: 

Lockie91 wrote:
thats stupid...


Not entirely, cost him $15 tp keep his car on the road until he could get a replacement mount

Author:  Lockie91 [ Sat Jul 10, 2010 10:41 am ]
Post subject: 

JC wrote:
Lockie91 wrote:
thats stupid...


Not entirely, cost him $15 tp keep his car on the road until he could get a replacement mount


oh for sure... If I was desperate I would.. but the amount of blood pain and suffering trying to get these mounts out, I would steer away from this option as much as possible. I would prefer not to have to replace it in a hurry!!! There is VERY LITTLE room to get my hands inside the bay, let alone turn a spanner where this one is positioned. Took me 4.5 just to get out :evil: (no ratchet will fit up there either!! :()

Author:  Lockie91 [ Sun Jul 11, 2010 2:04 pm ]
Post subject: 

ok so I have another problem now...

I have this mount, shown below that has lost its stiffness and needs replacing. Can't find it at any of the part places, and because we have no idea what it is off, im stuck. I've looked at someway of modifying other mounts, but all the threads and mounting holes don't seem to be going in the right direction to fit em...

The mount is for my gearstick lever underneath the floor and it also bolts on to the back of the engine.

Any idea's on how I can make another mount? A product u've seen that would work with some adjustments??

Image

Image

Image

Author:  Archangel007 [ Sun Jul 11, 2010 2:21 pm ]
Post subject: 

You have a pattern in your hand - why not make another just like it, but slightly stronger??

Author:  Lockie91 [ Sun Jul 11, 2010 3:02 pm ]
Post subject: 

Archangel007 wrote:
You have a pattern in your hand - why not make another just like it, but slightly stronger??


the metal bracket you mean? How would I go about fixing the attached/ glued rubber inserts?

I was thinking of chopping out the rubber inserts you can see, and putting mini engine rubber stays in the gaps, then drilling a hole right the way through?

Thing is once I hack it, there's no going back, and Im scared of this as its my daily,,,

Author:  Archangel007 [ Sun Jul 11, 2010 3:27 pm ]
Post subject: 

I would do them in polyurathane - it is more oil/petrol reistant and will last longer.

It will also be slightly stiffer but you wont notice that a all.

You can get the polyurathane kit readily enough.

I think JC alluded to it before.

Cheers,
Tricky

Author:  Lockie91 [ Sun Jul 11, 2010 6:08 pm ]
Post subject: 

Archangel007 wrote:
I would do them in polyurathane - it is more oil/petrol reistant and will last longer.

It will also be slightly stiffer but you wont notice that a all.

You can get the polyurathane kit readily enough.

I think JC alluded to it before.

Cheers,
Tricky


thanks for that Tricky.

Could you explain more what you mean? The rubber is glued to the metal mount, it all comes as one kit sorta thing, and its a weird looking rubber mount. Never seen one quite like it before...

Author:  mickmini [ Sun Jul 11, 2010 6:50 pm ]
Post subject: 

Lockie91 wrote:
Could you explain more what you mean? The rubber is glued to the metal mount, it all comes as one kit sorta thing, and its a weird looking rubber mount. Never seen one quite like it before...


What I reckon has happened is that the guy has gone waltzing through the U-pullit or PicknPayless until he found a mount that was about the right size and shape.

Mounts like this are bonded at original manufacture using a heat and pressure process. You cannot replicate this at home.

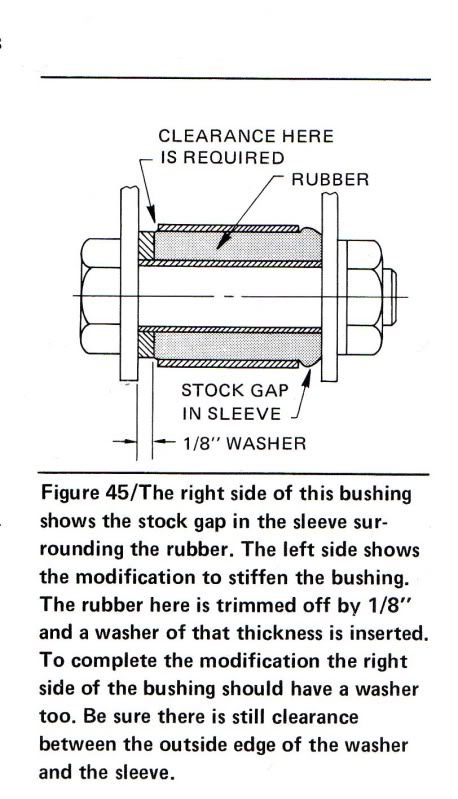
As Tricky suggests, you can achieve the same result by using polyurethane that is clamped between the metal bracket. Most of the bushes on a standard mini are this format. Have a look at the rear subframe trunion mounts for a good example.

All you need is the metal brackets bent to the right shape, washers, bolts and polyurethane bushes of the right dimensions.

Critical points are that the metal parts of the bracket and the mounting bolt/washer/inner tube do not make contact when it flexes or vibrates. This will simply transmit the vibrations to the body and you may as well have it solidly mounted.

See the picture below, courtesy of How to Make Your Car Handle, by Fred Puhn
Image

cheers
michael

Page 1 of 2 All times are UTC + 10 hours
Powered by phpBB® Forum Software © phpBB Group
http://www.phpbb.com/