Ausmini
It is currently Fri Jun 27, 2025 2:55 pm

All times are UTC + 10 hours


Post new topic Reply to topic  [ 12 posts ] 
Author Message
PostPosted: Fri Jun 29, 2007 9:27 pm 
Offline
848cc
848cc

Joined: Sun Oct 15, 2006 4:41 am
Posts: 384
Location: Adelaide
I know from experience that it can be a little difficult to get this kit in/out of your mini. The main areas i had difficulty in accessing were the manifold bolts and attaching the inlet pipe to the rear of the supercharger.
I was told about a different method so thought i'd share it.....

n.b. Pics off mobile so a little fuzzy!
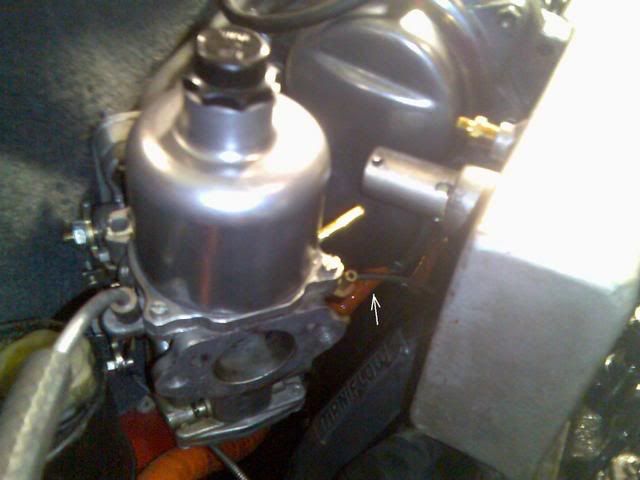
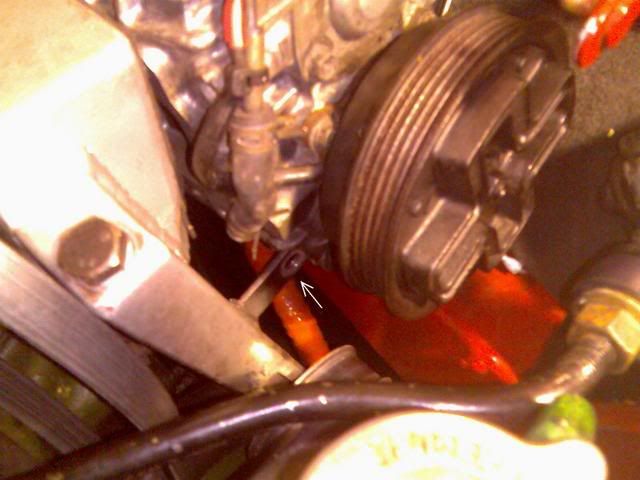
Look for my arrows in white->

1) First thing, remove engine steadys & inlet pipe from in front of SU. Remove Supercharger belt, boost gauge line, fuel line, accelerator cable & choke cable (if possible).

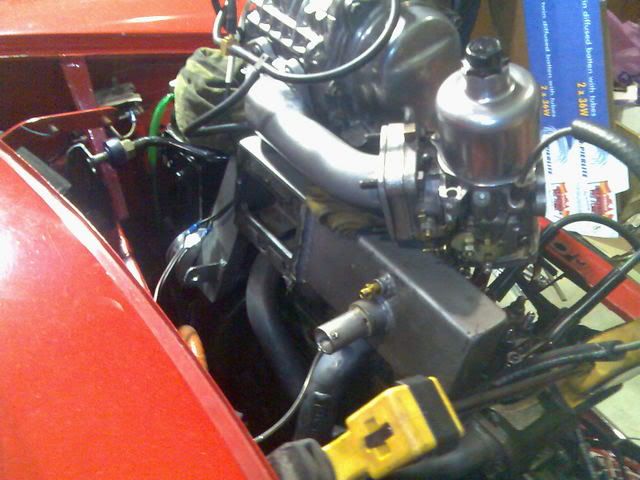
2) You can now undo the 10mm bolts pictured below.
Image

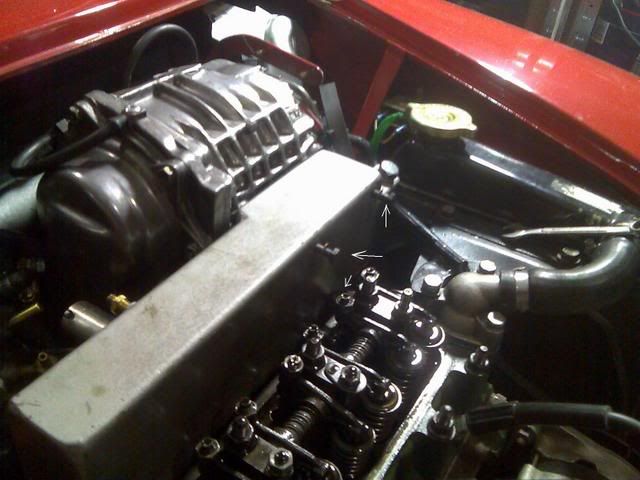
3) Undo 17mm nut below supercharger & remove large supporting bolt.
Image
Image

4)I then use a 'quickgrip' to give the motor a slight push forward.
Image

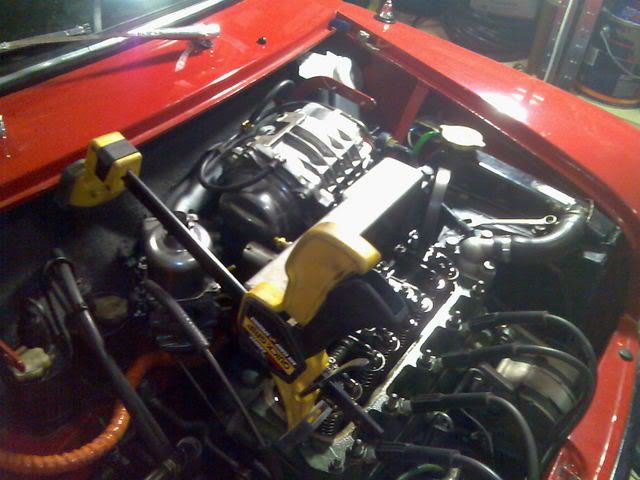
5)This should now give you enough room to pull the supercharger, inlet pipe & SU out all in one go!!!

I used this method and found it sooooooooo much easier.
If your keen, this should take no more than 15-20 mins & look something like this:
Image

Look at all that room to get to the manifold bolts!!! :D

_________________
Carl
Previous Owner & Driver of 1 Morris "It's not a Cooper!!" 850


Top
 Profile  
 
 Post subject:
PostPosted: Fri Jun 29, 2007 10:53 pm 
Offline
1275cc
1275cc
User avatar

Joined: Wed Jun 14, 2006 9:45 pm
Posts: 4031
Location: Adelaide, SA
Hey I like that.

I did it, manifold, then charger, then carby, attached to short manifold. So that's three steps. But the quick grips would make it even easier!

Mine came on and off about 5 times, so by the end I got good at it, especially the carby part.

Glad you took pics, should make it a sticky, as I've been PM'd about this quite a few times. And keep answering the same question. Since you did such a good job of showing everyone and taking good pics.....

STICKY! :idea:

_________________
1964 Morris 850, 1330 Supercharged - 81.8hp atws.
1975 Leyland Mini S 1100S powered - Nice and reliable.
1977 Leyland Mini LS - Project LS-T 8)


Top
 Profile  
 
 Post subject:
PostPosted: Sat Jun 30, 2007 12:34 am 
Offline
1360cc
1360cc

Joined: Mon Nov 01, 2004 4:36 pm
Posts: 7673
nice!, appreciate you posting that.
what kind of transmission do you have, because with a remote im guessing it wouldnt tilt forward like that?


Top
 Profile  
 
 Post subject:
PostPosted: Sat Jun 30, 2007 2:11 am 
Offline
1275cc
1275cc
User avatar

Joined: Wed Mar 17, 2004 12:16 am
Posts: 5717
Location: Adelaide SA Ausmini Sales Department
Spaceboy wrote:
what kind of transmission do you have, because with a remote im guessing it wouldnt tilt forward like that?


Correct.

Depends what would be quicker..... undoing all 3 parts of the inlet, or undoing the remote then the inlet as one piece....

_________________
[NATHAN] -- Sold everything mini related and am back in big beautiful BMWs
Image


Top
 Profile  
 
 Post subject:
PostPosted: Sat Jun 30, 2007 2:03 pm 
Offline
1275cc
1275cc
User avatar

Joined: Wed Jun 14, 2006 9:45 pm
Posts: 4031
Location: Adelaide, SA
I did it in parts for that reason. It would piss me off too much undoing the remote mounting bolts on the body.

But probably would have made it easier, but I even drilled another hole in firewall so a small socker could get to the hardest bolt on carby to charger manifold. Really quick with that, and a little grommet covers the hole.

_________________
1964 Morris 850, 1330 Supercharged - 81.8hp atws.
1975 Leyland Mini S 1100S powered - Nice and reliable.
1977 Leyland Mini LS - Project LS-T 8)


Top
 Profile  
 
 Post subject:
PostPosted: Sat Jun 30, 2007 2:12 pm 
Offline
1275cc
1275cc
User avatar

Joined: Wed Mar 17, 2004 12:16 am
Posts: 5717
Location: Adelaide SA Ausmini Sales Department
Thats exactly what I was telling a guy at brickworx with the blue clubby (having a mental blank with him name sorry). Suggested that it would be faster and less painful if he had a removable panel in the firewall for easier access.

_________________
[NATHAN] -- Sold everything mini related and am back in big beautiful BMWs
Image


Top
 Profile  
 
 Post subject:
PostPosted: Sat Jun 30, 2007 3:04 pm 
Offline
1275cc
1275cc
User avatar

Joined: Wed Jun 14, 2006 9:45 pm
Posts: 4031
Location: Adelaide, SA
supercharged 850 wrote:
Thats exactly what I was telling a guy at brickworx with the blue clubby (having a mental blank with him name sorry). Suggested that it would be faster and less painful if he had a removable panel in the firewall for easier access.


Actually the removable panel is a graet a idea. My dad said that if the motor ever needs to come out and the s/c setup is still going back in a large removeaable pane is going in. It would need to be pretty well sealed, and tightly attached.

At the moment I have the centre removable speedo thing, and a small hole drilled for socket, but removable panel would be sooooo much easier!

_________________
1964 Morris 850, 1330 Supercharged - 81.8hp atws.
1975 Leyland Mini S 1100S powered - Nice and reliable.
1977 Leyland Mini LS - Project LS-T 8)


Top
 Profile  
 
 Post subject:
PostPosted: Sat Jun 30, 2007 5:46 pm 
Offline
848cc
848cc

Joined: Sun Oct 15, 2006 4:41 am
Posts: 384
Location: Adelaide
As for my gear change, i don't have a magic wand... it's a remote with linkages etc. & i manage to get the clearance without damaging or bending anything.

One thing i forgot to mention is to remove the bottom bolt from the extractors to gearbox support. Without this removed it won't tilt at all. Also put the bolts through the inlet first, as they are so long, they won't clear the rockers.

As far as drilling a hole in the firewall, thought about it... A removable panel?? If i ever take the blower out i don't want some massive panel visible, plus that then means i have to pull interior pieces out each time.Too much work, this is easier IMO.

Before i was putting the inlet & supercharger on together, then the carby & rear inlet pipe as one. Many different ways of doing it, i just found this to be the best for my set up. :wink:

_________________
Carl
Previous Owner & Driver of 1 Morris "It's not a Cooper!!" 850


Top
 Profile  
 
 Post subject:
PostPosted: Sat Jun 30, 2007 7:50 pm 
Offline
1275cc
1275cc
User avatar

Joined: Wed Mar 17, 2004 12:16 am
Posts: 5717
Location: Adelaide SA Ausmini Sales Department
sox61 wrote:
As for my gear change, i don't have a magic wand... it's a remote with linkages etc. & i manage to get the clearance without damaging or bending anything.


Does it have a long alloy box from the gearbox to the gear stick, or 2 exposed bars? The alloy is a "remote" unit, the 2 bars are a "rod change" unit.

_________________
[NATHAN] -- Sold everything mini related and am back in big beautiful BMWs
Image


Top
 Profile  
 
 Post subject:
PostPosted: Sat Jun 30, 2007 9:44 pm 
Offline
848cc
848cc

Joined: Sun Oct 15, 2006 4:41 am
Posts: 384
Location: Adelaide
Ah, ok... that clears it up ^^^ cheers SC.

Mine would be a rod change then- bars exposed etc.

I'm assuming this makes the process a little bit different?!? Mine is a 998...

All sorted then- good for rod change- maybe not so for remote :(
Too bad :lol: :P

_________________
Carl
Previous Owner & Driver of 1 Morris "It's not a Cooper!!" 850


Top
 Profile  
 
 Post subject:
PostPosted: Sat Jun 30, 2007 10:54 pm 
Offline
SooperDooperMiniCooper ExpertEngineering
User avatar

Joined: Fri Apr 29, 2005 9:46 am
Posts: 18887
Location: Under the bonnet son!
Stickied up as requested. Nice how to by the way. i like the use of the clamp to push the engine forward a little with no damage or paintwork issues. Good for a few other jobs in the engine bay.

_________________
SooperDooperMiniCooperExpertEngineering

All garage work involves equal measures of enthusiasm, ingenuity and a fair degree of irresponsibility.


Top
 Profile  
 
 Post subject:
PostPosted: Sun Sep 16, 2007 12:06 pm 
Offline
848cc
848cc

Joined: Wed Sep 12, 2007 2:25 pm
Posts: 39
Location: Adelaide, SA
Nice "how to"! Took me a little more than 20 minutes and I had to adjust a few things to get it out in one hit but yeah, other then that, nice work!


Top
 Profile  
 
Display posts from previous:  Sort by  
Post new topic Reply to topic  [ 12 posts ] 

All times are UTC + 10 hours


Who is online

Users browsing this forum: No registered users and 10 guests


You cannot post new topics in this forum
You cannot reply to topics in this forum
You cannot edit your posts in this forum
You cannot delete your posts in this forum
You cannot post attachments in this forum

Jump to:  

© 2016 Ausmini. All garage work involves equal measures of enthusiasm, ingenuity and a fair degree of irresponsibility.