Ausmini
It is currently Mon Jul 21, 2025 12:31 am

All times are UTC + 10 hours


Post new topic Reply to topic  [ 9 posts ] 
Author Message
PostPosted: Tue Apr 08, 2014 6:25 pm 
Offline
848cc
848cc
User avatar

Joined: Sun Dec 30, 2012 12:29 pm
Posts: 384
Location: Adelaide, South Australia
My front wheels still wobble slightly in a 360 degrees radius when turned by hand and I'm now certain it's the bearings.
I've locked up the ball joints and steering track rod to check and it's definitely the bearings.
What I am not so sure of is how to use a dial indicator to check the end play.
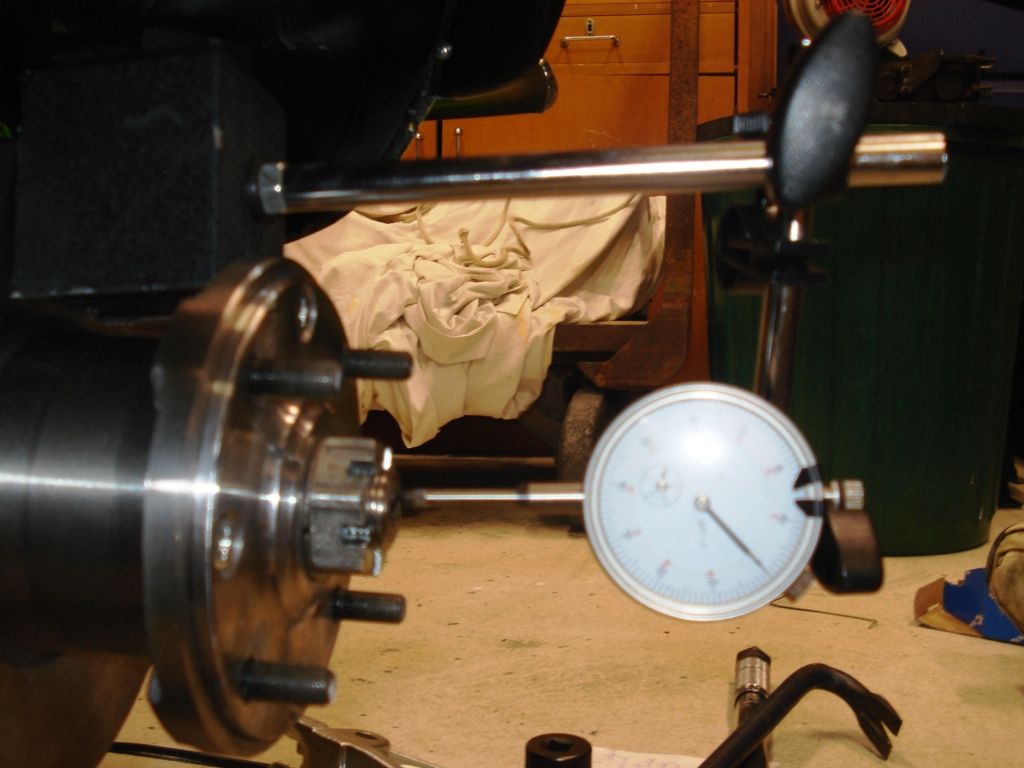
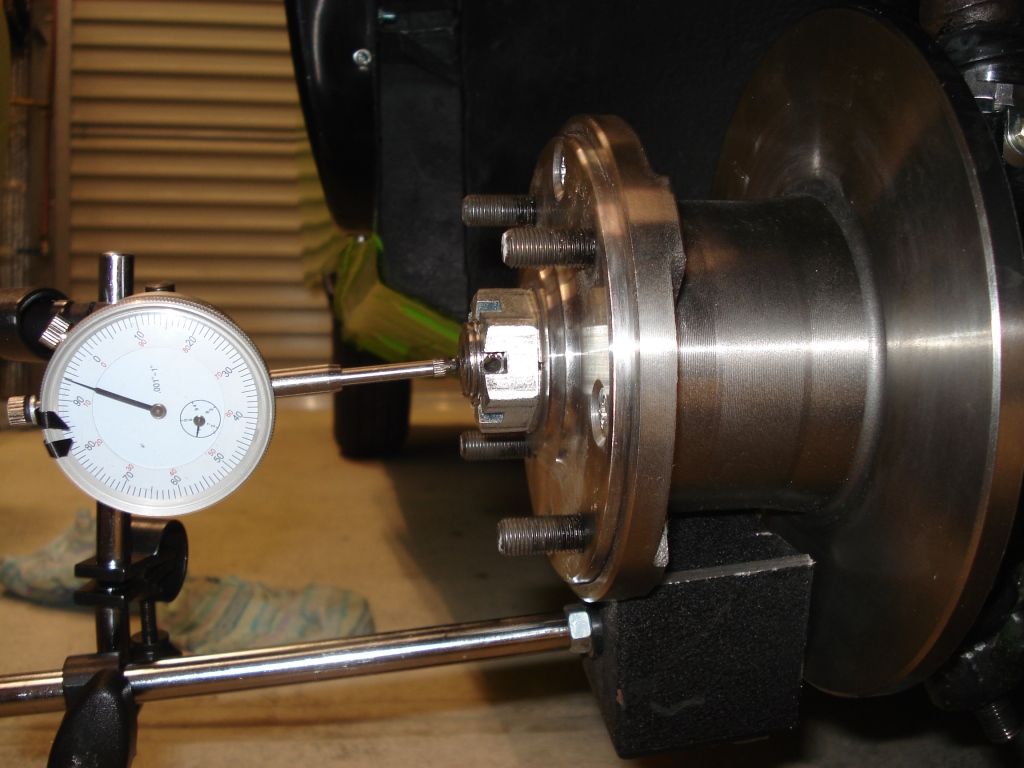
I've basically stuck the magnetic end on the disc rotor and the needle on the end of the CV and rotated the rotor 360 degrees whilst "pulling" and "pushing".
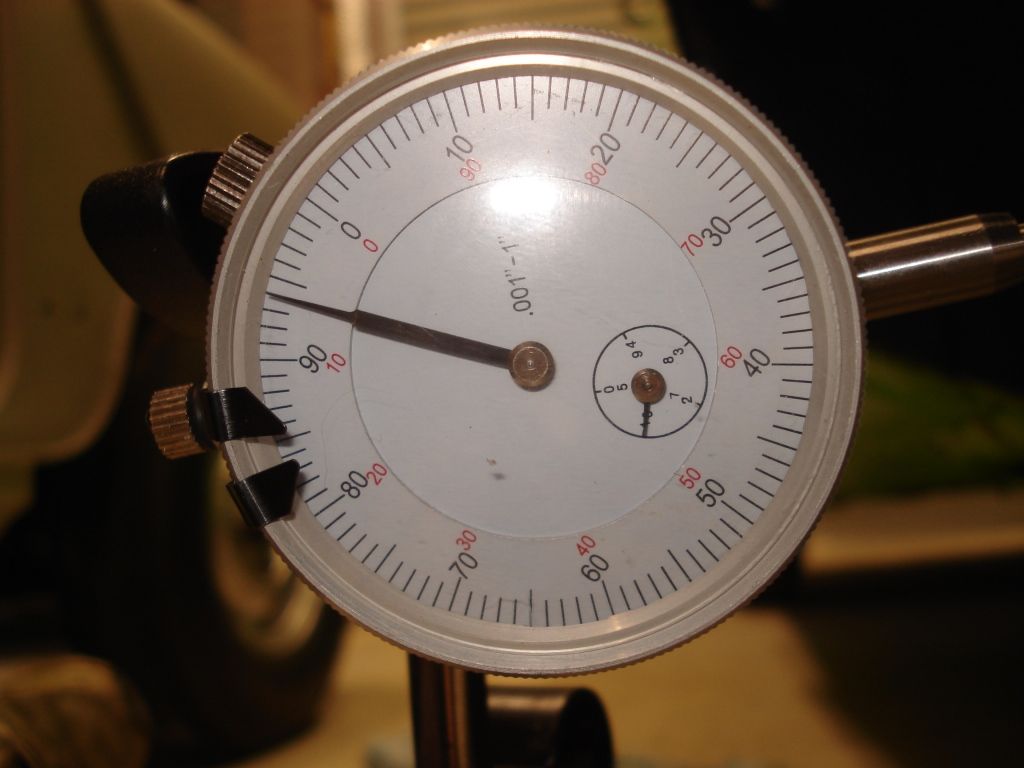
I get two readings, one where the dial doesn't move which I've set to 0 and the other 6 thou (0 is at the start point and the 6 thou reading is when the rotor is turned 180 degrees).
These are minimum and maximum readings when the rotor is turned a complete 360 degrees whilst pushing and pulling.
My question then is this-does this mean the bearing end play is 6 thou in total so I need to machine off 7 thou off the spacer to allow for a 1 thou bearing preload?.
Here is a couple of photos of the situation:

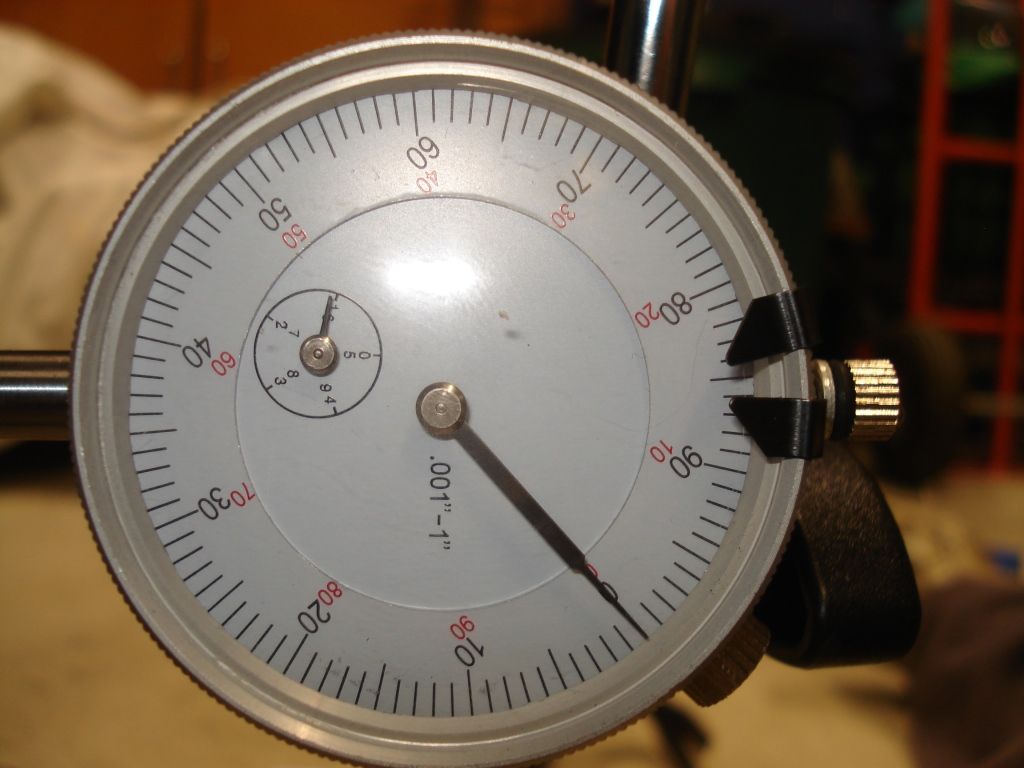
Minimum reading (dial at the top) = 0

Image
Image

Maximum reading (when rotor is turned 180 degrees)= 6 thou

Image
Image

Any advice would be great as I don't want to stuff this up

Thanks

Dave

_________________
Your imagination is only limited by the size of your wallet
"61 850 original and crusty (Mavis)
"64 Smooth Roof Van (Colin)
"67 Deluxe resto project (Monty)


Last edited by captainwaldopepper on Tue Apr 08, 2014 9:22 pm, edited 1 time in total.

Top
 Profile  
 
PostPosted: Tue Apr 08, 2014 7:55 pm 
Offline
1098cc
1098cc
User avatar

Joined: Tue Aug 05, 2008 8:03 pm
Posts: 1479
Location: Qld, Brisbane
What you are doing there is not right at all.

Firstly, if the cv joint is done up tight, the rotor will move with the cv joint as they are bolted together. If there was play in the bearing then the whole assembly (the rotor, cv joint and the bearings) would all move together and the play would be between the inner and outer bearing races inside the hub. If there is play between the rotor and the cv joint then the cv joint is loose.

Also, how have you locked up the balljoints and tie rod end?


Just going off your pictures, it doesn't look like the cv joint is done up tight, the split collar doesn't look like it's squeezed up enough.


My suggestion would be to do the cv joint nut up firmly by hand and check the feel of spinning the wheel. Try to get an idea of the rolling resistance of the bearing and assembly.
Then do it up to 150ft/lb then continue to the next split pin hole and check for any play in the assembly. If there is no play and the rolling resistance has not increased then it should be all good to go.
If there is still play then you need a thinner spacer, if the rolling resistance has increased then either the disc is rubbing on the steering arm or the hub or the bearing is too tight and you need a bigger spacer.


Top
 Profile  
 
PostPosted: Tue Apr 08, 2014 8:08 pm 
Offline
848cc
848cc
User avatar

Joined: Sun Dec 30, 2012 12:29 pm
Posts: 384
Location: Adelaide, South Australia
Hi Matt

Thanks for the reply
I've locked up the balljoints by taking all the shims out so they are very stiff when the balljoint nuts are tightened up.
I've used a rattle gun to tighten up the hub castle nut and split washer and my torque wrench says its over 150 ft/lbs.
There is absolutely no rolling resistance and I'm currently removing the spacers as I suspect they are too wide as the whole wheel still wobbles when it's all tightened up to 150 ft/lbs.
I'm currently trying to work out how much too wide the spacers are.
Cheers
Dave

_________________
Your imagination is only limited by the size of your wallet
"61 850 original and crusty (Mavis)
"64 Smooth Roof Van (Colin)
"67 Deluxe resto project (Monty)


Top
 Profile  
 
PostPosted: Tue Apr 08, 2014 9:52 pm 
Offline
1098cc
1098cc
User avatar

Joined: Tue Aug 05, 2008 8:03 pm
Posts: 1479
Location: Qld, Brisbane
Well in that case is there any mini specialist or fanatic near you that would have an assortment of spacers? I'm not really sure if there is anyway to measure correctly to work out what size you need. Probably easiest to just keep going down in size until you have no play.

It's a real bummer when you have to play around to get it right


Top
 Profile  
 
PostPosted: Tue Apr 08, 2014 10:08 pm 
Offline
848cc
848cc
User avatar

Joined: Sun Dec 30, 2012 12:29 pm
Posts: 384
Location: Adelaide, South Australia
Hi Matt

Yes, apparently I'm not the only one with this problem which is caused by the spacers between the bearings being too thick (or not thick enough if binding).

I tried measuring the endplay with the dial gauge using the method below and the spacers appear to be 0.001" too thick on both wheels;

viewtopic.php?f=25&t=40640

I've now taken them out and will ask a mate at work to machine off 0.002" and see how they go (they apparently need to cover the 0.001" endfloat + 0.001" of preload.

If this doesn't work, I'll take the van down to Minisport and stump up the dough for the bearings to be fitted by the professionals as it's starting to give me the sh*ts.

Thanks again

Dave

_________________
Your imagination is only limited by the size of your wallet
"61 850 original and crusty (Mavis)
"64 Smooth Roof Van (Colin)
"67 Deluxe resto project (Monty)


Top
 Profile  
 
PostPosted: Wed Apr 09, 2014 9:05 am 
Offline
998cc
998cc
User avatar

Joined: Sat Mar 24, 2012 1:39 pm
Posts: 584
Location: qld
Dave

hate it when straight forward jobs don't turn out that way. :)


Top
 Profile  
 
PostPosted: Wed Apr 09, 2014 6:01 pm 
Offline
SooperDooperMiniCooper ExpertEngineering
User avatar

Joined: Fri Apr 29, 2005 9:46 am
Posts: 18887
Location: Under the bonnet son!
Put that much good effort in and you're sure to get good results. Keep at it!

_________________
SooperDooperMiniCooperExpertEngineering

All garage work involves equal measures of enthusiasm, ingenuity and a fair degree of irresponsibility.


Top
 Profile  
 
PostPosted: Thu Apr 10, 2014 8:14 am 
Offline
848cc
848cc
User avatar

Joined: Sun Dec 30, 2012 12:29 pm
Posts: 384
Location: Adelaide, South Australia
Here's an update on my wheel bearing situation;
My mate didn't get around to machining the spacers but another mate mentioned that if I only need a thou or two off I could use emery paper on a flat glass base and just grind off this amount using a circular motion.
I did just this and used a micrometer to ensure that I only took off two thou and that the amount removed from the spacers was the same around the entire circumference.
It only took 5 minutes to remove two thou from both spacers using this method and I would recommend doing this if you don't have a lathe handy (as I mentioned, you just need to confirm that the spacers are a uniform final thickness using a micrometer).
I also found on the Minimania forum the following advice which is straight from the Haynes manual.
"Prior to tightening up the entire hub, install a large flat washer over the CV shaft, followed by the castle nut but WITHOUT THE SPLIT WASHER UNDERNEATH". Tighten to the recommended torque, remove the flat washer, install the split washer and tighten again. You do this because it is possible to jam the split washer in place which then prevents the hub assembly from tightening as much as it should. I found that using the flat washer I was able to get the castle nut to turn a tad more than was possible when using just the split washer.
After doing this and re-installing the split washer I used a rattle gun to tighten the whole assembly until the castle nut wouldn't move any more.
I reckon the torque is slightly more than the 150ft/lbs recommended but both wheels are now solid and freely turn with absolutely no binding and wobbling.
The good thing about the whole exercise (which turned into a week long saga) is that I could easily to do the job again and it would probably only take me an evening (instead of days of mental agony wondering what the hell I was doing wrong).
I would also suggest that using the flat glass and emery paper method I described above, you could get away with not measuring the endplay at all and just take a thou off the spacer at a time, refit and tighten and continue doing this until the assembly is tight (but use a micrometer to check that the spacer thickness is uniform).
Thanks everyone for your comments and advice-I hope the above helps someone else out that is having a similar issue.
Regards
Dave

_________________
Your imagination is only limited by the size of your wallet
"61 850 original and crusty (Mavis)
"64 Smooth Roof Van (Colin)
"67 Deluxe resto project (Monty)


Top
 Profile  
 
PostPosted: Thu Apr 10, 2014 6:26 pm 
Offline
1275cc
1275cc
User avatar

Joined: Thu Aug 31, 2006 7:56 pm
Posts: 2663
Location: Muswellbrook -- NSW
At least you should have some huge satisfaction that resolved the problem Dave .


Top
 Profile  
 
Display posts from previous:  Sort by  
Post new topic Reply to topic  [ 9 posts ] 

All times are UTC + 10 hours


Who is online

Users browsing this forum: Bing [Bot] and 83 guests


You cannot post new topics in this forum
You cannot reply to topics in this forum
You cannot edit your posts in this forum
You cannot delete your posts in this forum
You cannot post attachments in this forum

Jump to:  

cron

© 2016 Ausmini. All garage work involves equal measures of enthusiasm, ingenuity and a fair degree of irresponsibility.