Ausmini
It is currently Sun Jun 22, 2025 2:40 am

All times are UTC + 10 hours


Post new topic Reply to topic  [ 1864 posts ]  Go to page Previous  1 ... 9, 10, 11, 12, 13, 14, 15 ... 125  Next
Author Message
 Post subject:
PostPosted: Fri Jan 12, 2007 2:42 pm 
Offline
1098cc
1098cc
User avatar

Joined: Thu Sep 30, 2004 3:12 pm
Posts: 1461
Location: Brisbane
Im not a fan of the log type manifolds. And another reason i want to make a new manifold is to make the inlet to the turbo a bigger size. And the manifold i have is a little rough, and to get it ceramic coated the way i want it has to be a better finish.
And Tricky yeah the pics helped, and i will be running a GT2860RLS. And it will be 3" through

_________________
If you want more inches, stroke it
Life's a garden.... Dig It!
http://www.ausmini.com/forums/viewtopic.php?t=20746


Top
 Profile  
 
 Post subject:
PostPosted: Sat Jan 13, 2007 7:15 am 
Offline
1275cc
1275cc
User avatar

Joined: Fri Jun 17, 2005 10:31 am
Posts: 3183
Location: Burpengary, Queensland - Home of Tricky Performance Engineering
Gordo,

I didnt think your manifold looked all that bad......

Yes, not a fan of log myself, that is why I am going with a ram-horn design for my TD04L.

That Gt28 will really make it haul @ss alright........

Send pics when complete.

Cheers,
Tricky

_________________
"Not Speeding Officer..........Qualifying"


Top
 Profile  
 
 Post subject:
PostPosted: Sat Jan 20, 2007 9:14 pm 
Offline
1275cc
1275cc
User avatar

Joined: Fri Jun 17, 2005 10:31 am
Posts: 3183
Location: Burpengary, Queensland - Home of Tricky Performance Engineering
CHAPTER 14 - More Body Work

Hi All,

I guess its time for an update again. I have been spending huge amounts of time getting the bodywork finished so it can be sent off to the spray painters to have the top coat done. This is the last major thing that has to be done. There is an enormous amount of minor things still to be done though!!

Last chapter I made some in-roads into doing some body mods to individualise the car, and this chapter is no different. Some of them are from necessity, to house some of the equipment forced upon me from the Starlet conversion, while some I have chosen to do just to make the car stand out.

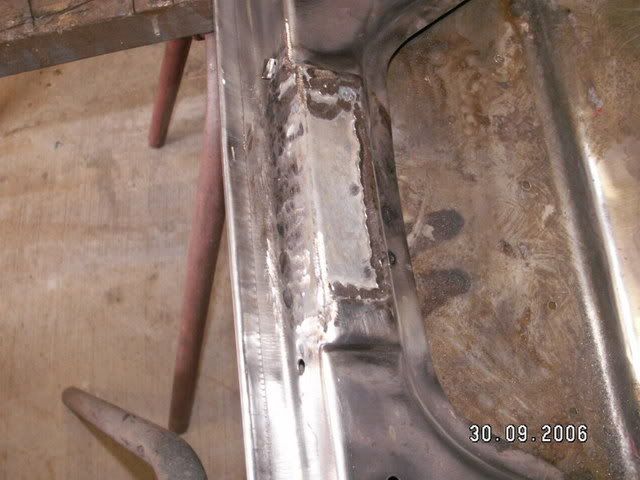
While I was working on the tunnel (last chapter we filled the hole in the floor where the rod change went), I decided to mount the Starlet gearshift mechanism. To do this I put the seat into the shell, and measured up exactly where the shifter would go. Using a very exact science of closing my eyes and letting my hand fall to exactly where I believed the shifter should be, and it was right on top of the brake lever. Yes, that far back. So the first thing to do was relocate the hand brake further to the rear by by about 100mm. This is where it ended up. The small plate in front was the result of a skin tear, so I plated it just to make sure.

Image

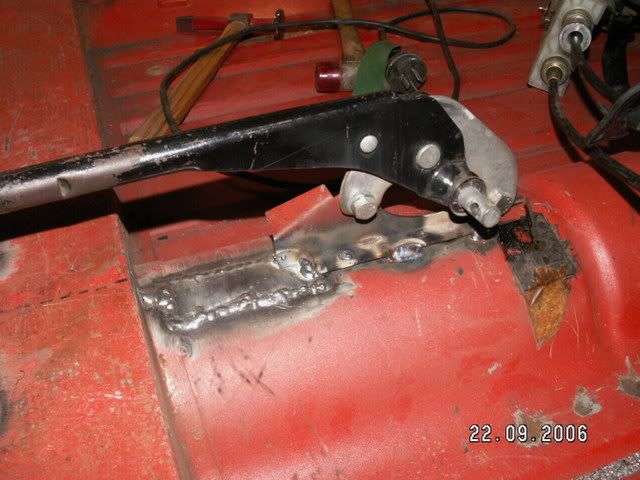
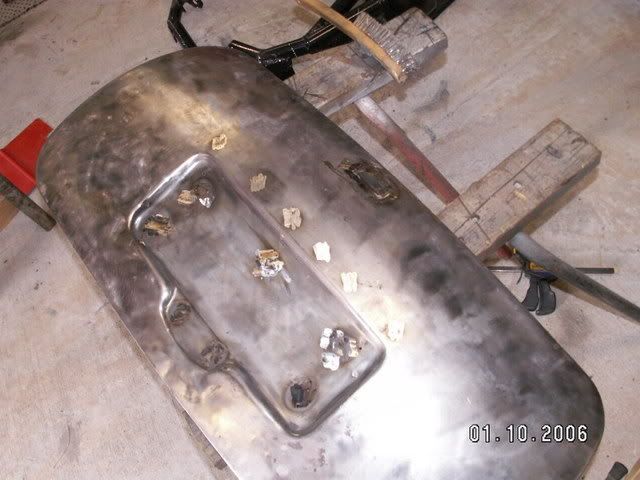
Now, to mount the gearshift mechanism. From most of the spots people have mounted theirs, it looks to me that it is way too far forward (just my opinion, bearing in mind I am vertically challenged!), most likely because people dont want to move the handbrake lever (also my opinion!). To start, I cut out the 'crowns' out of the rear two mount holes, that is the raised platforms that contain the captive nuts that the plastic cradle bolts to. With the crowns cut out, I welded them straight onto the floor crossmember in the spot I had previosuly marked. To mount the front two bolt holes, I cut the whole strip out of the front, with mounting holes attached, bent the ends down, and then welded them onto the transmission tunnel. This is how it turrned out.

Image

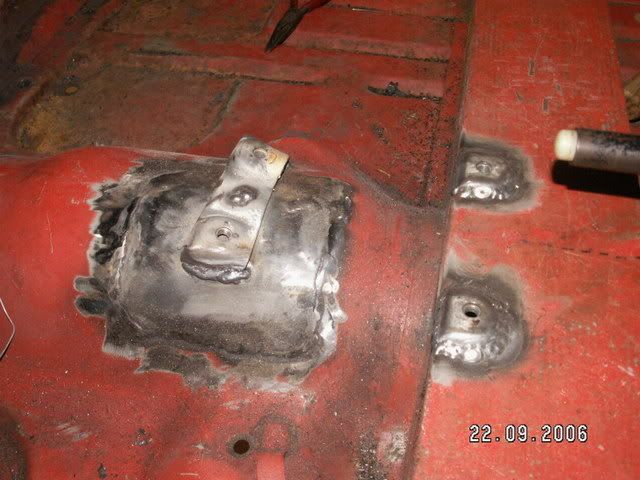
As you can see from the pic, the profile is nice and low, so carpet has a better chance of sitting over it and not looking like Quasimodo's back!

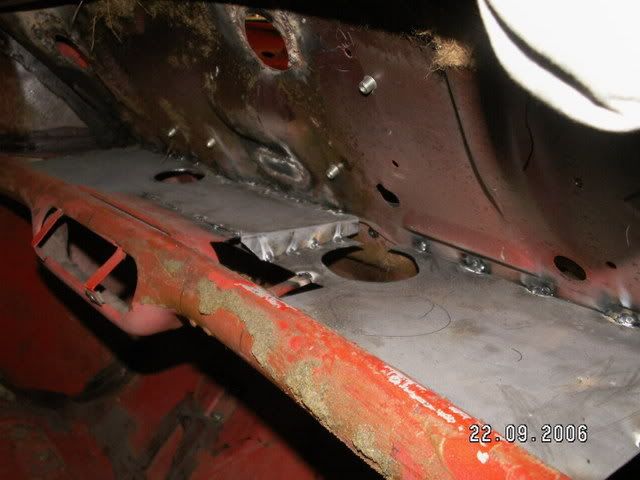
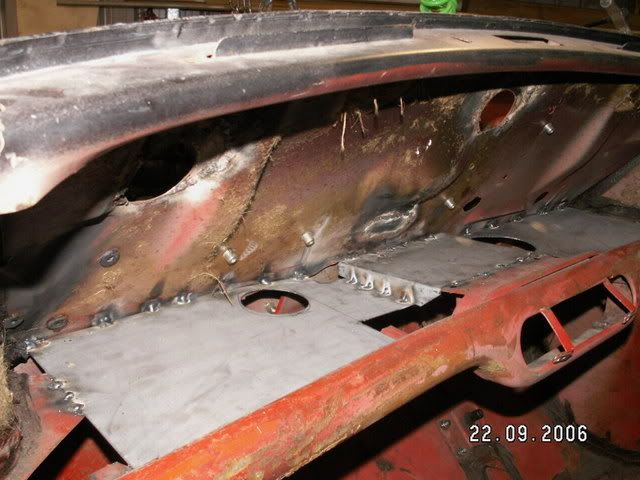
Next up came the dash, or rather, what was under the dash. Because there was so much equipment to be stored behind the dash (ECU's, boost controllers etc), I decided to cut out the spider brace underneath, and plate it with 1.2mm sheet, to make a sort of shelf. The shelf is made in two parts, with one part spanning the entire wdth of the dash, and the second part reinforcing where the heater controls were. The underside will be sprayed with a bit of sound deadening to stop the drumminess. This is the end result:
Image

Image

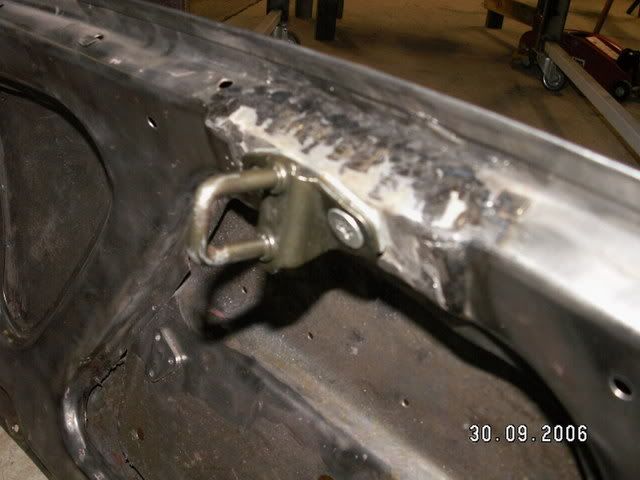
Now it was time to attack the panels proper - the external stuff. I decided that for the boot, I wanted a flush finish. No badges, no handle, nothing protruding except the number plate light. So, I decided to use the electric internal hatch release off the AWD Civic (Project Number II) and graft that onto the Mini. Firstly, was the removal of the latch on the inside, upper lip of the boot. I removed this using a spot weld remover (If you havent got one, get one - great tool!) This is where it had been originally located:

Image

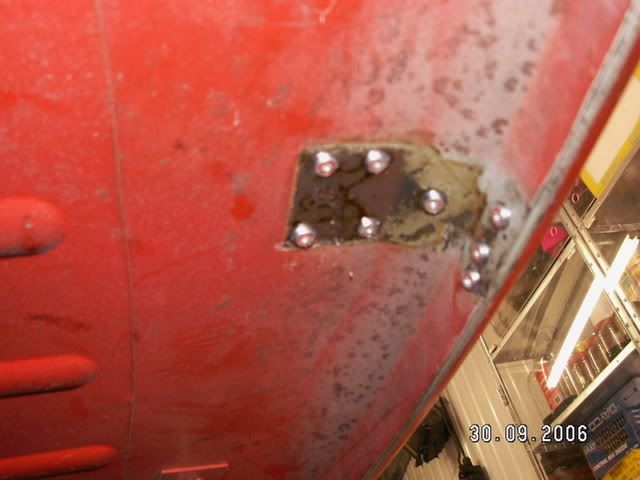
And this is what was removed. See how the spot weld removing tool just cuts around the spot weld to one layer deep. The latch almost fell off at the end. Then just grind off the spot weld 'dimples'.
Image

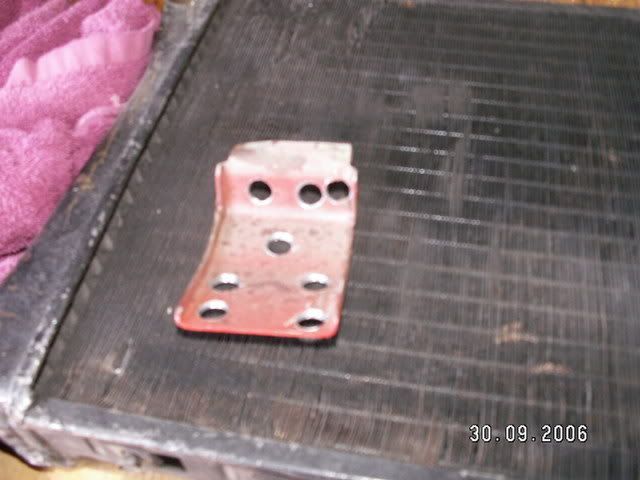
The Mini latch will now be replaced with the Civic latch. Firstly we cut out the section out of the Civic where the latch had been located with the air hacksaw. This is where the tongue in the hatch comes to mate up with the latch.
Image
And this is the part that was cut out.
Image
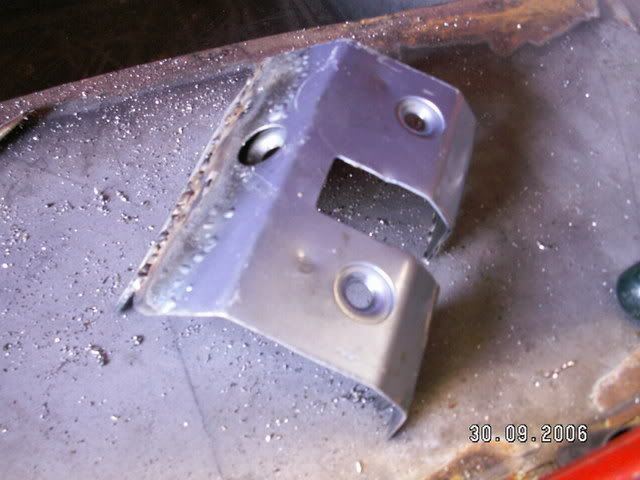
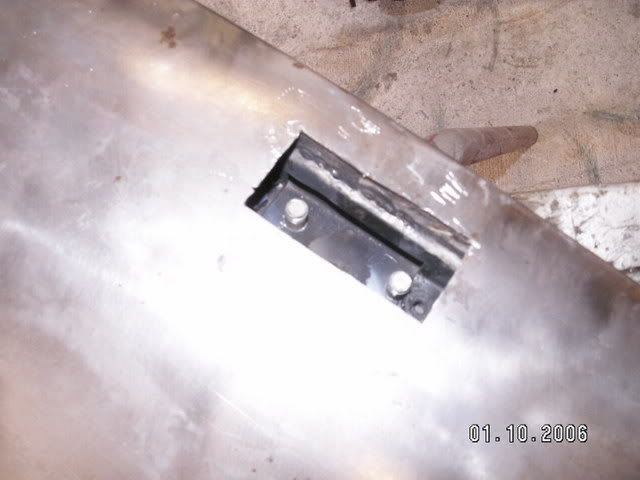
Because we wanted this.....its an electric and cable release for the Civic hatch. Now we will have a fully functioning remote release for the Mini boot.
Image
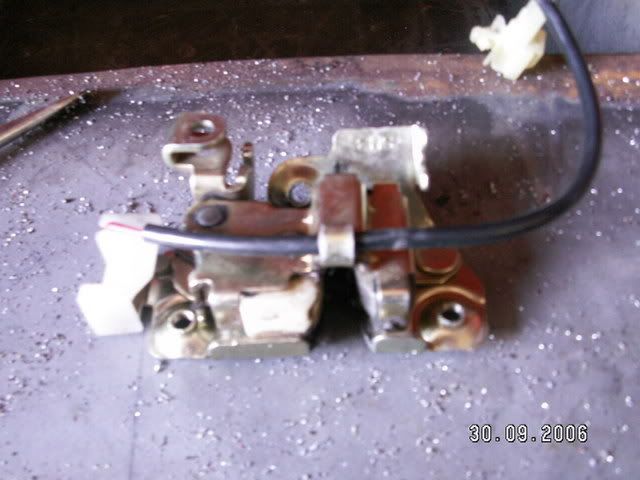
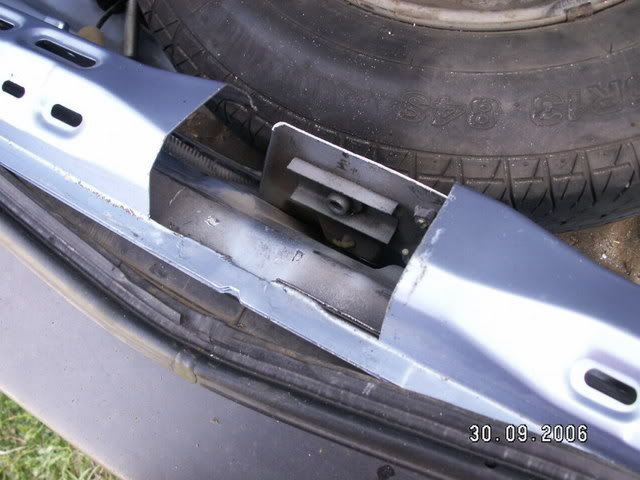
And this is the part welded into place, with the electric strike mounted.
Image

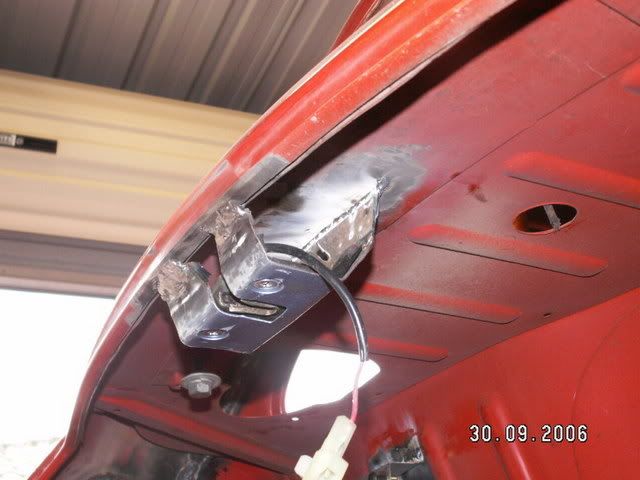
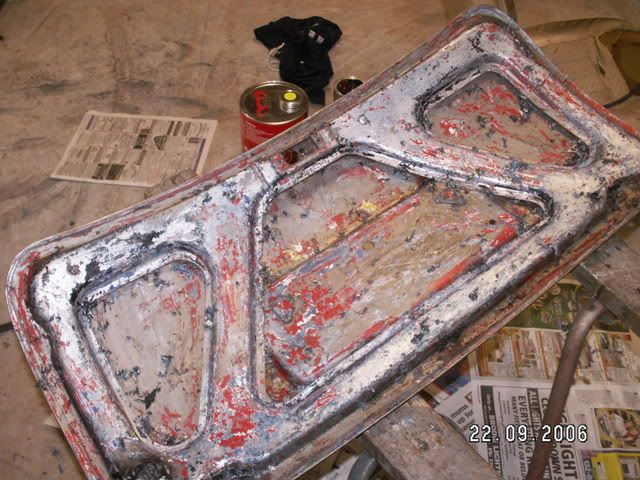
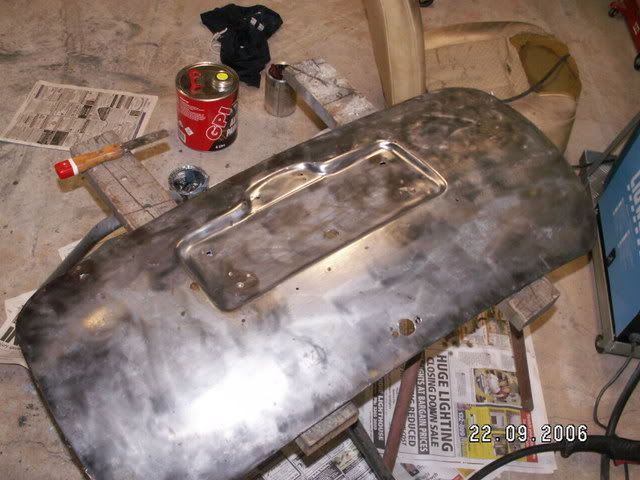
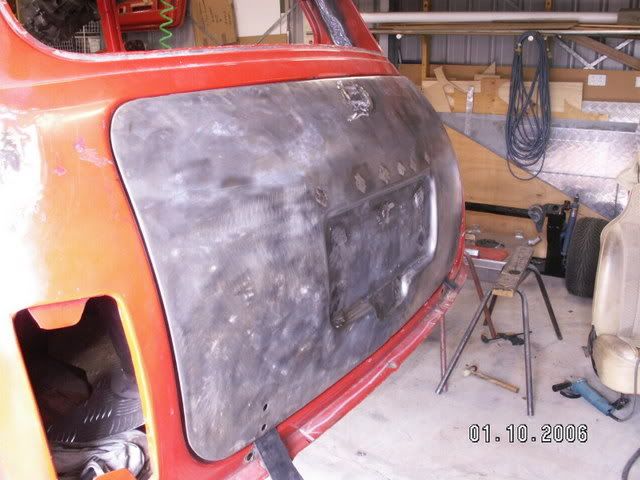
Next up came the task of mounting the tongue onto the Mini boot lid. Before I did any welding etc, I decided to fully strip the Mini boot back to bare metal. This would have to be done regardless, as with a full colour change its the best way. Anyway, it had need of some TLC in the panel beating department as well. What I couldnt get over, was how many layers of paint were on this thing - I counted four, and that was just the topcoats....
Image
This was the end result after a couple of hours with the stripper and wire wheel. On the left you can see the tab welded into place for the gas strut. This will mean that when the boot is remotely released, it will open under its own steam (slowly and precisely), pushed by the strut. The strut will also act as the opening limiter. The gas trut came from a Toyota Camry bonnet.
Image
Image
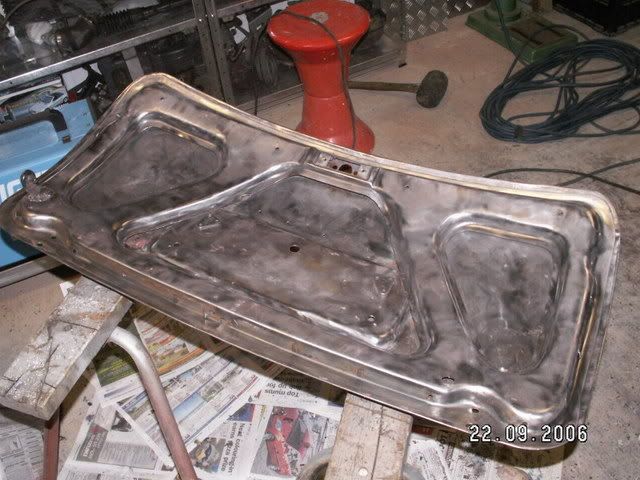
With the boot fully strpped back to bare metal, it was time to plate over where the MIni handle had been, and also the Mini internal latch mechanism. Using 1.2mm plate, simply cut to size, and weld in. You can see the Civic tongue lying next to the boot lid in this picture.
Image
And then grind off flush with the disc sander.....
Image

Next came the task of filling in where the handle protrudes through the boot lid skin, and all those other nastly little holes where they mount the badges etc. The holes where the handle protrudes through, was just cutout to a square shape, to make it nice and easy to weld in the new patch.
Image
And then all the other little holes filled in as well as the plate for the sqaure cutout.
Image
Then of course, we just grind off the welds flush with the skin using the flapper disc...
Image

The last job of the day was mounting the tongue. It had to be positioned exactly, so it would enter the latch without binding and catch the striker just right. A couple of trial fits and the location was marked. I drilled and tapped (hence why we use 1.2mm plate) the boot lid to mount the tongue, using the factory screws.
Image
Image

And this is the end result, a flush bootlid with remote release either by key fob or internal lever release next to the drivers seat. Now all I need to do to finish it is some filling and sanding.
Image

_________________
"Not Speeding Officer..........Qualifying"


Top
 Profile  
 
 Post subject: mmini
PostPosted: Sat Jan 20, 2007 9:29 pm 
Offline
1098cc
1098cc
User avatar

Joined: Tue Mar 23, 2004 10:07 pm
Posts: 1504
Location: melbourne australia
That book lock idea is unreal.

_________________
Image
*Reasonable pricing
*I come to you..
Jay: 0431404607


Top
 Profile  
 
 Post subject:
PostPosted: Sat Jan 20, 2007 9:33 pm 
Offline
1275cc
1275cc
User avatar

Joined: Fri Oct 28, 2005 10:40 pm
Posts: 2051
Location: newcastle
yer i love the boot,,,,

given me a project for this week

_________________
Image


Top
 Profile  
 
 Post subject:
PostPosted: Sun Jan 21, 2007 12:43 am 
Offline
998cc
998cc
User avatar

Joined: Thu Aug 03, 2006 9:00 pm
Posts: 536
Location: Sydney
Ive though of doing this heaps.. You can do it out of any car. I was thinking a holden or something as there parts are cheaps as anything... Pretty simple when you think about it hey.. Its just an actuator a catch and the striker. Simple...

Was even thinking of doing it on a flip front too... Now how cool would that be? Just cant bring myself to cut up the mini but ..

Looks good mate. Just dont get a flat battery in your key fob lol... Make sure you have a cable release aswell. Borrow that from the civic too

Mike

_________________
If it cant be fixed with a hammer it cant be FIXED!!


Top
 Profile  
 
 Post subject:
PostPosted: Sun Jan 21, 2007 9:50 am 
Offline
1275cc
1275cc
User avatar

Joined: Fri Oct 28, 2005 10:40 pm
Posts: 2051
Location: newcastle
i recon you should maybe writing up a HOW-TO article for this,,,,,,

there is alot of people like me that would benefit from it......

_________________
Image


Top
 Profile  
 
 Post subject:
PostPosted: Sun Jan 21, 2007 10:20 am 
Offline
the King of Bling
User avatar

Joined: Thu Jun 03, 2004 11:11 pm
Posts: 19858
Location: Baulkham Hills
That is nice work thier...So makes me want to lean to weld also.

I not a big lover of Badges also 8)

_________________
Stop Licking the Dog...I Don't Care Who Started It


Top
 Profile  
 
 Post subject:
PostPosted: Wed Jan 31, 2007 8:32 pm 
Offline
Yay For Hay!
User avatar

Joined: Wed Sep 08, 2004 9:27 pm
Posts: 15912
Location: Wodonga - Vic/NSW border
very very cool Andy - didn't realise there was an update till just now - sorry :oops:

_________________
did I tell you that I won a trophy?


Top
 Profile  
 
 Post subject:
PostPosted: Thu Feb 01, 2007 11:46 am 
Offline
848cc
848cc

Joined: Thu Nov 02, 2006 9:04 am
Posts: 163
Location: Adelaide S.Australia
Mike,
You have taken the words right out of my mouth with the catch and gas strut for the flip front. Your not waiting for mine to be done first are you? I'm rrying desperately to squeeze blood out of a stone when it comes to time as I do my mech eng. in the evenings as well as getting ready for our wedding in April. I have nearly finished my write-up in word doc, but I would love to finish it off by using catches and gas strut... Hmmm, bloody time!!!!! Hehe.

Nice work so far tricky, keep up the good work
cheers,
Ciaran


Top
 Profile  
 
 Post subject:
PostPosted: Mon Feb 05, 2007 5:26 pm 
Offline
1098cc
1098cc
User avatar

Joined: Sun Oct 10, 2004 4:04 pm
Posts: 1533
Location: melbourne, victoria
hope the battery is not in the boot :)


Top
 Profile  
 
 Post subject:
PostPosted: Tue Feb 06, 2007 7:10 am 
Offline
1275cc
1275cc
User avatar

Joined: Fri Jun 17, 2005 10:31 am
Posts: 3183
Location: Burpengary, Queensland - Home of Tricky Performance Engineering
Nah, Floss, they are in the rear side pockets!

There are two of them, one for starting the engine, and one for running the ancilliaries, they link when the motor is running but when the ignition is off they are seprated.

That way I shouldnt get a flat battery.

Cheers,
Tricky

_________________
"Not Speeding Officer..........Qualifying"


Top
 Profile  
 
 Post subject:
PostPosted: Tue Feb 06, 2007 2:24 pm 
Offline
848cc
848cc

Joined: Mon Jan 22, 2007 8:38 am
Posts: 490
Location: Carlingford, NSW
Wow.

Have worked my way through this thread in a state of absolute amazement. What you're building over there is awesome, to say the least.

Looking forward to the next update! :D


Top
 Profile  
 
 Post subject:
PostPosted: Wed Feb 07, 2007 8:35 am 
Offline
1275cc
1275cc
User avatar

Joined: Fri Jun 17, 2005 10:31 am
Posts: 3183
Location: Burpengary, Queensland - Home of Tricky Performance Engineering
Thanks Smegger,

Your close by, feel free to drop around sometime!

Cheers,
Tricky

_________________
"Not Speeding Officer..........Qualifying"


Top
 Profile  
 
 Post subject:
PostPosted: Wed Feb 07, 2007 10:36 pm 
Offline
848cc
848cc

Joined: Thu Nov 02, 2006 9:04 am
Posts: 163
Location: Adelaide S.Australia
Tricky...
With all this work on the boot, I am surprised you didn't add a gass strut and internal hinging. Could be a bit tricked up then for keyless pop open. This is what I would be doing soon. ... ;)


Top
 Profile  
 
Display posts from previous:  Sort by  
Post new topic Reply to topic  [ 1864 posts ]  Go to page Previous  1 ... 9, 10, 11, 12, 13, 14, 15 ... 125  Next

All times are UTC + 10 hours


Who is online

Users browsing this forum: No registered users and 21 guests


You cannot post new topics in this forum
You cannot reply to topics in this forum
You cannot edit your posts in this forum
You cannot delete your posts in this forum
You cannot post attachments in this forum

Jump to:  

© 2016 Ausmini. All garage work involves equal measures of enthusiasm, ingenuity and a fair degree of irresponsibility.