Ausmini
It is currently Sat Jul 19, 2025 3:10 pm

All times are UTC + 10 hours


Post new topic Reply to topic  [ 9 posts ] 
Author Message
 Post subject: Rubber Cone Compresor
PostPosted: Wed Jan 24, 2007 8:35 pm 
Offline
998cc
998cc
User avatar

Joined: Wed Jul 20, 2005 8:23 pm
Posts: 776
Location: Concord West, NSW
Guys,
Has anyone got a cone compressor that i can borrow for a weekend??

Dan


Top
 Profile  
 
 Post subject:
PostPosted: Wed Jan 24, 2007 8:47 pm 
Offline
848cc
848cc
User avatar

Joined: Sun Nov 26, 2006 8:51 pm
Posts: 254
Location: Mornington
hi, can u please take some photo's of the section when your going to use the compressor tool on the cone. i need to do mine and i havent seen any pictures of anyone doing it. if you could that would be a big favor.

thanks
craig


Top
 Profile  
 
 Post subject:
PostPosted: Wed Jan 24, 2007 9:05 pm 
Offline
848cc
848cc
User avatar

Joined: Sun Jan 14, 2007 7:51 pm
Posts: 176
Location: The big island
You could always make one. Go to your local bolt shop and buy 300mm to 400mm of 1/2 UNF threaded rod, a couple of sturdy 1/2 washers, 3 1/2 unf nuts. Find a piece of pipe that fits nicely on the rod (and a little shorter) in the shed and you have all that you need. Remove the rubber plugs in the body over the cones, wind 2 of the nuts on one end of the rod and lock them together. Wind the rod down into the cone about 10 turns, then remove both nuts. Slide one washer and then the pipe over the rod (washer stops pipe from damaging the car where pipe sits) another washer on top of the pipe and then a nut. Wind the nut down and you are compressing the cone upwards. Removal is the reverse order.
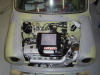
I also found it easier to remove the engine mount on the drivers side to get the upper arm rod/pin out and this saved having to buy brake fluid and bleed the brakes from removing the brake lines. Also I had a new mount to put in.
This was on a Clubbie so no idea about the rest.
Also dont buy mild steel rod or the thread might pull off.
Or you could just borrow one. :oops:


Top
 Profile  
 
 Post subject:
PostPosted: Wed Jan 24, 2007 9:36 pm 
Offline
1275cc
1275cc
User avatar

Joined: Wed Jun 14, 2006 9:45 pm
Posts: 4031
Location: Adelaide, SA
I used one fat length of the correct thread, preferably high tensile and two big nuts. One was welded to top of theard and the other is what pushes against the top of the subframe tower. The truth behind it all is you don't need a fancy tool, it's probably safer or easier with a fancy tool, but it is entirely possible with a thread two nuts (if you have a welder or or 3 nuts in which 2 can be locked together tightly instead of welding one to the thread) and a large spanner. Improvments to my tool would be a large washer or falt piece of emtal to help spread the tension over instead of just over a nut.

_________________
1964 Morris 850, 1330 Supercharged - 81.8hp atws.
1975 Leyland Mini S 1100S powered - Nice and reliable.
1977 Leyland Mini LS - Project LS-T 8)


Top
 Profile  
 
 Post subject:
PostPosted: Wed Jan 24, 2007 9:43 pm 
Offline
religious status
religious status
User avatar

Joined: Fri Mar 19, 2004 6:19 pm
Posts: 39754
Location: near Baulkham Hills, NSW
You need to spread the load out around the mounting bolts/studs, the big hole in the middle has no tube around it, crossmember will collapse down when you start tightening unless you do this.
Here's a pic of mine-
Image

_________________
DrMini- 1970 wasaMatic 1360, Mk1S crank, 86.6HP (ATW) =~125 @ crank, 45 Dellorto (38 chokes), RE282 sprint cam, 1.5 rockers, 11.0:1 C/R. :mrgreen:


Top
 Profile  
 
 Post subject:
PostPosted: Wed Jan 24, 2007 9:50 pm 
Offline
1275cc
1275cc
User avatar

Joined: Wed Jun 14, 2006 9:45 pm
Posts: 4031
Location: Adelaide, SA
I did it as I typed above no drama. I ahve seen many version, Dr MIni your does look a little over done though. But safety first.

_________________
1964 Morris 850, 1330 Supercharged - 81.8hp atws.
1975 Leyland Mini S 1100S powered - Nice and reliable.
1977 Leyland Mini LS - Project LS-T 8)


Top
 Profile  
 
 Post subject:
PostPosted: Wed Jan 24, 2007 9:56 pm 
Offline
religious status
religious status
User avatar

Joined: Fri Mar 19, 2004 6:19 pm
Posts: 39754
Location: near Baulkham Hills, NSW
Not quite as heavy as it looks, that round bit is 2" exhaust pipe.. see the seam?? :lol:
There's a bronze washer sits on top, reduces friction of the nut when tightened.
OIL THE THREADS!!! :wink:

_________________
DrMini- 1970 wasaMatic 1360, Mk1S crank, 86.6HP (ATW) =~125 @ crank, 45 Dellorto (38 chokes), RE282 sprint cam, 1.5 rockers, 11.0:1 C/R. :mrgreen:


Top
 Profile  
 
 Post subject:
PostPosted: Thu Jan 25, 2007 6:52 am 
Offline
848cc
848cc

Joined: Mon Dec 05, 2005 7:57 pm
Posts: 52
Location: New Zealand
My dad made one in 1973...very similar to the one pictured......has four triangular fillets welded onto the tube to spread load.....he also tack welded on a tapered roller bearing on the top for when the "pain" comes on............and I use it now to do my minis.......
On the thread that winds into the cone, cut a flat with a semi sharp edge-this acts to clean out any crap and sort of chase the thread out-use WD 40.......and as said, a few squirts of oil......... :wink:

_________________
If you idiot proof the world, only idiots there shall be!!!!!


Top
 Profile  
 
 Post subject:
PostPosted: Tue May 26, 2009 7:01 pm 
Offline
1275cc
1275cc
User avatar

Joined: Wed Jun 14, 2006 9:45 pm
Posts: 4031
Location: Adelaide, SA
A mate was asking me about spring compressors and ended up on this page.

When I re-read this I realised I said that you don't need a washers, turns out I was using a large steel washer and totally forgot when typing the response.

Just thought I'd add that in the interest of anyone who does infact actually use the search function.

_________________
1964 Morris 850, 1330 Supercharged - 81.8hp atws.
1975 Leyland Mini S 1100S powered - Nice and reliable.
1977 Leyland Mini LS - Project LS-T 8)


Top
 Profile  
 
Display posts from previous:  Sort by  
Post new topic Reply to topic  [ 9 posts ] 

All times are UTC + 10 hours


Who is online

Users browsing this forum: No registered users and 71 guests


You cannot post new topics in this forum
You cannot reply to topics in this forum
You cannot edit your posts in this forum
You cannot delete your posts in this forum
You cannot post attachments in this forum

Jump to:  

© 2016 Ausmini. All garage work involves equal measures of enthusiasm, ingenuity and a fair degree of irresponsibility.