Ausmini
It is currently Fri Jul 18, 2025 11:01 pm

All times are UTC + 10 hours


Post new topic Reply to topic  [ 64 posts ]  Go to page Previous  1, 2, 3, 4, 5  Next
Author Message
 Post subject:
PostPosted: Thu Sep 27, 2007 9:22 pm 
Offline
848cc
848cc

Joined: Tue May 01, 2007 10:18 pm
Posts: 114
since i got a 64 model that means i gotta slaves for the rear?


Top
 Profile  
 
 Post subject:
PostPosted: Thu Sep 27, 2007 9:32 pm 
Offline
religious status
religious status
User avatar

Joined: Fri Mar 19, 2004 6:19 pm
Posts: 39754
Location: near Baulkham Hills, NSW
Yes you have two 3/4" rear wheel cylinders (slaves), and a pressure limiting valve on the rear subframe.

_________________
DrMini- 1970 wasaMatic 1360, Mk1S crank, 86.6HP (ATW) =~125 @ crank, 45 Dellorto (38 chokes), RE282 sprint cam, 1.5 rockers, 11.0:1 C/R. :mrgreen:


Top
 Profile  
 
 Post subject:
PostPosted: Thu Sep 27, 2007 9:53 pm 
Offline
This space for rent
User avatar

Joined: Thu Feb 08, 2007 12:40 pm
Posts: 5455
Location: Melbourne
My car has ¾" slave cylinders on the rear.. I'll be changing those for ⁵⁄₈" on Saturday.

As for the master cylinder, I still don't know whether or not I'll have to do any work on mine -- we'll find out tomorrow. There's a chance the non-return valve (if it's actually fitted) in my master will prevent the caliper pistons from releasing the discs, and there's probably an equal chance that it's worn enough to work.

-- Simon

_________________
Simon

The adventures of an owner builder in the Tallarook Ranges

Image


Top
 Profile  
 
 Post subject:
PostPosted: Thu Sep 27, 2007 10:04 pm 
Offline
1098cc
1098cc
User avatar

Joined: Sat Dec 17, 2005 7:58 am
Posts: 1284
Location: Yarraville, Melbourne
Looking good, I'll eagerly await the outcome. :D

_________________
1970 Mini Deluxe - 1275, Weber, Clive 346 cam, MS 4-pot slotted discs, Megajolt ignition Now with new improved Mambas... almost on the road
1966 Van with Traveller rear seat conversion
2008 Prado GXL
All in various states of repair...


Top
 Profile  
 
 Post subject:
PostPosted: Thu Sep 27, 2007 10:20 pm 
Offline
religious status
religious status
User avatar

Joined: Fri Mar 19, 2004 6:19 pm
Posts: 39754
Location: near Baulkham Hills, NSW
⁵⁄₈" = 5/8" as used on Cooper S?

_________________
DrMini- 1970 wasaMatic 1360, Mk1S crank, 86.6HP (ATW) =~125 @ crank, 45 Dellorto (38 chokes), RE282 sprint cam, 1.5 rockers, 11.0:1 C/R. :mrgreen:


Top
 Profile  
 
 Post subject:
PostPosted: Thu Sep 27, 2007 10:27 pm 
Offline
This space for rent
User avatar

Joined: Thu Feb 08, 2007 12:40 pm
Posts: 5455
Location: Melbourne
drmini in aust wrote:
⁵⁄₈" = 5/8" as used on Cooper S?


Err, yes.. does that not display right? Looks fine on the Mac 8)

_________________
Simon

The adventures of an owner builder in the Tallarook Ranges

Image


Top
 Profile  
 
 Post subject:
PostPosted: Fri Sep 28, 2007 4:23 pm 
Offline
religious status
religious status
User avatar

Joined: Fri Mar 19, 2004 6:19 pm
Posts: 39754
Location: near Baulkham Hills, NSW
sgc wrote:
drmini in aust wrote:
⁵⁄₈" = 5/8" as used on Cooper S?


Err, yes.. does that not display right? Looks fine on the Mac 8)

Maybe- but us pov Mini owners can't afford Macs... if we could we'd be driving a Porsche or something too. :lol:

_________________
DrMini- 1970 wasaMatic 1360, Mk1S crank, 86.6HP (ATW) =~125 @ crank, 45 Dellorto (38 chokes), RE282 sprint cam, 1.5 rockers, 11.0:1 C/R. :mrgreen:


Top
 Profile  
 
 Post subject:
PostPosted: Fri Sep 28, 2007 7:10 pm 
Offline
This space for rent
User avatar

Joined: Thu Feb 08, 2007 12:40 pm
Posts: 5455
Location: Melbourne
drmini in aust wrote:
Maybe- but us pov Mini owners can't afford Macs... if we could we'd be driving a Porsche or something too. :lol:


Meh.. this Mac was about $1800.. cheaper'n a Dell.

_________________
Simon

The adventures of an owner builder in the Tallarook Ranges

Image


Top
 Profile  
 
 Post subject:
PostPosted: Fri Sep 28, 2007 8:16 pm 
Offline
848cc
848cc
User avatar

Joined: Fri Jan 13, 2006 11:24 am
Posts: 404
Location: Mandurah, WA
Bah Ive got a mac too, not spensive at all......

8)

_________________
68 Mini
70 Moke


Top
 Profile  
 
 Post subject:
PostPosted: Fri Sep 28, 2007 9:23 pm 
Offline
This space for rent
User avatar

Joined: Thu Feb 08, 2007 12:40 pm
Posts: 5455
Location: Melbourne
OK, update time.

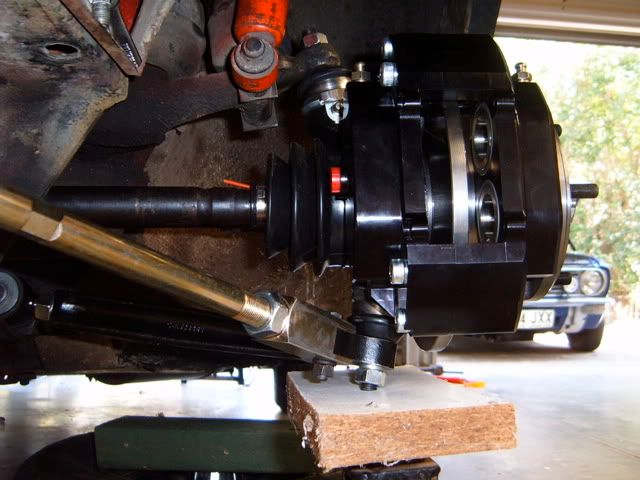
The day started well, with assembly of the CVs and driveshafts and fitment to the car. Can't remember where I picked up this trick, but it's a good'un -- a length of thin plastic pipe (the nozzle of an old can of WD40) inserted into the CV boot, which allows the boot to 'breathe'. When the brakes get hot, that heat is transferred to the CV and the air in the boot expands. If it's sealed, the boot expands as well and can rub against the upright, wearing a hole. This bit of pipe solves that :)

Image

With the drive shafts fitted, we could fit the uprights:

Image

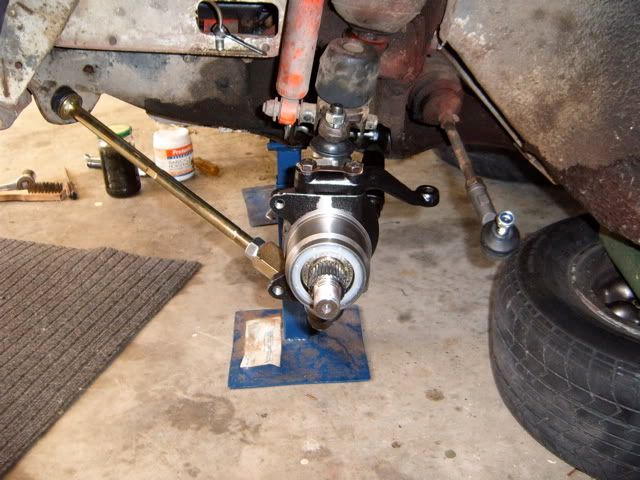
.. and with the uprights on, the discs and drive flanges were next (although not yet torqued):

Image

This is all going very well. Next up, fit a caliper and double-check that we have clearance to the wheel.

Image

Yep, it's all good. ALL good 8) 8)

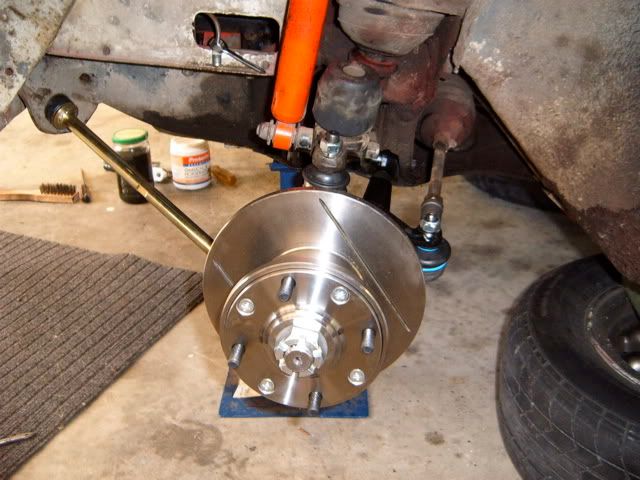
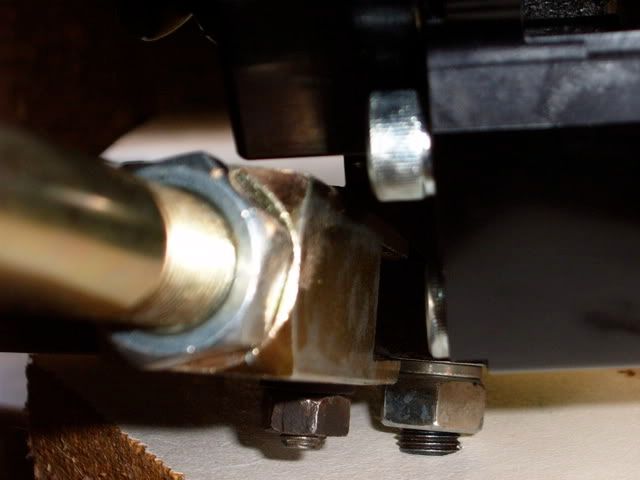
Um, wait a minute. Mini Spares said something about some undefined clearance problem between the calipers and adjustable lower arms. Better figure out what that's all about. With the car in the air and the suspension at full throw, there's a clearance problem alright. Only about 2/3rds lock is available before the caliper touches the big, square section on the caster bar:

Image

The way I see it, I'm not likely to be asking for full steering lock while I'm getting air, so this is unlikely to be a major problem :lol: 
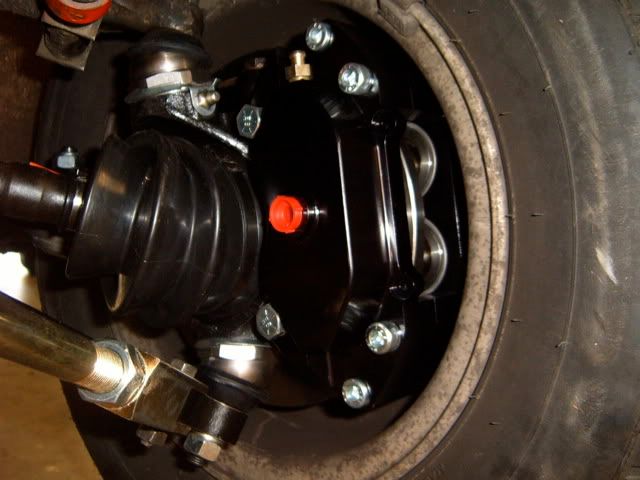
From the looks of it, it appeared that with the suspension at normal ride height the caliper would clear the arm, and it turns out that this is true:

Image

At full lock, there's still a few millimetres between the caliper and the caster bar, so we're safe. It's a bit hard to make out from this shot, but a miss is as good as.

Image

Well, so far, so good. We got this far in only a couple of hours, so it looked like we'd have the car on the road in the afternoon. Best laid plans, and all...

Decided the next thing to do would be to get the brakes bled. It was about now that I realised I'd fitted the calipers without attaching the brake hoses. Why, oh why isn't there a union fitted to the end of the hoses!? The calipers had to come off in order to get the hoses attached, but hey, no biggie. While we were there, we got the pads fitted up (after grinding a few millimetres of the corners of the backing plates of the inside pads so they clear the calipers).. looking good 8)

Calipers back on, it was time to bleed. I picked up a Gunson's Eezibleed with the Mini Spares order, so figured bleeding would be a snap. Not so, unfortunately -- as I suspected, the kit doesn't come with a master cylinder cap suitable for the large Lockheed plastic reservoir. As I don't have a spare cap, I ended up modifying my cap to allow the Eezibleed to fit. As a result, I now have a master cylinder cap with a bolt in it, sealing up the hole we made :shock: No photo, unfortunately.

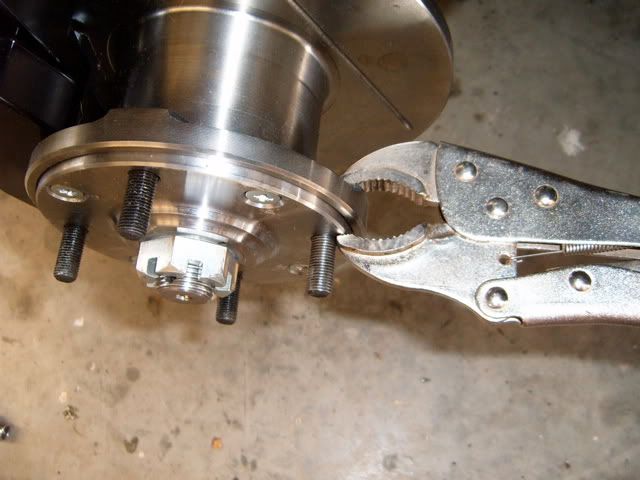
So anyway, back to bleeding. With the system nearly completely evacuated after the disassembly, the rears were the best place to start. That meant getting the rear wheels off, which meant getting the front wheels on and the car off the axle stands. While fitting up one of the front wheels, we discovered that one of the wheel studs had not been press fitted very well and spun in its seat, stripping its splines :evil: :evil: :evil:

Image

Nobody nearby could supply me with a new stud, so it got Loctite'd in. Here's hoping it holds :?

Image

From here, things seemed to take a bit of a downhill turn. Bleeding the brakes turned out to be a #$@* of a job. The Eezibleed probably works pretty well with the master cylinders for which it has caps, but I couldn't get a good seal with mine which meant we had brake fluid leaking all over the place. Eventually though, we got all (most?) of the air out of the system and attempted to get a pedal.

Attempted, that is.

No go. The pedal goes pretty much all the way to the floor on the first stroke, and after a few pumps comes up to about half way. Once there, pressure can be held and the brakes seem to work pretty well, but release your foot and it's back to square one. There doesn't seem to be any air in the system, we've put at least a litre of fluid through and there's very little, if any air being expelled.

I'm at a bit of a loss as to why we can't get a pedal. With drums all round, the pedal was high and hard, but now.. :?: :?: Anyone have any suggestions?

My suspicion is that the 4-piston calipers require a larger volume of fluid moved before the pads engage the discs, and the drum-type master cylinder isn't moving enough. Pumping the pedal quickly delivers enough fluid to get a pedal, and it's all returned to the master cylinder when you let the pedal go. Does that sound reasonable?

If so, what's the best master cylinder to get?

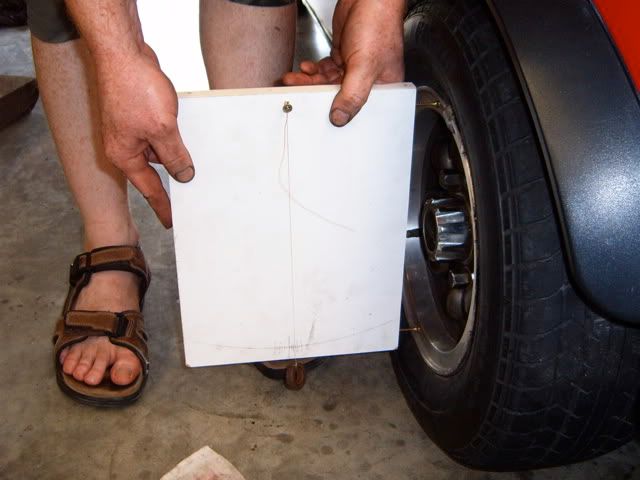
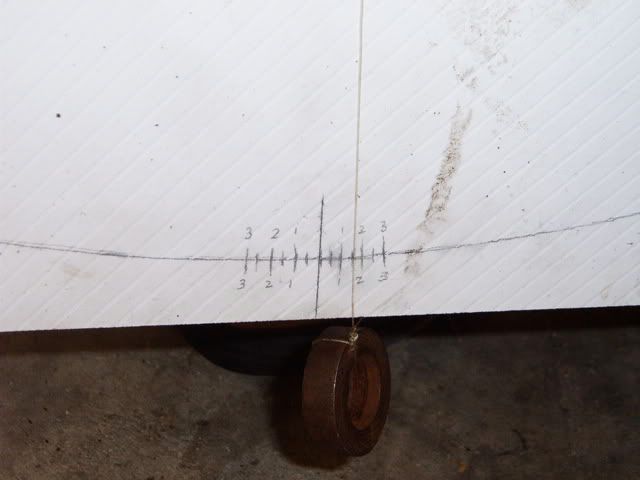
Anyway, with on-road plans scuttled and an hour to kill, I decided to have a play with my make-shift camber gauge. Amazing how easy it is to adjust -- I now have 1.5 degrees negative on each side.. a major improvement over the 1 deg negative / 0.75 deg positive with the standard arms :D

Image

Image

Oh, and the only other thing: Getting 150 ft-lbs of torque on the drive shaft nut is not a very nice job. Getting the split pin holes lined up once it's torqued is even less fun. Let us never speak of this again :lol:

_________________
Simon

The adventures of an owner builder in the Tallarook Ranges

Image


Top
 Profile  
 
 Post subject:
PostPosted: Fri Sep 28, 2007 9:37 pm 
Offline
1098cc
1098cc
User avatar

Joined: Tue Jan 11, 2005 9:07 pm
Posts: 1336
Location: Emu Plains, NSW
Can tell us how you made this please (the degree markings that is)
By the way the whole setup looks fantastic, hope you can sort out the pedal pressure.
Image
Cheers Pete

_________________
A recent study found the average Aussie walks about 900 miles a year
Another study found Aussies drink, on average, 22 gallons of alcohol a year
That means, on average, Australians get about 41 miles per gallon

Kind of makes you proud to be an AUSSIE


Top
 Profile  
 
 Post subject:
PostPosted: Fri Sep 28, 2007 9:53 pm 
Offline
848cc
848cc
User avatar

Joined: Fri Jan 13, 2006 11:24 am
Posts: 404
Location: Mandurah, WA
This is a great thread!! Keep it coming, its very interesting to see the different problems and ideas. I like the simplicity of the camber guage, would make a good how to .........

btw the brakes look great.

_________________
68 Mini
70 Moke


Top
 Profile  
 
 Post subject:
PostPosted: Fri Sep 28, 2007 9:58 pm 
Offline
1360cc
1360cc
User avatar

Joined: Thu Feb 03, 2005 1:41 pm
Posts: 12311
Location: Rockingham - Collie WA
:? Hmmmm, perhaps it might be worth bedding in your new pads
(on a controlled private road of course) as I think it may actually be your brand new piston seals pushing the pots all the way back.

Once the seals loosen up a bit the pots should remain partially extended, only pushed back by the disc against the pads.

Of course you can check the volume of the master cylinder against the volume of your new pots + the rear cylinders, but I doubt that is the problem.
And asking the obvious, the rears are adjusted properly so that you aren't using up fluid capacity there too?

_________________
Too many cars, and too little time.


Top
 Profile  
 
 Post subject:
PostPosted: Fri Sep 28, 2007 10:06 pm 
Offline
SooperDooperMiniCooper ExpertEngineering
User avatar

Joined: Fri Apr 29, 2005 9:46 am
Posts: 18887
Location: Under the bonnet son!
Just an old trick I was told many moons ago.

Puty a plank of wood between the brake pedal and the crossmember (or chair or where ever you can jam it). Have it to it jams the pedal down hard (pump it up as high as you can so it has something to press against).

Leave this overnight or as long as you can and then bleed the system.

I think it works by squeezing all the airbubbles down to a tiny poofteenth of their original size inside the brake system. Then they suddenly find it much easier to float up to the top through all the small passages.

There's also a procedure to bleeding the wheels in the right order, can't remeber it right now but it is in the manual.

Mini brake systems are a black art sometimes.

_________________
SooperDooperMiniCooperExpertEngineering

All garage work involves equal measures of enthusiasm, ingenuity and a fair degree of irresponsibility.


Top
 Profile  
 
 Post subject:
PostPosted: Fri Sep 28, 2007 10:19 pm 
Offline
This space for rent
User avatar

Joined: Thu Feb 08, 2007 12:40 pm
Posts: 5455
Location: Melbourne
deluxe_68 wrote:
Can tell us how you made this please (the degree markings that is)


It's really quite straightforward.

1. Drive a couple of screws into the side of the MDF at the correct spacing to sit on your wheels. Try to get them more or less even, but it's not critical. What is critical is that you don't move them once they're set.

2. Drive a screw (or nail) into the top of the board, roughly centred, and attach a bit of fishing wire. This should be long enough so that your weight (a heavy washer in my case) hangs below the bottom of the board, and can swing freely.

3. Take a pencil, hold onto the fishing line close to the bottom of the board, and draw an arc.

4. Find a perfectly vertical surface. I used one of the steel posts holding up the garage :)

5. Hold the screws on the side of the gauge up against the vertical, and allow the fishing line to hang vertically. Mark where it crosses your drawn arc. This calibrates your gauge to the vertical.

6. Measure the distance from the screw holding the fishing line to your drawn arc. Call this distance 'y'. The aim is to use Pythagoras to determine what distance (call this 'x') along the arc represents one degree. The equation for this is:

x = y * tan 1

Once you know 'x', you can make marks either side of your zero degree position which represent one degree. I found it easier to mark every degree, then mark the half degrees by eye rather than trying to measure tiny fractions of millimetres.

Voila! One home made camber gauge.

_________________
Simon

The adventures of an owner builder in the Tallarook Ranges

Image


Top
 Profile  
 
Display posts from previous:  Sort by  
Post new topic Reply to topic  [ 64 posts ]  Go to page Previous  1, 2, 3, 4, 5  Next

All times are UTC + 10 hours


Who is online

Users browsing this forum: No registered users and 18 guests


You cannot post new topics in this forum
You cannot reply to topics in this forum
You cannot edit your posts in this forum
You cannot delete your posts in this forum
You cannot post attachments in this forum

Jump to:  

© 2016 Ausmini. All garage work involves equal measures of enthusiasm, ingenuity and a fair degree of irresponsibility.