|
I know - I know - high resistance spark plug, so when you pull the cap half off causing a spark across the gap between the lead and the plug the spark charge builds up enough charge first to jump the gap, and therefore feed a higher (and shorter) charge to the plug so that it fires OK.
How do I know???, let me relate a lengthy story to you all that was first written several years ago for the club mag ....
The next time you’re stopped on the side of the road shivering in the freezing cold, wind and rain, trying to diagnose a problem in your electrical system in the dark of night with no light other than a flickering street light 100 metres down the deserted road – just spare a thought for those poor people with the later model Rover Minis that have…..
<cue suspense music>
LUCAS ELECTRONICS
After many decades of practical joking, Lucas, The Prince of Darkness, was growing tired of playing the same old jokes all of the time. Just how many times can a fun loving Prince have a laugh at some poor human when he burns his fingers on a smoldering switch that he has grossly overloaded by innocently swapping to H4’s? Or when someone runs off the road in the rain while trying to peer out of a dirty windscreen because the wipers only work sometimes? Although his personal favorite of suddenly stopping the engine when a truck coming the other way throws water over the front of the car still managed to give him a little chuckle deep down.
Plus it was getting a lot harder to play his old jokes these days. The word was spreading that the simple use of electrical relays in the headlight circuit and rubber gloves with the tips of the fingers cut off would foil many of his attempts at his old repertoire of practical jokes.
Lucas was bored. He needed some new tricks.
Then one day when Lucas was too bored to go out joking, he was tinkering aimlessly in his workshop when he suddenly had a brilliant idea. What if he could redesign some of his more simple circuits into far more complex ones? The more he thought about it, the more his smile started to return. But why stop there – why not incorporate little sealed black boxes filled with redundant sub-circuits. He could even have revenge on those smarties that fitted relays to foil his switch overload jokes by building a few – no make that 20 or so relays randomly inserted into the circuits. He could then make the looms so thick and bulky that those uneducated humans would be so amazed at the complexity that they wouldn’t dare try to fix it themselves.
Lucas’ life suddenly had a direction again and he set to work with renewed vigor on his new designs. First thing he did was ring his cousin, Bill, in Seattle and asked him for some tips. Bill wasn’t a lot of help though. He just kept rambling on about making things only 99.9% backward compatible and insisting that he would have to incorporate “random blue screen generators” – what ever they were.
Lucas decided that he would start out small and slowly build up to his greatest masterpiece. Over the years he kept himself amused with little tricks like the Rear Demister – a simple mechanism of heated wires that warmed the rear window, that would gauge the height of the driver and isolate the heating wire of optimum height from the circuit so that when the driver checked his mirror, all he would see was a line of fog across the centre of his field of vision through an otherwise clear window. And who can forget his other great idea of a multi-function control stalk to replace the comparatively simple indicator switch, with a random selector built in to determine which of the multiple-functions wouldn’t work at any one time.
But eventually his greatest creation was ready to be unleashed onto the world – the MEMS (Modular Engine Management System) incorporating his piece de resistance.. the ECU (Electronic Control Unit). Lucas was confident that this would keep him amused for many more decades to come. It was so complex that the potential for practical jokes was endless. He even made some of them “features” – one thing that his cousin Bill had told him was “call it a feature then you can charge them more for it”. Like the Fuel Cutoff Inertia Switch – which he could market as a safety feature that would stop the fuel pump if the car were in an accident, that he had actually designed to cut the engine and stop the car in the middle of the busiest intersections whenever the car hit a small pothole in the road.
Well, so much for the past. Let me now tell you a tale of a recent battle that I waged against HRH Lucas, the Prince of Darkness, and his allies.
Recently we bought our second Rover Cooper so that my wife and I could both have a more reliable every-day Mini to drive (stop laughing – there are such things a reliable Minis). When we bought it, it had to be roadworthied, so we took it to the local guy – the result wasn’t too bad, a ball joint and a couple of other minor things. So the next weekend I fixed these things and gave the car a full service while I was at it. Back to the local Roadworthy guy for a re-test with a pass and that should have been it – time to sit back and enjoy the motoring.
A couple of days later, whilst driving home along the freeway it rained – very heavily with strong gusts of headwind. Then all of a sudden the car was only running on 3 cylinders. Luckily it wasn’t far to limp home in the dark and rain, trailing a large cloud of thick black smoke (only running a bit rich).
The next morning I only had time to check the obvious things like a lead off or water in the distributor cap – but no luck with a quick fix. So I decided to leave it a couple of days until the next weekend to see if would dry out and fix itself.
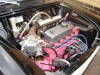
Early Saturday morning I bit the bullet and started the car to see if the fairies had fixed it for me – no luck, it was still running very roughly on 3 cylinders and blowing heaps of black smoke. The night before I had read the relevant chapters of the Manuals I had on the computer about the ignition system and printed out the 21 A4 pages from the Rover Workshop Manual, 8 pages from the Electrical Reference Manual, and 2 x A3 pages (yes 2) of the ignition circuit diagram. Time to roll up the sleeves and start checking things, armed with this wad of reference material and my secret weapon – a second SPi Mini that was working correctly that I could check against and swap parts with.
First, lets find which cylinder is misfiring. A quick prayer that the insulation on the spark plug leads isn’t the fault, then start the engine and remove one lead at a time to locate the misfire. It turns out that it’s number 3 – well it didn’t stall when I took that lead off like it did with all the others.
Try the obvious first… remove the coil mounting bracket from the engine so that I can get the socket onto the number 3 spark plug, then removed the plug. Not fouled, gap looks OK, but it’s very black. Cleaned the plug and refitted it and the coil – no change.
Maybe it’s the distributor cap? Removed the grille so that I could access the mounting screws on the cap and removed the cap. All looked OK, but gave the cap and the rotor a good clean and spray with WD40 anyway. Replaced the rotor, cap and leads – no change. Maybe it’s a v-e-r-y fine crack, so swapped the cap, rotor and leads with the other Mini (after removing its’ grille) – no change.
Must have spark! Just to confirm it I removed the coil and number 3 plug again, fitted the plug into the end of the lead and earthed it to a head stud. Start the engine and plenty of healthy looking spark. Put the plug and coil back again,
Hmmm, time to read a bit. Maybe it’s the crankshaft timing sensor (which sets the timing). Raised the front of the car so that I could get under and remove the sensor from the back of the flywheel housing under the starter motor by contorting a hand up between the gearbox/sump and the subframe. Very dirty, so I cleaned it up and refitted it – no change. Jacked the front of the other Mini and swapped the sensors -– no change.
(Has anyone notice the pattern yet that you have to always do something else before you can get in to do the thing you want?)
Maybe it’s moisture in the ECU connector (Engine Control Unit, the square aluminum box on the inside drivers side wing)? The other Mini had once had a problem with the famous UK green grunge on this huge multi-wire connector causing a misfire. Unbolted the condenser coil and moved some pipes for the air conditioning to allow enough room to push a hand down between the ECU and the brake master cylinder, and unbolted and extracted the ECU. The connectors looked OK but I gave them a clean with a fine brass wire brush anyway.
I decided to check inside the ECU for moisture while it’s out. Turned the box over and noticed a big dent in the cover plate. Removed the cover and immediately noticed that the dent was big enough to make the metal cover touch the circuit board – obvious by the imprint of some of the electronic components in the soft aluminium metal cover – but it was dry and no signs of moisture ever being in there. But finally I had some hope – I’d found something that wasn’t right. Straightened the cover plate, and lined it with some insulating material to prevent a re-occurrence. Refitted it all – very little change, still only running on 3 cylinders and black smoke, but maybe running slightly less rough.
By this time I had been at it for 10 hours, and it was starting to get dark – so I called it a day, packed up and went inside to read up some more.
Day 2:
Maybe it’s the MAP (manifold air pressure) sensor? This is located inside the ECU, but it has a thin plastic vacuum tube that runs to it from the back of the inlet manifold via an in-line filter to keep fuel and oil from being pushed into the sensor if the engine backfires. Removed the air filter and checked out the tubing. Ah-ha – 3 of the 4 rubber ends on the tubing were perished and split. I didn’t have any spare rubber ends, so I made a temporary fix by wrapping insulation tape around them, and cleaned the inline filter. Refitted and started it up – the black smoke stopped, the engine ran a lot smoother and idled better – BUT STILL ONLY ON 3 CYLINDERS!
I figured that a 40km round trip to Clark Rubber to get some rubber tube to replace the perished ends on the MAP sensor tubing would give me time to think some more. There was plenty of spark, and the MEMS now seemed to be working right – so what else could it be? By the time that I got back with the tubing I had decided that there was only two other possible reasons for the misfire, Either a problem with the reluctor ring on the back of the flywheel that the crankshaft sensor reads to set the timing, or there was a problem with the compression in cylinder 3 – both probably expensive to fix.
I thought again and decided that it probably wasn’t the reluctor ring as it would also affect cylinder 2 (4 stroke engines require 2 revolutions of the crankshaft per cycle so cylinders 2 and 3 would be timed off the same point on the reluctor ring). So off with the air filter again (changed the perished rubber ends with pieces of the newly acquired rubber tubing while it’s off), then removed the rocker cover. Everything looked OK. I felt the rockers for number 3 even though there wasn’t any unusually loud tappet noise when it was running – all OK (gap seems about right). Then I started the engine and quickly observed the rocker and valve operation before too much oil got distributed around the engine bay – all looked OK too. Right that rules out cam, followers, push-rod, rocker, valve stem and valve springs. Replace the rocker cover and mop up the oil.
I was confident that it wasn’t a piston, rings or valve guide seal because there was no blue smoke – in fact since fixing the vacuum leaks in the MAP Sensor circuit there was no smoke. Maybe it’s a burnt valve or seat? A compression test should show that up if its bad enough to cause a misfire. So off with the coil so that plugs 3 and 4 can be removed, and out with plug 2 which then allows you to remove the mounting bolt for the alternator so that it can be pushed aside so you can get to plug 1 (again). I checked the compression on all 4 cylinders – all surpassingly good, nothing wrong there either.
That was it – I was out of ideas. I’d spent 2 full days trying everything in the books plus everything else I could think of about engines in general. The only thing I hadn’t checked was the reluctor ring, but to get to it would involve removing the air conditioning condenser and piping, and the brake booster and master cylinder so as to maybe gain enough room to remove the wok, clutch and flywheel – and it probably isn’t that anyway because cylinder 2 is firing correctly.
Depressed and beaten now, I admitted my defeat to myself and put everything back together again. Nothing better to do so I started it up and sadly listened to it running pitifully on 3 cylinders, randomly pulling leads in case the misfire had somehow moved to another cylinder. I ran through everything in my head that I had tried in last 2 days to see if I’d missed anything. Pulled the lead off plug number 3 again and slid it loosely back on so that I could hear the spark “clicking” to confirm that there was still a spark there then pushed the cap all the way back on.
Hang on…. what was that? I pulled number 3 lead off again and slid it on far enough to cause the spark to jump inside the cap to the top of the plug. The <insert your choice of adjectives here> thing was running on all 4 cylinders. Lead on – 3 cylinders firing – lead half off; 4 – lead on 3 – lead off 4 – lead on 3 – lead off 4!!!!
Off with the coil again, pull number 3 plug out and replaced it with an old one I found laying around, and the engine now ran as smooth as the day it was built (and so it should after removing, cleaning and/or replacing just about everything electrical in the engine bay. One of the new spark plugs that I had put in a week earlier had gone faulty!
So as the sun sinks slowly on 2 days of a frustrating battle with HRH Lucas – Prince of Darkness, while the usual eerie calm settles over the landscape as it does at sunset every day and the echoing obscenities fade into the distance, if you listen very carefully you can hear the far off laughter of Lucas and his friend Champion as they roll around in fits of hysterics.
So if anyone has read this far.... the moral of this story? Don’t throw faulty spark plugs as far as physically possible, as you’ll only pull a muscle in your arm and you’ll have a sore arm for the next 4 days!
|