Ausmini
It is currently Sat Jul 12, 2025 12:17 am

All times are UTC + 10 hours


Post new topic Reply to topic  [ 13 posts ] 
Author Message
PostPosted: Tue Oct 07, 2008 5:58 pm 
Offline
1275cc
1275cc
User avatar

Joined: Thu May 24, 2007 7:19 pm
Posts: 5370
Location: Yandina,Sunshine Coast,QLD
Basically this is how Matt Read removes his and since I first tried it this way I haven't looked back and seeing as this method isn't in the "How To" section I decided to do it step by step to show you all how easy it is.
If the mods feel it necessary to add this to the How To's by all means go for it.
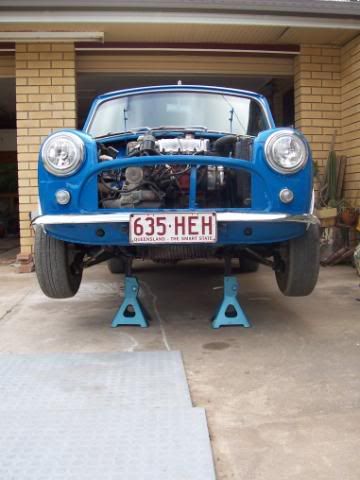
Step 1:
Set your car up in a good level spot and remove your grill.

Step 2:
Jack up your car and set it on some good axle stands.
Image

Step 3:
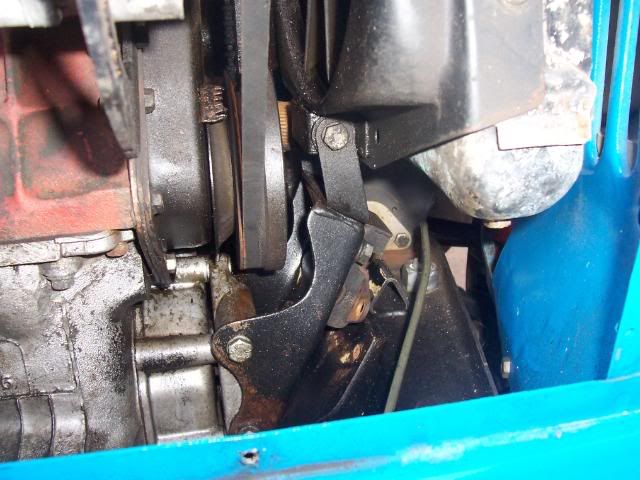
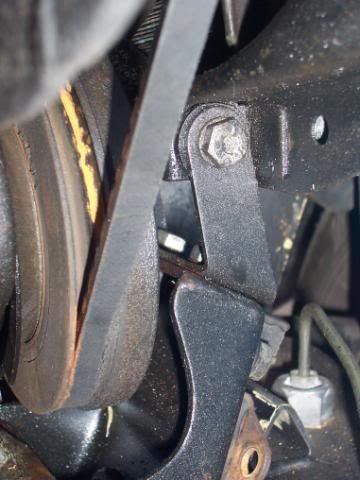
Remove the two engine mount bolts on the passenger side.
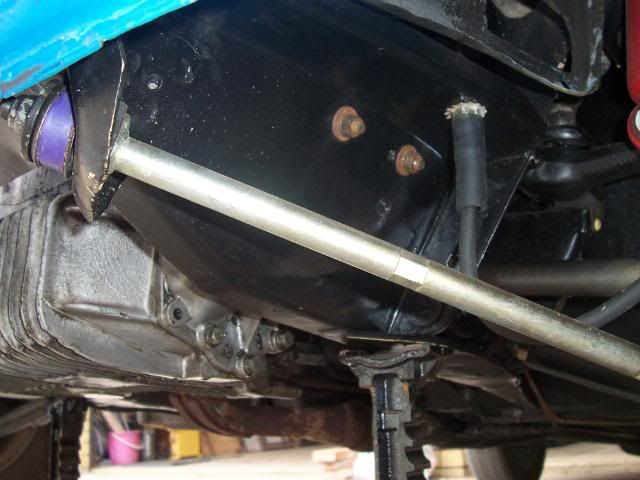
Image

Step 4:
Once the bolts are removed place a piece of wood under the gearbox on the passenger side and slowly and carefully jack the engine up.
Image
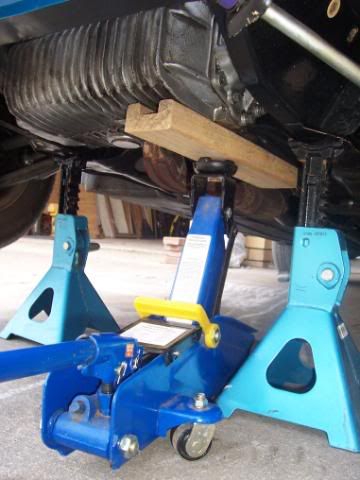
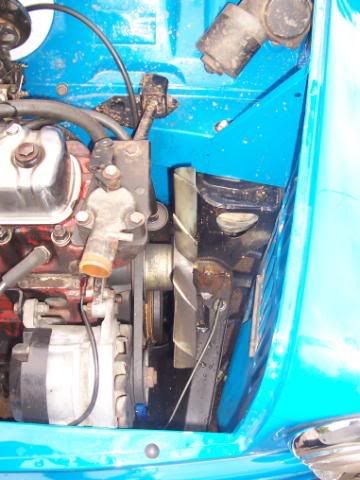
The engine should move freely for an inch or two until the gear linkage hits on the exhaust tunnel under the car. When it hits that's when you stop jacking as you don't want to lift the car off the axle stands, (if the car has moved off the axle stands lower the engine down and repeat step 4 until you are happy). You should end up with a gap like this.
Image
Note: Do not remove the jack until you are finished, it shouldn't be in the way and it is only supporting the engine not holding up the car so it is fairly safe.

Step 5:
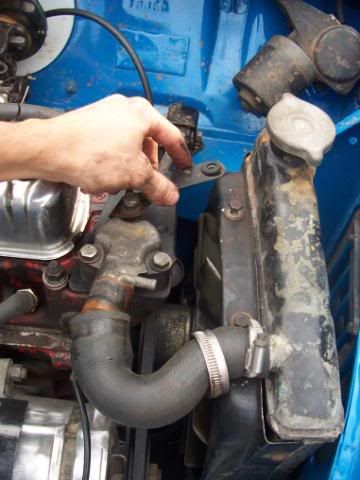
Remove the two bolts that hold the bottom radiator mount onto the engine mount.
Image

Step 6:
(This is where the radiator will drop all its liquids so be ready for water).
Now you can undo the bottom radiator hose,
Image
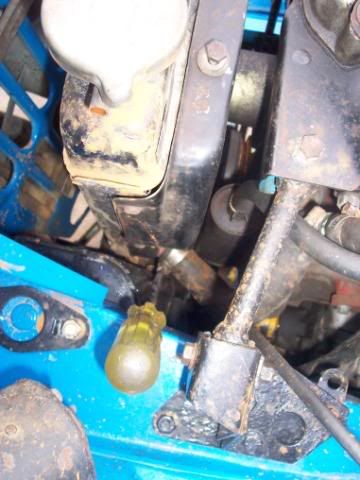
the top radiator hose and the top radiator mount,
Image

Step 7:
Now with everything undone the radiator should slip straight out the top. You may need to rotate the cooling fan at the same time to make it easier but it shouldn't be too hard.
Image
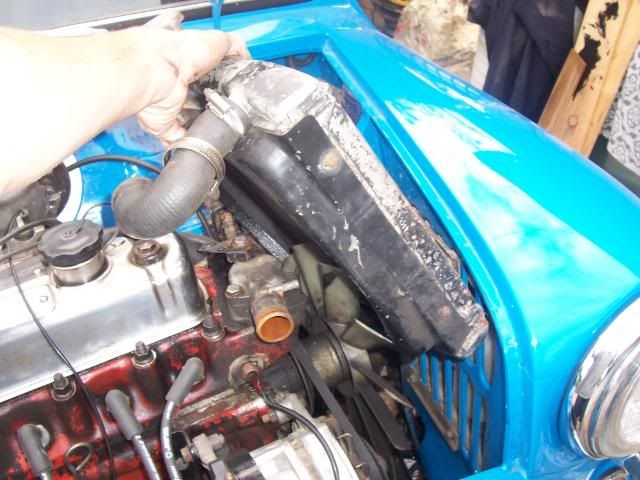
Note: My car doesn't have the standard radiator shroud that should be welded to the inner wing, this dose make the job easier but I'm assured it's still easy to remove your radiator this way if your car dose still have the shroud attached :wink: .

So with a few tools and a bit of patience you will have your radiator out in under 20 minutes (the first time I did this it took me 16 minutes).
Image
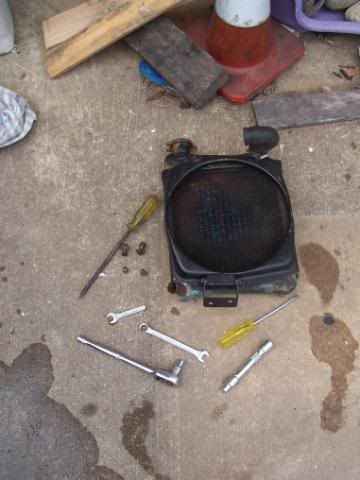
You do not have to spend hours trying to remove the radiator surround in the car, it all comes out in one unit. As you can see by my surround Rover decided to make them in one piece not two like were all use to seeing.
Image
Job done and happy mini-ing :D

_________________
Respect mine and I'll respect yours.


Top
 Profile  
 
 Post subject:
PostPosted: Tue Oct 07, 2008 6:15 pm 
Offline
998cc
998cc
User avatar

Joined: Thu Aug 11, 2005 1:36 pm
Posts: 942
Location: Melbourne
I love the idea and thanks for posting with BRILLIANT pics.

But HOW T F do you get the back engine mount bolt back IN again???

Try as I might using this method I had NO way of getting my hand down past the fan to slide the bolt back into its hole!!

Thanks again :)

Cheers,
Skender.


Top
 Profile  
 
 Post subject:
PostPosted: Tue Oct 07, 2008 7:36 pm 
Offline
The Mini King
User avatar

Joined: Mon May 21, 2007 7:20 pm
Posts: 1338
Location: Windsor, NSW
Brown Clubman wrote:
I love the idea and thanks for posting with BRILLIANT pics.

But HOW T F do you get the back engine mount bolt back IN again???

Try as I might using this method I had NO way of getting my hand down past the fan to slide the bolt back into its hole!!

Thanks again :)

Cheers,
Skender.


Get an OLD kitchen fork, flatten the arch, Then bend the middle prong out so that it rests on the head of the bolt and slide the bolt down so that two prongs are under the head of the bolt, You can then use the handle of the fork to locate the bolt, When the bolt is in place and the nut is screwed on simply slide the fork out


Last edited by John Smidt on Tue Oct 07, 2008 7:41 pm, edited 1 time in total.

Top
 Profile  
 
 Post subject:
PostPosted: Tue Oct 07, 2008 7:39 pm 
Offline
998cc
998cc
User avatar

Joined: Thu Aug 11, 2005 1:36 pm
Posts: 942
Location: Melbourne
ah yes .... there is NO substitue for experience!

Thanks John :wink:


Top
 Profile  
 
 Post subject:
PostPosted: Tue Oct 07, 2008 8:21 pm 
Offline
1275cc
1275cc
User avatar

Joined: Sat Apr 14, 2007 8:34 pm
Posts: 3415
Location: Cowra
i have also heard of people tieing string to the bolt and pulling it through the hole that way.

_________________
Image


Top
 Profile  
 
 Post subject:
PostPosted: Tue Oct 07, 2008 9:10 pm 
Offline
religious status
religious status
User avatar

Joined: Fri Mar 19, 2004 6:19 pm
Posts: 39754
Location: near Baulkham Hills, NSW
I found a decent size cable tie round the bolt head works OK too.

_________________
DrMini- 1970 wasaMatic 1360, Mk1S crank, 86.6HP (ATW) =~125 @ crank, 45 Dellorto (38 chokes), RE282 sprint cam, 1.5 rockers, 11.0:1 C/R. :mrgreen:


Top
 Profile  
 
 Post subject:
PostPosted: Tue Oct 07, 2008 9:37 pm 
Offline
1275cc
1275cc
User avatar

Joined: Tue Dec 14, 2004 9:38 am
Posts: 2008
Location: Adelaide, South Australia
but you didn't need to take out the engine mount bolts with that radiator surround...

_________________
Miniworx Centre 0883741299
Sooperdooperminicooperexpertengineering
Online BMW Mini Shop


Top
 Profile  
 
 Post subject:
PostPosted: Tue Oct 07, 2008 11:02 pm 
Offline
1275cc
1275cc
User avatar

Joined: Thu May 24, 2007 7:19 pm
Posts: 5370
Location: Yandina,Sunshine Coast,QLD
Brown Clubman wrote:
But HOW T F do you get the back engine mount bolt back IN again???

Try as I might using this method I had NO way of getting my hand down past the fan to slide the bolt back into its hole!!

Thanks again :)

Cheers,
Skender.

I go in from underneath. I also put the bolts in from the engine side and have the nuts on the outside as shown in the pic. I do this because if for some reason the nuts come off the bolt is still in the hole locating the mount and their-for keeping the engine in place.

brickworx wrote:
but you didn't need to take out the engine mount bolts with that radiator surround...

I didn't know that, however it is easier IMO with that extra inch and a half of space.

_________________
Respect mine and I'll respect yours.


Top
 Profile  
 
 Post subject:
PostPosted: Tue Oct 07, 2008 11:33 pm 
Offline
THIS SPACE FOR RENT
User avatar

Joined: Wed Jun 09, 2004 3:35 pm
Posts: 11847
Kennomini wrote:
however it is easier IMO with that extra inch and a half of space.


I see you've met Hutto's sister, too...

;)

_________________
Image


Top
 Profile  
 
 Post subject:
PostPosted: Wed Oct 08, 2008 8:03 am 
Offline
Give Ash some flowers Nick .
User avatar

Joined: Wed Aug 09, 2006 1:22 pm
Posts: 10149
Location: Toowoomba Region, QLD
Good pics Kenno.

I use a long flexible magnet and I stick the nut to it and then position it into place. Usually doesn't take me anymore than about 20 sec to get the bolt started :wink:

Also, just check this out :wink:
http://www.ausmini.com/forums/viewtopic.php?p=526919#526919

_________________
"In two years time your car will be like a lady's clothes, out of date, my car will still be in fashion when I am dead" - Sir Alec speaking to Pininfarina


Top
 Profile  
 
 Post subject:
PostPosted: Wed Oct 08, 2008 8:09 am 
Offline
Postally Verbose
Postally Verbose
User avatar

Joined: Mon Jan 02, 2006 9:12 am
Posts: 19595
Location: Northern NSW
I was about to say I was sure I put Matts version in there ....

_________________
Image


Top
 Profile  
 
 Post subject:
PostPosted: Wed Oct 08, 2008 8:32 pm 
Offline
1275cc
1275cc
User avatar

Joined: Thu May 24, 2007 7:19 pm
Posts: 5370
Location: Yandina,Sunshine Coast,QLD
Yeah but mine has pretty pictures :lol:

_________________
Respect mine and I'll respect yours.


Top
 Profile  
 
 Post subject: Nice and easy
PostPosted: Thu Oct 09, 2008 6:43 am 
Offline
1275cc
1275cc

Joined: Thu Dec 09, 2004 6:57 am
Posts: 3022
Location: JIMBOOMBA QLD.
It helps to have no radiator shroud on the Body too. This one has been removed.

_________________
DID I MENTION THAT I AM THE BEST SUPPLIER FOR MINI ELECTRICAL PARTS AND REPAIRS?
"Let us remove your "SHORTS"


Top
 Profile  
 
Display posts from previous:  Sort by  
Post new topic Reply to topic  [ 13 posts ] 

All times are UTC + 10 hours


Who is online

Users browsing this forum: No registered users and 82 guests


You cannot post new topics in this forum
You cannot reply to topics in this forum
You cannot edit your posts in this forum
You cannot delete your posts in this forum
You cannot post attachments in this forum

Jump to:  

© 2016 Ausmini. All garage work involves equal measures of enthusiasm, ingenuity and a fair degree of irresponsibility.