Ausmini
It is currently Sun Aug 17, 2025 5:58 am

All times are UTC + 10 hours


Post new topic Reply to topic  [ 10 posts ] 
Author Message
PostPosted: Fri Aug 21, 2009 6:04 pm 
Offline
1275cc
1275cc
User avatar

Joined: Thu May 24, 2007 7:19 pm
Posts: 5370
Location: Yandina,Sunshine Coast,QLD
I've done the searching and I still can't find the info I need.
What is a good way of mounting the rear of a late clubby on a rotisserie? All I can see is the rear seat belt mounts, would that be strong enough?
I already have the front mounted with the pole going through the windscreens, I'll post some pics if their needed.

_________________
Respect mine and I'll respect yours.


Last edited by Kennomini on Thu Aug 27, 2009 9:28 pm, edited 1 time in total.

Top
 Profile  
 
 Post subject:
PostPosted: Fri Aug 21, 2009 6:25 pm 
Offline
1098cc
1098cc
User avatar

Joined: Wed Aug 04, 2004 6:21 am
Posts: 1788
Location: Wullingtun, Unzud
How about a plate bolted to the rear parcel shelf and coming down to lower, closer to the centreline and then a strut between the rear shock mounts?

This is mine, just finished and while I've gone through the rear seat hole, I think the above method would work. It may depend on your fabrication skills somewhat. What's not visible in this pic is the strut between the shock mounts, which was as solid an area as any on the car.

Image


Top
 Profile  
 
 Post subject:
PostPosted: Fri Aug 21, 2009 7:24 pm 
Offline
Mods rock!
User avatar

Joined: Fri Oct 03, 2008 9:02 pm
Posts: 5079
Kennomini, it sounds like your clubby is a very late on (1977 - 1978). Not exactly sure when, but the hole in the firewall and rear seat frame disappeared somewhere around this time, as in the factory, they stopped using the rotodip when they moved from Zetland to Moorebank.

So much for the history lesson, this doesn't help you.

Try making a frame that bolts on to the shock top mounts in the boot.


Top
 Profile  
 
 Post subject:
PostPosted: Fri Aug 21, 2009 7:35 pm 
Offline
1098cc
1098cc
User avatar

Joined: Sun Feb 20, 2005 8:11 pm
Posts: 1347
Location: Wellington,
Hi Simon

Roto looks great

Kiwiinwgtn


Top
 Profile  
 
 Post subject:
PostPosted: Fri Aug 21, 2009 7:35 pm 
Offline
Causing or creating vexation

Joined: Wed Jul 21, 2004 10:32 pm
Posts: 19124
GT mowog wrote:
Kennomini, it sounds like your clubby is a very late on (1977 - 1978). Not exactly sure when, but the hole in the firewall and rear seat frame disappeared somewhere around this time, as in the factory, they stopped using the rotodip when they moved from Zetland to Moorebank.

So much for the history lesson, this doesn't help you.

Try making a frame that bolts on to the shock top mounts in the boot.

You mean Zetland to Enfield. :wink:

Just mount it to the seat belt mounts and the master cylinder mounts at the front. Take a look at the seat belt mounts under the shelf, there is a thick bridge supporting the mounts.
The shell will be off centre but if you make the rotisserie with a wide base to prevent tipping it should be Ok. You could also add a counterweight to balance it. (the rotodip had a counterweight on some models to balance them.)


Top
 Profile  
 
 Post subject:
PostPosted: Fri Aug 21, 2009 7:42 pm 
Offline
998cc
998cc
User avatar

Joined: Fri Jun 19, 2009 10:19 am
Posts: 666
Location: sydney
zetland to moorebank????

I think your thinking of DNSDC (defence national storage and distribution centre)

_________________
ANY SEA ANY TIME


Top
 Profile  
 
 Post subject:
PostPosted: Fri Aug 21, 2009 7:44 pm 
Offline
Causing or creating vexation

Joined: Wed Jul 21, 2004 10:32 pm
Posts: 19124
Leyland Spare Parts division was at Moorebank and when Enfield closed they moved everything to Moorebank.


Top
 Profile  
 
 Post subject:
PostPosted: Fri Aug 21, 2009 9:35 pm 
Offline
848cc
848cc

Joined: Fri Apr 10, 2009 7:16 pm
Posts: 220
Location: on the yellow brick toad Brissie
I built one that mounted across the bonnet catch panel(drilled out 1/2"thread and put high strenght bolt& washers)then rear onto subframe bolts in boot.I did'nt have a pole run thru the car just had the pivot point at the same height. i'm strugleing posting pics but should be able to email if anyone wants,just pm me a adress.


Top
 Profile  
 
 Post subject:
PostPosted: Sat Aug 22, 2009 1:36 pm 
Offline
1275cc
1275cc
User avatar

Joined: Sat Apr 14, 2007 8:34 pm
Posts: 3415
Location: Cowra
The one i use is a large rectangular trolley with 4 uprights. These uprights mount into the shock absorber holes in the rear and where the subframe bolts to the engine bay cross-member in the front. the ends of the trolley has an extention that protrudes from the centre and then up then out again. these last extrusions sit into 2 upright stands so i can spin the whole thing. (Hope thats understandable)


cheers Brenton

_________________
Image


Top
 Profile  
 
 Post subject:
PostPosted: Thu Aug 27, 2009 9:26 pm 
Offline
1275cc
1275cc
User avatar

Joined: Thu May 24, 2007 7:19 pm
Posts: 5370
Location: Yandina,Sunshine Coast,QLD
Just finished making a couple so now I can roll early and late model sedans and vans :D
I made the mounts so the center is in line with where it should be.
Image
Image
Image
^^^The front subframe mount was used plus the hole above it.
Image
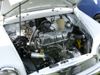
The top of the subframe towers was used as the other mount.
Image
I used the rear seatbelt mounts and wrapped the bar through the rear screen to make the support mounts for the pipe as far apart as possible, without making the jig too big and flimsy.
Image
I then used the rear shocky towers to mount the cross bar.
Image
Image
Image
I already rolled the car around and it is balanced quite well. The floor is still a bit heavier than the roof (this is the same with my other rotisserie down the bottom) but easily a one man job.
Now for the van.
This rear mount is bolted to the rear door hinge mounts and the both jigs shown above will be used with it if the van is a later model, otherwise the std front rotisserie mount will be used (see down below).
Image
Finally these are my jigs for the older model minis. They use the conventional style of mounting similar to how the factory would have mounted them.
Front mount engine bay side
Image
Front mount cabin side
Image
Rear mount cabin side
Image
Rear mount boot side
Image
The frame at either end, these could be another 50mm taller but they still clear no worries.
Image
Image
Image
Image
The only thing left to do is make a long "arm" on either end so turning the car over can be done at the stands.

_________________
Respect mine and I'll respect yours.


Top
 Profile  
 
Display posts from previous:  Sort by  
Post new topic Reply to topic  [ 10 posts ] 

All times are UTC + 10 hours


Who is online

Users browsing this forum: No registered users and 346 guests


You cannot post new topics in this forum
You cannot reply to topics in this forum
You cannot edit your posts in this forum
You cannot delete your posts in this forum
You cannot post attachments in this forum

Jump to:  

© 2016 Ausmini. All garage work involves equal measures of enthusiasm, ingenuity and a fair degree of irresponsibility.