Ausmini
It is currently Mon Jun 23, 2025 6:06 am

All times are UTC + 10 hours


Post new topic Reply to topic  [ 114 posts ]  Go to page 1, 2, 3, 4, 5 ... 8  Next
Author Message
PostPosted: Mon Jul 18, 2011 8:41 pm 
Offline
1098cc
1098cc
User avatar

Joined: Wed Oct 01, 2008 11:14 am
Posts: 1906
Location: Brisbane Qld, North side
I will slowly update this when i have time.

my aim is to have a nice 120bhp supercharged mini with aircon and Injection reliable not massive power.

been chasing up bits as I go, I nearly have everything I need to bolt it all back together & get my car running for this years mini muster.

I have finally chased up a small condenso for my aircon set up & i will be running this under the rear of the car, my aim is to keep the engine bay as free as i can & not look to busy hiding pipes & running it under the car.

I have dummy mounted up & wired the small alternator from a Kubota Tracktor, this is a 60amp mode from ebayl,perfect size & power output.

I have sprayed up a few things including my new arches and cleaned up the engine bay, will touch the car up more when i get time cut some small bits of rust out & re spray some parts.

currently it is running mega jolt with a rebuilt hif44 and this is a great set up but the mega jolt kit has been sold & making way for injection that should arrive soon.

as i said my aim is to have a nice road engine that revs to about 6k max cruises & has some grunt.

my spec is a 1293
Med Verto uprated backplate, lightened flywheel, clutch assembly
good for 120bhp & 120ftlb torque
1.3 full roller Titan rockers
sc Components injection kit
sc12 10psi pulley
std bottom end & rods A+ crank hypatec pistons
re83T cam & lightweight isky cam followers
compression 8.6.1
Gearbox rebuilt
3.1 diff
Quaife Lsd
New helical gears Cryo treated only' for extra strength.
shot peened drop gears and all gears, shafts etc have all been shot peened & cryo treated then dressed hopefully this helps.
my full Forced induction Head turbo Phil Spec

Image

Uploaded with ImageShack.us

Image

Uploaded with ImageShack.us

his is my head spec now with full roller rockers and a Med light fly wheel back plate etc etc set up.

Fast Road Unleaded.
Ideal for fast road applications where the use of unleaded fuel is required.
The 29.4mm stainless exhaust valves allow the use of unleaded hardened valve seats, while bullet-nosed guides, boss removal & throat & port work vastly improve flow.

The inlets are enlarged to accept a 35.6mm valve, the guides bullet-nosed & the boss restriction is removed. The seats are 3-angle.

HEAD.
Based on the 12g940 casting. The head is refaced to ensure total flatness, is fully ported flowed, features enlarged chambers to lower the compression, has 3 angle valve seats on the inlets, new silicone bronze guides {bullet nosed} are fitted, as are new valve stem oil seals, new 185lb double valve springs.
Exhaust.
29.4mm nitrided 21NS stainless steel race valves.
Inlet.
35.6mm nitrided 21NS stainless steel race valves for improved flow.
Chambers.
*High swirl chamber design opened out to 25cc
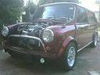
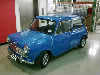
The car

Image

Uploaded with ImageShack.us

Me being stupid forgot to spray the bay till the engine was in lol

Image

Uploaded with ImageShack.us

my new arches will have chrome trim on them.

Image

Uploaded with ImageShack.us

Aircon mounted in

Image

Uploaded with ImageShack.us

my small alternator from ebay, a Kubota Tracktor 60amp $100 us new.

Image

Uploaded with ImageShack.us
engine before with all it's crap & huge Alternator!

Image

Uploaded with ImageShack.us

as the engine stands now

Image

Uploaded with ImageShack.us

soon to go on are these 2 items :)

Image

Uploaded with ImageShack.us

Image

Uploaded with ImageShack.us


Last edited by NG on Wed Jul 20, 2011 7:33 pm, edited 2 times in total.

Top
 Profile  
 
 Post subject:
PostPosted: Mon Jul 18, 2011 9:20 pm 
Offline
1360cc
1360cc
User avatar

Joined: Mon Aug 23, 2004 10:07 pm
Posts: 10653
Location: SE Melbourne
Sounds like an interesting project but I'm curious: where are you going to hide the second alternator to supply the 47 amp AC needed to run an electric air conditioning compressor?
(and thats a low power one! most need about 150 volts AC 50 amps or more)


Top
 Profile  
 
 Post subject:
PostPosted: Mon Jul 18, 2011 9:31 pm 
Offline
1098cc
1098cc
User avatar

Joined: Wed Oct 01, 2008 11:14 am
Posts: 1906
Location: Brisbane Qld, North side
never ever had a problem with my 65amp rover one that was original and come with the SPI, I have never heard of running a 2nd alternator on a mini the biggest i have seen stock is 70amp

maybe the Mpi?

I had the car with aircon sound system, sub amp everything loaded up & had not one problem for 2years. maybe luck i don't know.

I did buy a yellow top high out put battery though.

all the rover spi mini's i have ever seen run a single 65amp unit and this is what i got the kit from originally.

so i don't see why a 60amp will be a problem, but time will tell!
otherwise i can get one the same size but 90amp uprated but at a good price form usa.

fingers crossed ill just have to try it


Last edited by NG on Mon Jul 18, 2011 9:38 pm, edited 1 time in total.

Top
 Profile  
 
 Post subject:
PostPosted: Mon Jul 18, 2011 9:36 pm 
Offline
1360cc
1360cc
User avatar

Joined: Mon Aug 23, 2004 10:07 pm
Posts: 10653
Location: SE Melbourne
No, no, you said this in your first post:

Quote:
I have finally chased up a small condenso for my aircon set up & i will be running this under the rear of the car, my aim is to keep the engine bay as free as i can & not look to busy hiding pipes & running it under the car


How are you going to power it?
Even a tiny 5000 BTU air compressor (about half to a third of whats in a normal small car) would need 600 watts power supply.
Thats why compressors run off the engine and thats why in small cars you notice when its on: its robbing a bit of power!

EDIT: ignore me...i mixed up condensor with compressor. My bad. :oops:
I'll shut up now.


Top
 Profile  
 
 Post subject:
PostPosted: Mon Jul 18, 2011 9:40 pm 
Offline
1098cc
1098cc
User avatar

Joined: Wed Oct 01, 2008 11:14 am
Posts: 1906
Location: Brisbane Qld, North side
thats ok.

I think ill trial it and see how i go harley,no harm in trying.
8)


Top
 Profile  
 
 Post subject:
PostPosted: Mon Jul 18, 2011 9:43 pm 
Offline
1360cc
1360cc
User avatar

Joined: Mon Aug 23, 2004 10:07 pm
Posts: 10653
Location: SE Melbourne
Where do you think you'll run the AC pipes along to the rear? A supercharged car will have a big hot exhaust so transmission tunnel is out.

Now that I think about it there was a car at the last minishow with the radiator in the boot, running a 1" pipe to and from the engine. Wonder where he put them?


Top
 Profile  
 
 Post subject:
PostPosted: Mon Jul 18, 2011 9:54 pm 
Offline
1098cc
1098cc
User avatar

Joined: Wed Oct 01, 2008 11:14 am
Posts: 1906
Location: Brisbane Qld, North side
I have a few idea's either drill a small hole into the floor and run 2 pipes inside the car or run it flat under the car & P clamp it all the way flush to the floor.

or maybe running through the inner sills.

not sure yet!


Top
 Profile  
 
 Post subject:
PostPosted: Mon Jul 18, 2011 10:23 pm 
Offline
1360cc
1360cc
User avatar

Joined: Mon Aug 23, 2004 10:07 pm
Posts: 10653
Location: SE Melbourne
You'll want to get the path well sorted as ac gas isnt exactly something you'll want to be draining to change anything. I think where the hydro lines used to run on sedans would be a good start. :D


Top
 Profile  
 
 Post subject:
PostPosted: Wed Jul 20, 2011 7:20 pm 
Offline
1098cc
1098cc
User avatar

Joined: Wed Oct 01, 2008 11:14 am
Posts: 1906
Location: Brisbane Qld, North side
only a small update, so today i did not get upto much had a busy day with music.

I poped out and wanted some boost hose and fittings for my sc12.

every shop wanted $140 for the braided kit and about $30ish for a clear hose and fittings. way to much.

so i decided ill give it a crack and make my own, really easy actually.

im very happy with the result, cost me about $60 for 1 metre of braided line fittings etc, could have gone cheaper but i could not be bother going to NZ pipes, i was in a rush.

these are my fittings
Image

Uploaded with ImageShack.us

crimping the braided line to get the little stab thing in
Image

Uploaded with ImageShack.us

you can see it all pushed on.

Image

Uploaded with ImageShack.us

and all done on my sc12 kit, yes i polished the charger lol looks nice :D

Image

Uploaded with ImageShack.us

connected up my boost gauge just because, will mount that in the car tomorrow hopefully.

Image

Uploaded with ImageShack.us


Top
 Profile  
 
 Post subject:
PostPosted: Wed Jul 20, 2011 8:57 pm 
Offline
1275cc
1275cc
User avatar

Joined: Thu May 24, 2007 7:19 pm
Posts: 5370
Location: Yandina,Sunshine Coast,QLD
In this pic I got some questions;
Image
What is the brass fitting for?
(Have you thought about water injection?)
And what is the pipe with the split pin through it below the boost line?

_________________
Respect mine and I'll respect yours.


Top
 Profile  
 
 Post subject:
PostPosted: Wed Jul 20, 2011 9:05 pm 
Offline
1275cc
1275cc
User avatar

Joined: Fri Apr 25, 2008 2:34 pm
Posts: 2002
Location: Brisbane
The brass fitting would be a vacuum take off for the brake booster.
I guess the split pin could be a manifold boost sensor take off.
And water injection would make it really fun.

_________________
Simplify and add lightness


Top
 Profile  
 
 Post subject:
PostPosted: Wed Jul 20, 2011 9:27 pm 
Offline
1098cc
1098cc
User avatar

Joined: Wed Oct 01, 2008 11:14 am
Posts: 1906
Location: Brisbane Qld, North side
What is the brass fitting for? BOOSTER :)

(Have you thought about water injection?) yes, first fuel injection :D

And what is the pipe with the split pin through it below the boost line?

it's some sort of backfire valve thing, simon has mentioned it before but ben who makes the kit would go into more detail.


Top
 Profile  
 
 Post subject:
PostPosted: Thu Jul 21, 2011 4:04 pm 
Offline
998cc
998cc
User avatar

Joined: Thu Aug 20, 2009 12:31 pm
Posts: 631
That polished blower looks great!
Did you go all out different grades of wet and dry or just some paste Polish and a buffing wheel?
How long did it take?


Top
 Profile  
 
 Post subject:
PostPosted: Thu Jul 21, 2011 7:52 pm 
Offline
1098cc
1098cc
User avatar

Joined: Wed Oct 01, 2008 11:14 am
Posts: 1906
Location: Brisbane Qld, North side
Polish and buff wheel in a drill

I used the white and green buffing stick. Cme out nice :) lots and lots of degreaser!

Took me maybe 2 hrs then I used a dremel tool to buff the corners etc


Top
 Profile  
 
 Post subject:
PostPosted: Fri Jul 22, 2011 5:58 pm 
Offline
1098cc
1098cc
User avatar

Joined: Wed Oct 01, 2008 11:14 am
Posts: 1906
Location: Brisbane Qld, North side
Today I got in & really made some headway on the car, i was thinking about it to much to do music.. so got up early did some studio work.

then out to the car.

firstly i mounted in my boost gauge, looks really good very happy!

Image

Uploaded with ImageShack.us

i spent a bit of time re wiring the car & i moved the washer bottle over, used a new smaller washer bottle electric motor in as i need to leave room for the blower also moved the Horn under the wing & extended the wiring just need to hook it up.

Image

Uploaded with ImageShack.us


So i moved onto the aircon today, i took some photo's of my new condenser that im going to mount under the car, as you can see it is very thin & very lightweight compared to the other one.

even though the photo is on a angle with the fan it is the same thickness as the old one.

Image

Uploaded with ImageShack.us

Image

Uploaded with ImageShack.us

Image

Uploaded with ImageShack.us


I then moved onto dummy fitting it and worked out where i want it to be, so the next thing to mount is the drier/ reciever.

i forgot to take a photo of this though but i made up a little bracket & mounted it to the rear subframe out the way.

bracket for drier, that looks pretty much like a mini coil.

Image

Uploaded with ImageShack.us

where i plan to mount it.

Image

Uploaded with ImageShack.us

mounted

Image

Uploaded with ImageShack.us

next week when i have some time, planning to remove the tank mod for fuel injection mount the compressor & look at getting some custom pipes made up, i think i'm going to measure it all my self & get them made up as a shop want nearly $90 to $100 per pipe! and fitting.

next job, i will fit my Mini Tastic fast road 2011 revised springs to my swift gti powered mini for extra comfort! the new kit lets you run the car lower & no springs to fall out, ill run standard height anyways.

The cones are killing me, I have the minitastic kit in my van and the transformation is amazing highly recommend them!


Image

Uploaded with ImageShack.us

Image

Uploaded with ImageShack.us


Top
 Profile  
 
Display posts from previous:  Sort by  
Post new topic Reply to topic  [ 114 posts ]  Go to page 1, 2, 3, 4, 5 ... 8  Next

All times are UTC + 10 hours


Who is online

Users browsing this forum: No registered users and 11 guests


You cannot post new topics in this forum
You cannot reply to topics in this forum
You cannot edit your posts in this forum
You cannot delete your posts in this forum
You cannot post attachments in this forum

Jump to:  

© 2016 Ausmini. All garage work involves equal measures of enthusiasm, ingenuity and a fair degree of irresponsibility.