Ausmini
It is currently Sun Jun 22, 2025 7:33 pm

All times are UTC + 10 hours


Post new topic Reply to topic  [ 1864 posts ]  Go to page Previous  1 ... 85, 86, 87, 88, 89, 90, 91 ... 125  Next
Author Message
 Post subject:
PostPosted: Mon Nov 28, 2011 11:08 am 
Offline
1360cc
1360cc
User avatar

Joined: Mon Aug 23, 2004 10:07 pm
Posts: 10653
Location: SE Melbourne
Isn't getting a back window in there going to be difficult? :?

Image


Top
 Profile  
 
 Post subject:
PostPosted: Mon Nov 28, 2011 2:49 pm 
Offline
1275cc
1275cc
User avatar

Joined: Fri Jun 17, 2005 10:31 am
Posts: 3183
Location: Burpengary, Queensland - Home of Tricky Performance Engineering
Hey Harley,

No, I hope not!!

The rear glass is curved so it should fit in with a bit to spare - just a bit mind you!!!

Cheers,
Tricky

_________________
"Not Speeding Officer..........Qualifying"


Top
 Profile  
 
 Post subject:
PostPosted: Sat Dec 03, 2011 10:18 am 
Offline
1275cc
1275cc

Joined: Sun Apr 02, 2006 2:38 pm
Posts: 2210
Location: Huon Valley, TAS
Archangel007 wrote:
Indeed Matt!!

I agree totally, AWD, purpose built, ultra-lightweight, forced induction is the winning recipe!! :shock:


I must say I'm getting use to the brilliant handling, and pure enjoyment of my AWD Turbo......

Still want to do this to a Mini one day. Was almost sooner than I thought when I was nearly cleaned up on a roundabout the other day......

Cheers,

Dicko.


Top
 Profile  
 
 Post subject:
PostPosted: Sat Dec 03, 2011 9:25 pm 
Offline
1275cc
1275cc
User avatar

Joined: Fri Jun 17, 2005 10:31 am
Posts: 3183
Location: Burpengary, Queensland - Home of Tricky Performance Engineering
Holy Cow Dicko, you need to watch out for tool-squeezers!!

_________________
"Not Speeding Officer..........Qualifying"


Top
 Profile  
 
 Post subject:
PostPosted: Sat Dec 03, 2011 10:02 pm 
Offline
1275cc
1275cc
User avatar

Joined: Fri Jun 17, 2005 10:31 am
Posts: 3183
Location: Burpengary, Queensland - Home of Tricky Performance Engineering
Hi Guys and Girls,

Did a bit more today just to keep the project ticking along. I had test fitted the door mirrors some time ago but never documented any of it. And to tell truth, I never really liked (at all) how they looked - they stuck up in the air like butterfly wings and didnt sit level - they looked silly!!

So, I decided to redo them, which I am glad that I did, as the outcome looks a whole lot better.

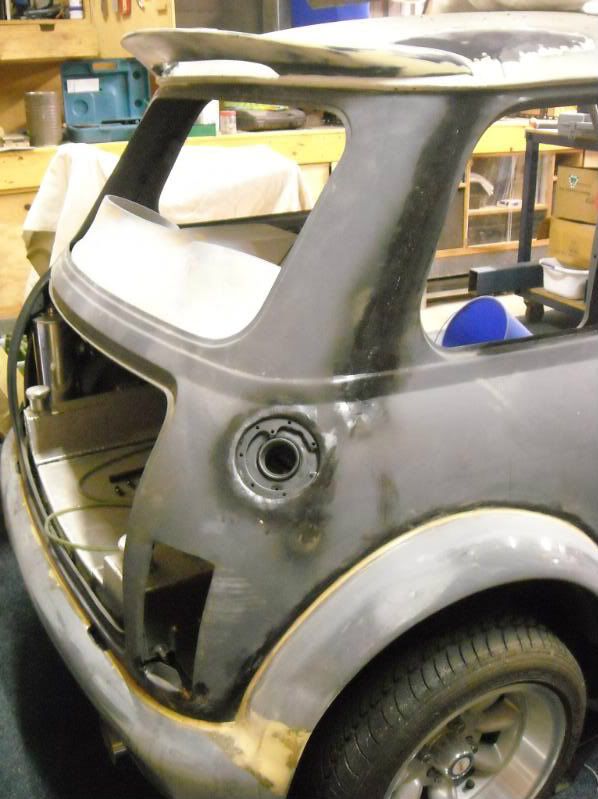
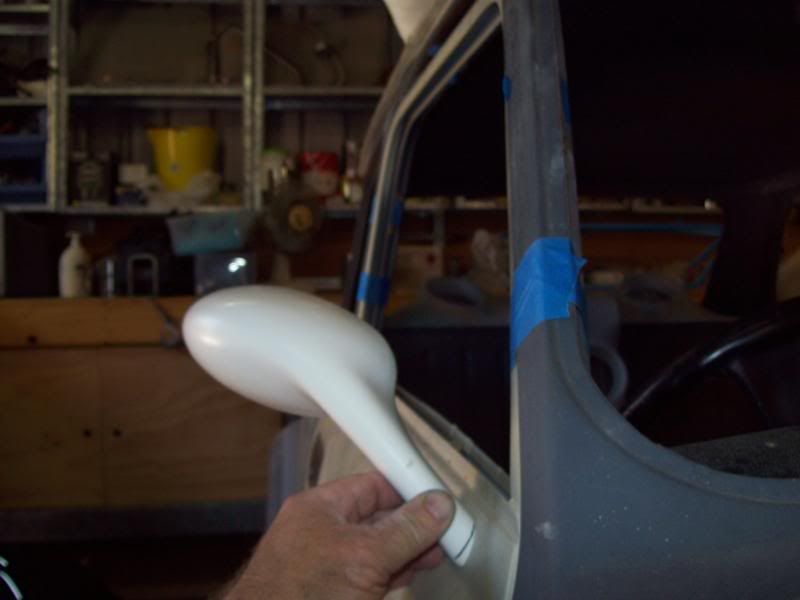
First things first, put the doors back onto the car temporarily just to get an idea of what the existing looked like - the doors are ready for paint so its a case of being gentle:
Image

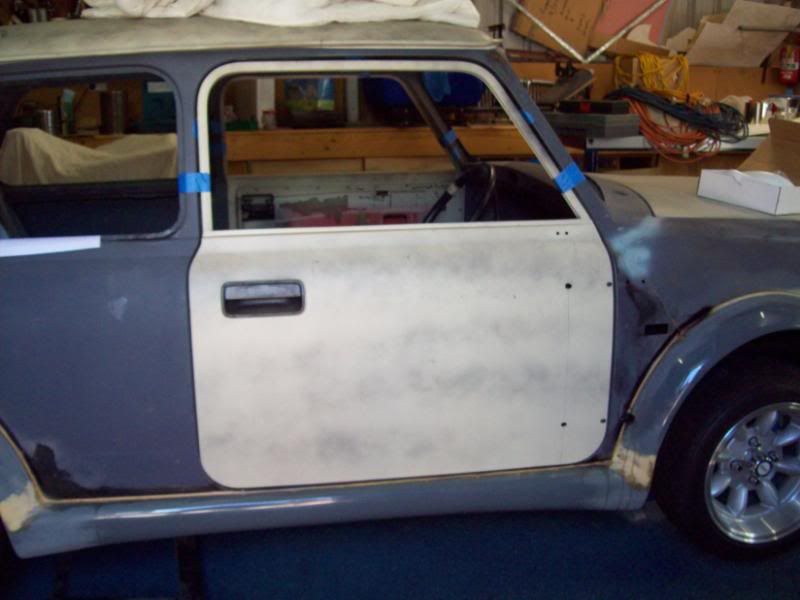
And this is what they looked like before fixing - ridiculous! The black line is the cut line for the new position:
Image

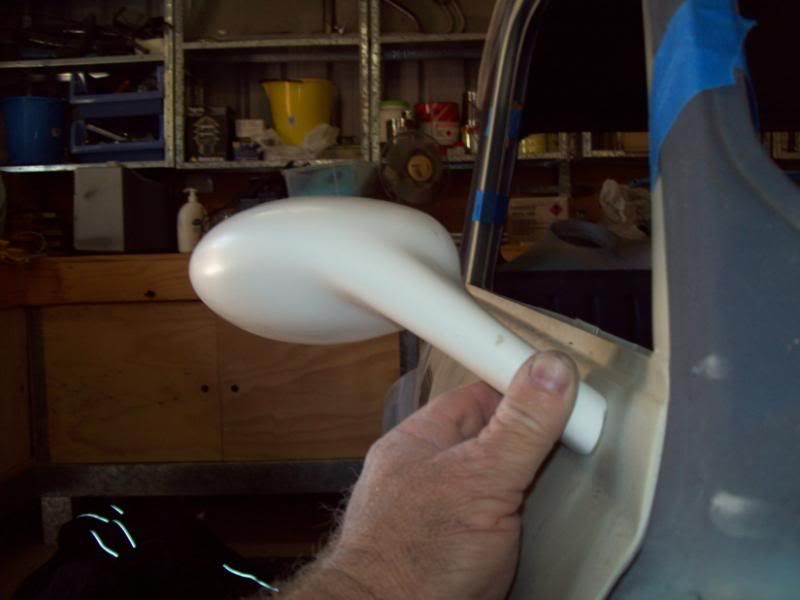
After some grinding and filing, they sat a lot better - nice and level. They look heaps better:
Image

Now to fix them - I ended up drilling and tapping two holes into the neck of the mirror, and from here I will screw in two stainless steel self tappers. To be able to actually screw the screws in, I had to drill two holes opposite the mirror mounting position to insert a screwdriver. These I will cover with small rubber bungs, so hopefully they wont look too intrusive. When I go to fix them permanently, I will screw them as well as bond them with Sikaflex!!
Image

Screwed in and looking good:
Image

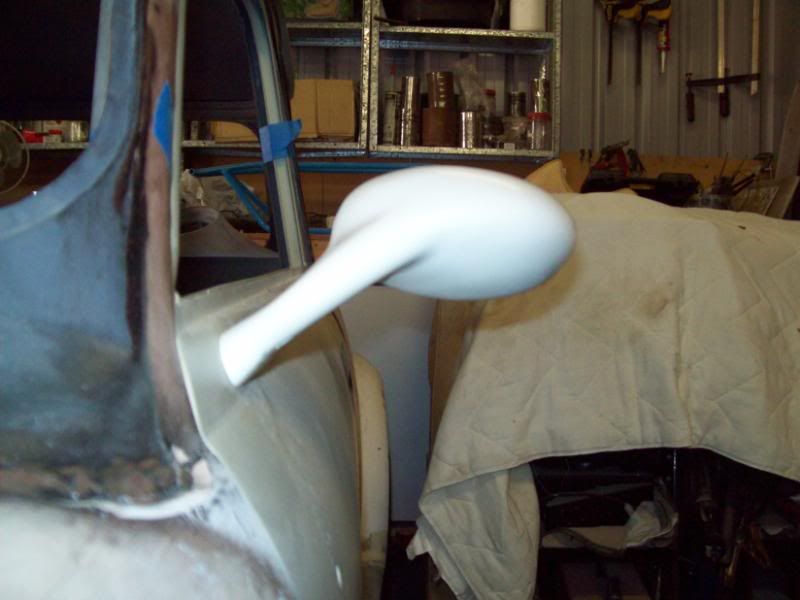
And from the front (I like these mirrors as they are very small and aerodynamic):
Image

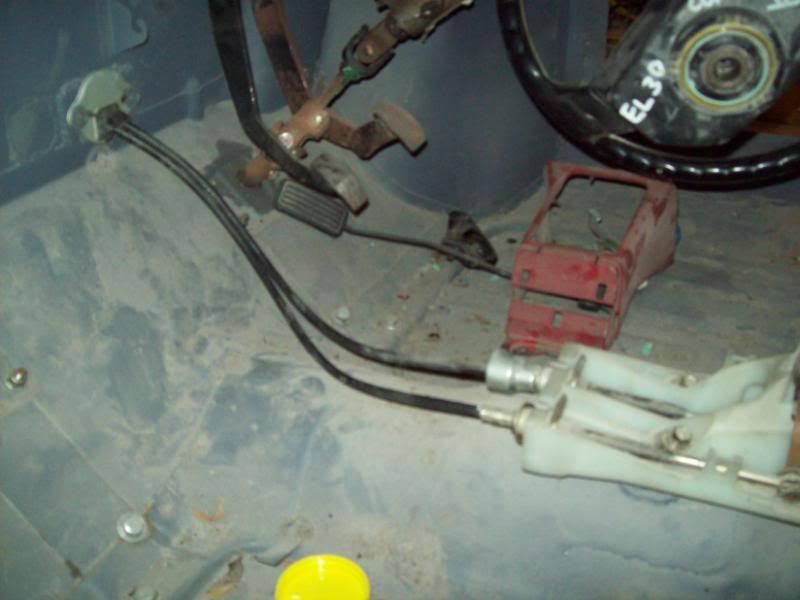
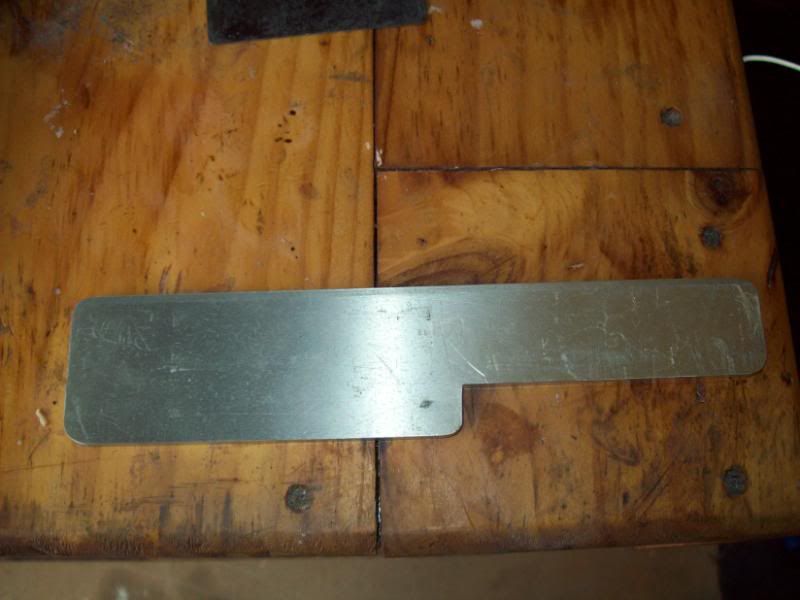
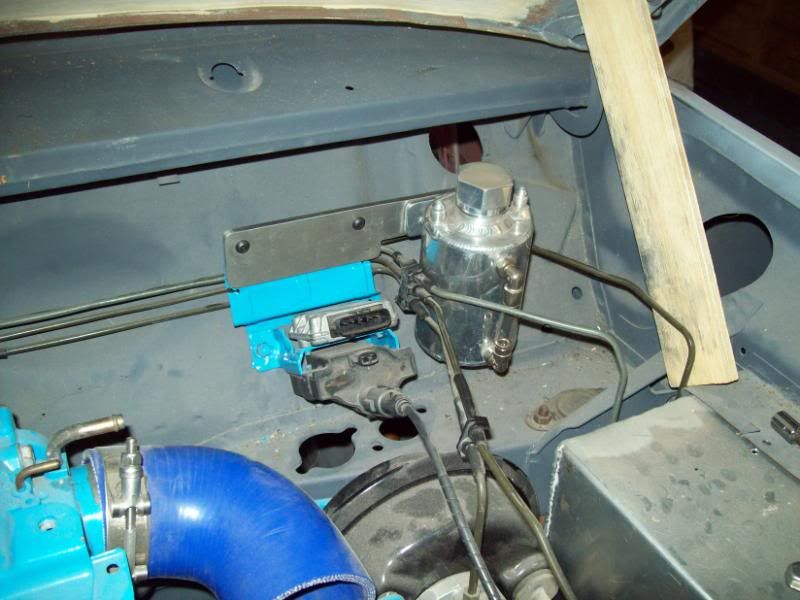
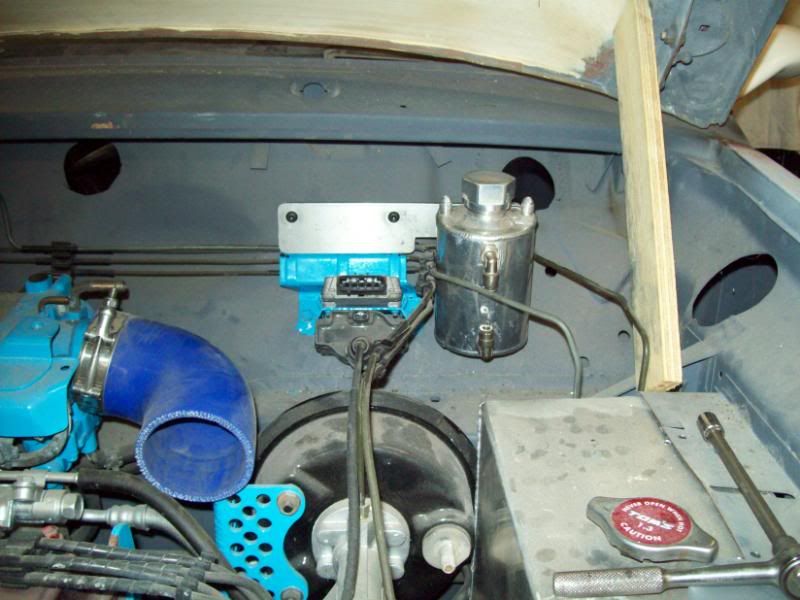
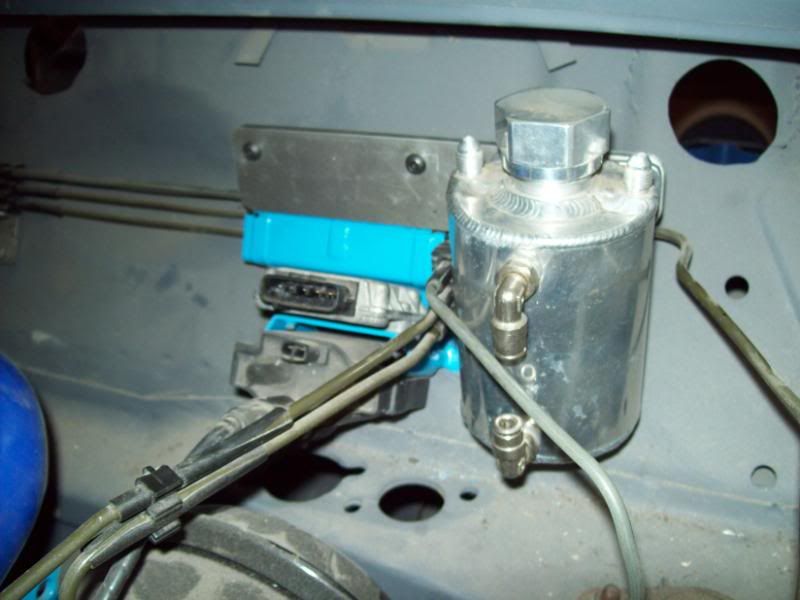
The next job I wanted to tackle was to mount the radiator overflow bottle. I have been putting this off for ages and I dont know why. I just had to find a place to mount it, which wasnt to hard in the end - in front of the wiper motor and above the brake booster. I decided to utilise the bracket that mounts the coil and ignitor, which now has a spare space above it where the A/C solenoid use to sit. So, I got on the mill, and milled up a nice alloy bracket (nothing like playing with big boys toys):
Image

And voila, not a bad place for it, and it should be easy to see the water level indicator from this position:
Image

Image

Image

Might play a bit more tomorrow. Until then...

Cheers,
Tricky

_________________
"Not Speeding Officer..........Qualifying"


Top
 Profile  
 
 Post subject:
PostPosted: Sat Dec 03, 2011 10:36 pm 
Offline
1360cc
1360cc
User avatar

Joined: Mon Aug 23, 2004 10:07 pm
Posts: 10653
Location: SE Melbourne
If you want to avoid putting rubber grommets in the door panel where visable, I'd get some allthread and loctite is into your mirrors.
To fit to car all you need to do is find somebody with little hands to reach in and put a washer and a whizzlock nut in there. You'll be able to tighten it with a spanner before the glass goes in.
:D


Top
 Profile  
 
 Post subject:
PostPosted: Sun Dec 04, 2011 2:37 am 
Offline
1275cc
1275cc
User avatar

Joined: Thu Jun 03, 2004 2:56 pm
Posts: 3981
Location: Brisbane
AT,

Just doing some research on suspension. Given what I'm proposing for a bbackend it would need rear coilovers. There is some commentary floating around on the net that some of the rear coilovers require some massaging of the inner guards to allow proper fitment.

I don't know the validity of those statements but I wondered if you had dry fitted your rear coilovers/subframe/wheels yet. Just wanted to make sure you don't paint it then find you have to do some massaging of the inner panels. Massaging = hitting with a hammer.

JC

_________________
But he's thriving and striving and hugging the turns.


Top
 Profile  
 
 Post subject:
PostPosted: Sun Dec 04, 2011 6:56 am 
Offline
1275cc
1275cc
User avatar

Joined: Fri Jun 17, 2005 10:31 am
Posts: 3183
Location: Burpengary, Queensland - Home of Tricky Performance Engineering
Hi Harley,

Thanks for the info - had a look at doing that the first time but found it way too difficult to do, seeing the way the mirrors are designed and made - i.e. injection moulded polycarbonate with a very thin neck. Two small rubber bungs I hope wont look out of place!

Hi JC,
Normal everyday coilovers wont fit - you need to get Mini-specific ones with an offset top pin. I have my coilovers on at the moment and they have no clearance issues. Mine are GAZ, but there are quite a few that make Mini specific ones now. See here:
http://www.minispares-online.co.uk/?cat_id=9&sub_cat_id=184&prod_id=2542

If you want to go to the std design central pin units like Ohlins, Tein or Bilstein etc you will need to widen the shock tunnel - not a huge job. All of the shocks for Mini's use a 50mm coil, so they are interchangeable with any spring on the market.

Cheers,
Tricky

_________________
"Not Speeding Officer..........Qualifying"


Top
 Profile  
 
 Post subject:
PostPosted: Sun Dec 04, 2011 7:20 am 
Offline
1275cc
1275cc
User avatar

Joined: Thu Jun 03, 2004 2:56 pm
Posts: 3981
Location: Brisbane
yeah, this was a discussion regarding mini specific ones. The discussion went along the lines that they fitted without interference until they were mated to the trailing arm.

_________________
But he's thriving and striving and hugging the turns.


Top
 Profile  
 
 Post subject:
PostPosted: Sun Dec 04, 2011 12:11 pm 
Offline
1275cc
1275cc
User avatar

Joined: Fri Jun 17, 2005 10:31 am
Posts: 3183
Location: Burpengary, Queensland - Home of Tricky Performance Engineering
JC wrote:
yeah, this was a discussion regarding mini specific ones. The discussion went along the lines that they fitted without interference until they were mated to the trailing arm.


Definitely no issues with mine that I can see JC!!

_________________
"Not Speeding Officer..........Qualifying"


Top
 Profile  
 
 Post subject:
PostPosted: Sun Dec 04, 2011 5:38 pm 
Offline
1275cc
1275cc
User avatar

Joined: Fri Jun 17, 2005 10:31 am
Posts: 3183
Location: Burpengary, Queensland - Home of Tricky Performance Engineering
Well did a bit more today....

Another job that I have been putting off forever is the gearshifter mechanism that is located on the gearbox - I dont know why I keep doing this!!!

Anyway, after looking at it for about 10mins I came up with a very simple fab to make it work. I simply cut off the side-to-side arm of the selector linkage and mounted it further round to the rear - of course I had to reshape it and shorten it and then weld it back on in its new position but amazingly it was very simple and worked very very well. I guess there are a dozen ways to go about this job and there are people on this forum wo have done it totally different, but I just went for the KISS principle on this one.

The only real things you have to remember is the orinetation of the selector (cable pushed out pushed the selector out) and the leverage ratio (2:1 - the arm that pulls the selector in and out is 40mm long from the pivot pin and the arm that fits onto the cable is 80mm long from the pivot pin). Get those two right without fowling anything and you are on a winner!!

Anyway, here are the pics. This is the selector from underneath:
Image

Topside:
Image

And in position:
Image

Image

And from inside, the cables are all nice and flat against the floor:
Image

The gearbox is a bit notchy but all cable operated ones seem to be. I have a speed shifter gearstick for the box that I will put on that is supposed to shorten the throw by about 50mm - we will leave that for another day!!!

Cheers,
Tricky

_________________
"Not Speeding Officer..........Qualifying"


Top
 Profile  
 
 Post subject:
PostPosted: Sun Dec 04, 2011 6:12 pm 
Offline
848cc
848cc
User avatar

Joined: Wed Mar 14, 2007 3:50 pm
Posts: 404
Location: MORNINGTON PENINSULA
Woohooo good work ol sock, at this rate you'll be burning rubber in no
time

What did you get the mirrors off?

Cheers Hallsey

PS gotta love the bonnet strut :D :D


Top
 Profile  
 
 Post subject:
PostPosted: Sun Dec 04, 2011 9:46 pm 
Offline
1275cc
1275cc
User avatar

Joined: Fri Jun 17, 2005 10:31 am
Posts: 3183
Location: Burpengary, Queensland - Home of Tricky Performance Engineering
Hey Hallsey,

I hope so - need driveshafts and it would be a driver!!

Mirrors are from here: http://visionhotrod.com/gallery.php
I have the VF2 - and you can even get them with LED indicators built in.

Bonnet strut was a one-off custom!!

Cheers mate,
Tricky

_________________
"Not Speeding Officer..........Qualifying"


Top
 Profile  
 
 Post subject: BBQ at Tricky's
PostPosted: Mon Dec 05, 2011 3:15 pm 
Offline
1275cc
1275cc
User avatar

Joined: Fri Jun 17, 2005 10:31 am
Posts: 3183
Location: Burpengary, Queensland - Home of Tricky Performance Engineering
Hey Everyone,

Is Anyone interested in having a Xmas BBQ at my place on Saturday afternoon/evening.

The pool will be available for your entertainment, and we can watch some vids on the wide-screen, and eat and drink and be merry.

JC, sorry about the short notice, but if you book a flight now.....

Please let me know soonest,

Cheers,
Tricky

_________________
"Not Speeding Officer..........Qualifying"


Top
 Profile  
 
 Post subject: Re: BBQ at Tricky's
PostPosted: Mon Dec 05, 2011 3:35 pm 
Offline
This space for rent
User avatar

Joined: Thu Feb 08, 2007 12:40 pm
Posts: 5455
Location: Melbourne
Archangel007 wrote:
Hey Everyone,

Is Anyone interested in having a Xmas BBQ at my place on Saturday afternoon/evening.


Yes!!

Shame I'll be in Victoria, but at least I'll (hopefully) be admiring my freshly-concrete-filled trenches :)

(They'll either be filled with concrete or water, anyway :lol: )

_________________
Simon

The adventures of an owner builder in the Tallarook Ranges

Image


Top
 Profile  
 
Display posts from previous:  Sort by  
Post new topic Reply to topic  [ 1864 posts ]  Go to page Previous  1 ... 85, 86, 87, 88, 89, 90, 91 ... 125  Next

All times are UTC + 10 hours


Who is online

Users browsing this forum: No registered users and 18 guests


You cannot post new topics in this forum
You cannot reply to topics in this forum
You cannot edit your posts in this forum
You cannot delete your posts in this forum
You cannot post attachments in this forum

Jump to:  

© 2016 Ausmini. All garage work involves equal measures of enthusiasm, ingenuity and a fair degree of irresponsibility.