So with help from the forum I managed to draft up a engine lift bracket, if you want a better image pm me and I will email you the pdf. Still need a hand with the engine stand adapter though:
So here's the scenario, I'm back at work for another stint and just itching to pull the engine out when I get back home. Last time I was home I was prepping and brought a 300kg SWL (safe working load) engine stand and borrowed a chain block (aka, endless chain). But oh no, I have no lifting bracket or engine adapter for the stand. A bit of searching during my lunch break and I find these same questions asked and answered in many ways. Unfortunately I still can't find all the info I need. So hopefully with the wealth of knowledge at this forum we can put it to bed once and for all. I will even draft a drawing for how to build an engine stand adapter and lifting bracket including all dimensions, materials and so on. I understand each to their own but at least it might be able to help a few people out.
So what I have learnt so far:
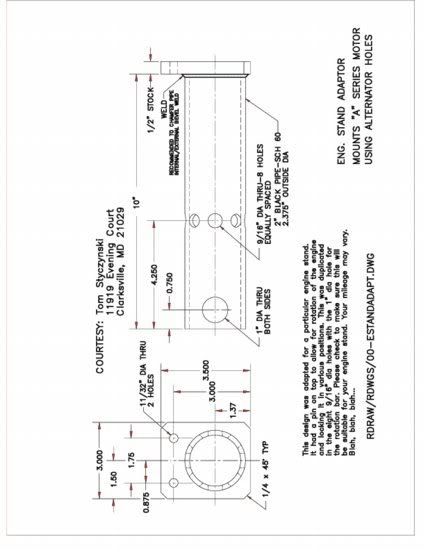
Engine stand adapter:
-most commonly 2 bolts are used in the alternator mounts although this is cast steel and may be fragile, thus it is recommended to use a third bolt as well (like the good drMini's, Fig A).
- you use 2x 5/16" UNF bolts that are 1" long and a 3/8" UNC (starter bolt) for the third
-A drafted drawing has been given before (Fig B)
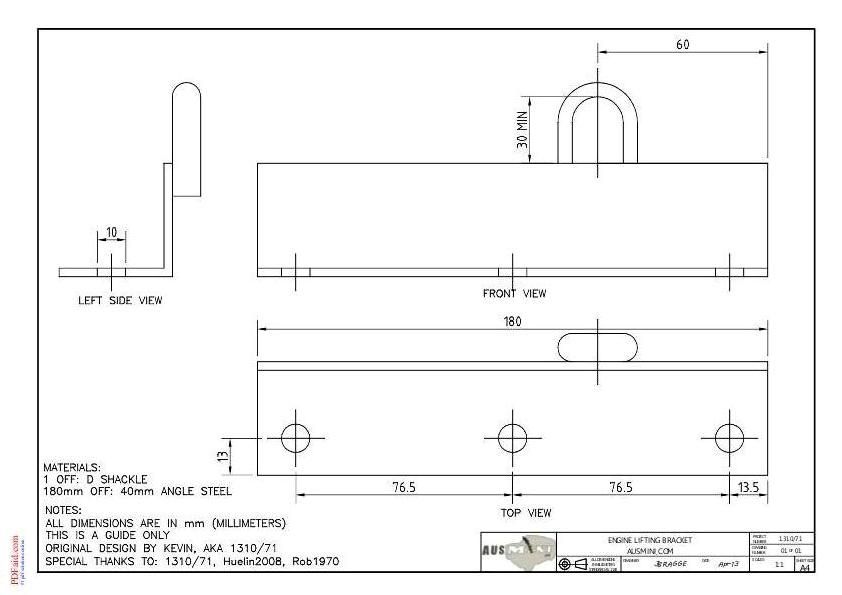
Lifting Bracket:
-the how to guide gives an example by 1310/77 (found here;
http://www.ausmini.com/forums/viewtopic.php?t=36503)
-the basis of which I plan to use
Fig A:

Fig B:
What I hope to learn (my questions):
Engine stand adapter:
(I realise I could just measure my engine but it is some 3000km away and I would like to weld everything while on my lunch breaks as I don't have a welder at home

)
-I will be using a plate and welding the pipe from the drafted drawing onto the plate, what are the distances between the hole centers? (eg, first alternator hole is 40mm from top edge of plate, second is 30mm to the right, third is 120mm directly beneth this one and then 36mm to the right)
-where will the pipe centre roughly go on the plate to achieve the best center of gravity?
-what size holes should they be to ensure a snug fit of the bolt (the +2mm rule apply?)
The lifting bracket:
-again what size holes? (same as the 5/16" like on the engine stand?)
-distance between each cam rod on the rocker cover that it will be attached to (bolt centers please)
-is a welded D shackle the best bet or another hole for a full D shackle to be attached too
-if the latter location of this hole
I think that pretty much sums it all up, I know I am asking ALLOT but if it is all figured out, then I can give back some pretty pictures to spread around and hopefully help some more people

Cheers and many thanks[/img]