Ausmini
It is currently Sun Jun 22, 2025 4:43 pm

All times are UTC + 10 hours


Post new topic Reply to topic  [ 1864 posts ]  Go to page Previous  1 ... 114, 115, 116, 117, 118, 119, 120 ... 125  Next
Author Message
PostPosted: Tue Apr 08, 2014 8:50 pm 
Offline
848cc
848cc
User avatar

Joined: Wed Mar 17, 2004 6:05 pm
Posts: 310
Location: Kallangur, Brisbane
Nah, there was no mud or anything just water. So I just swept all the water out and let it dry.

_________________
72 Clubbie - Current project - Vauxhall C20XE 2000cc 16v 150hp.
78 Clubbie - Future project.
Image


Top
 Profile  
 
PostPosted: Wed Apr 09, 2014 7:52 am 
Offline
848cc
848cc

Joined: Wed Oct 24, 2012 12:06 pm
Posts: 28
Hey Tricky,

Thats alot of rain in two hours. Thank god your shed was purpose built and came out perfectly without any damage to anything.

Cheers

Insom


Top
 Profile  
 
PostPosted: Wed Apr 09, 2014 6:12 pm 
Offline
1275cc
1275cc
User avatar

Joined: Fri Jun 17, 2005 10:31 am
Posts: 3183
Location: Burpengary, Queensland - Home of Tricky Performance Engineering
Hey mate,

Yes it certainly was - it was torrential!!
The shed fulfilled its design intent 110% - and thank god it did!!

Happy with the outcome, and back on to The Cat on the weekend! :D

Cheers,
Tricky

_________________
"Not Speeding Officer..........Qualifying"


Top
 Profile  
 
PostPosted: Mon Apr 14, 2014 9:13 pm 
Offline
1275cc
1275cc
User avatar

Joined: Fri Jun 17, 2005 10:31 am
Posts: 3183
Location: Burpengary, Queensland - Home of Tricky Performance Engineering
Quick Update:

I didnt get as much done on the weekend as I hoped - isnt that always the way!!

I realised I needed a few more Earls fittings for the swirl tank and I will order those this week so I can continue this weekend and hopefully get the boot closed out - I think I said that last weekend!!! :shock: The overflow pipe from the swirl tank to the fuel tank is a -4 hose (5.56mm ID), whereas the Earls fitting that I have on the top of the swirl is a -6 fitting (8.9mm ID) - so the hoses/fittings are incompatible. I bought them probably 12-18 months ago now so I must have gotten mixed up or forgotten the correct size. :roll:

Anway, I got the fuel tank vent pipes all done, it was simply a case of a quick trip to Masters to get a 1/4" fuel bard 'T' with 1/4" BSP thread on the tail end. I grabbed a few copper washers while I was there so I could sandwich some o-rings between the fuel tank and washers to allow for an airtight seal. Installation was simply drilling a 12mm hole with the step-drill and then screwing it in - had to take out the fuel sender/strainer/pump unit to get my hand in there to tighten the nut though, but all good in the end. Then it was a case of trimming the hoses to length tightening them onto the barbs.

This is the brass Tee - 1/4" bards and 1/4" BSP screw thread - note the sandwiched O-rings between the copper washers:
Image

Installed in the tank:
Image

And with the hoses cut to length and connected:
Image

I did run some fuel lines as well, and opened up some holes for the fuel lines to run through - as the rubber grommets are way bigger than the standard holes - I didnt take any pics though. Other than install a Earls fitting on the swirl tank, that was about it - not much I know but progress is progress.

Next week, if I have all the fittings on hand, I should be able to finish off all the fuel lines, and then do the wiring.

Cheers,
Tricky

_________________
"Not Speeding Officer..........Qualifying"


Top
 Profile  
 
PostPosted: Sat Apr 26, 2014 8:04 pm 
Offline
1275cc
1275cc
User avatar

Joined: Fri Jun 17, 2005 10:31 am
Posts: 3183
Location: Burpengary, Queensland - Home of Tricky Performance Engineering
Hi Forumites,

Well I havent been idle over the last two weeks, I have managed to fit a few hours in on The cat - mostly Sunday afternoons when all is quiet in the Treloar household, and some free time becomes available.

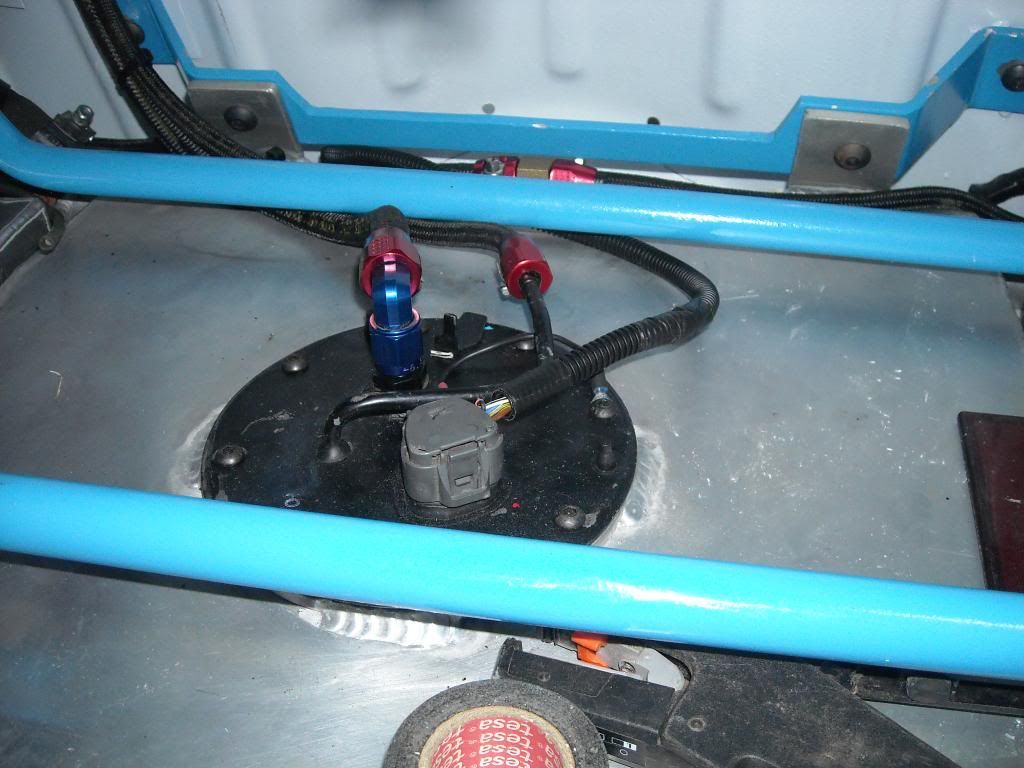
Last weekend I did manage to run all the fuel lnes in the boot and fit them off. It was not so much as a huge job, but just one of those fiddly jobs where you have to have double-jointed everything to be able to complete the tasks. Some of the stuff that was fitted into place had to be removed in order to fit the fuel lines or fit them off - like the swirl tank, it had to come out to fit the line to the main fuel pump - its just a case of too much equipment and not enough space!!

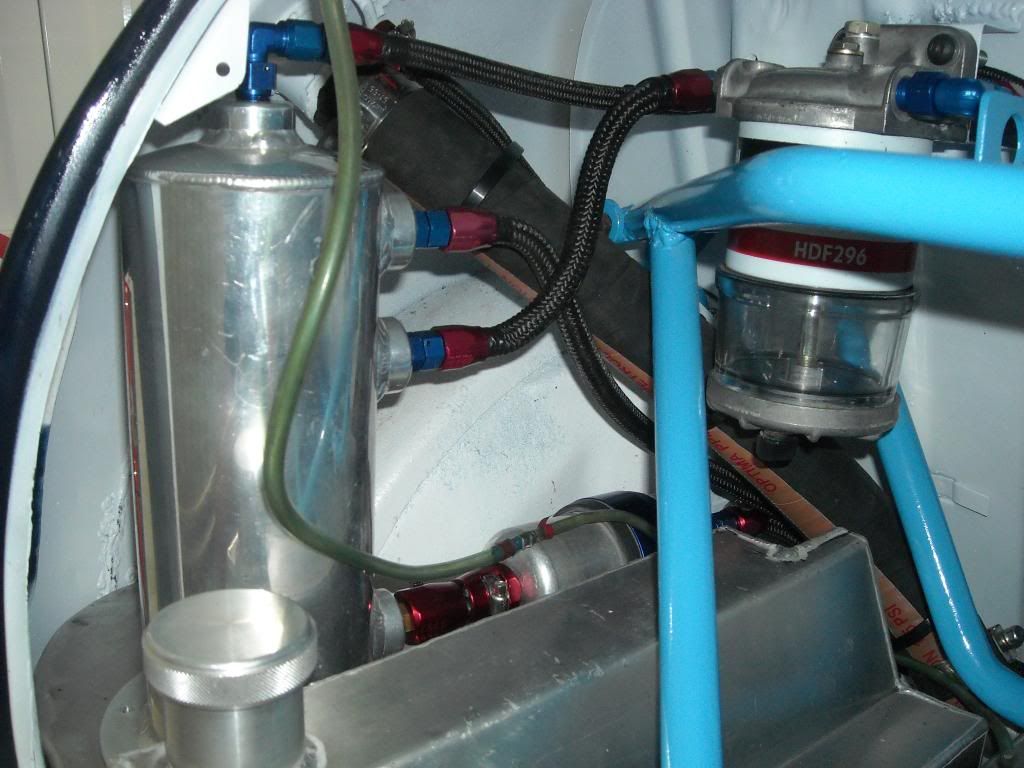
As promised the Earls fittings arrived mid-week and they were the first things to go on - now all the hose sizes and AN- fittings were aligned and the Gods were happy. The fuel feed and the fuel return to and from the tank completed:
Image

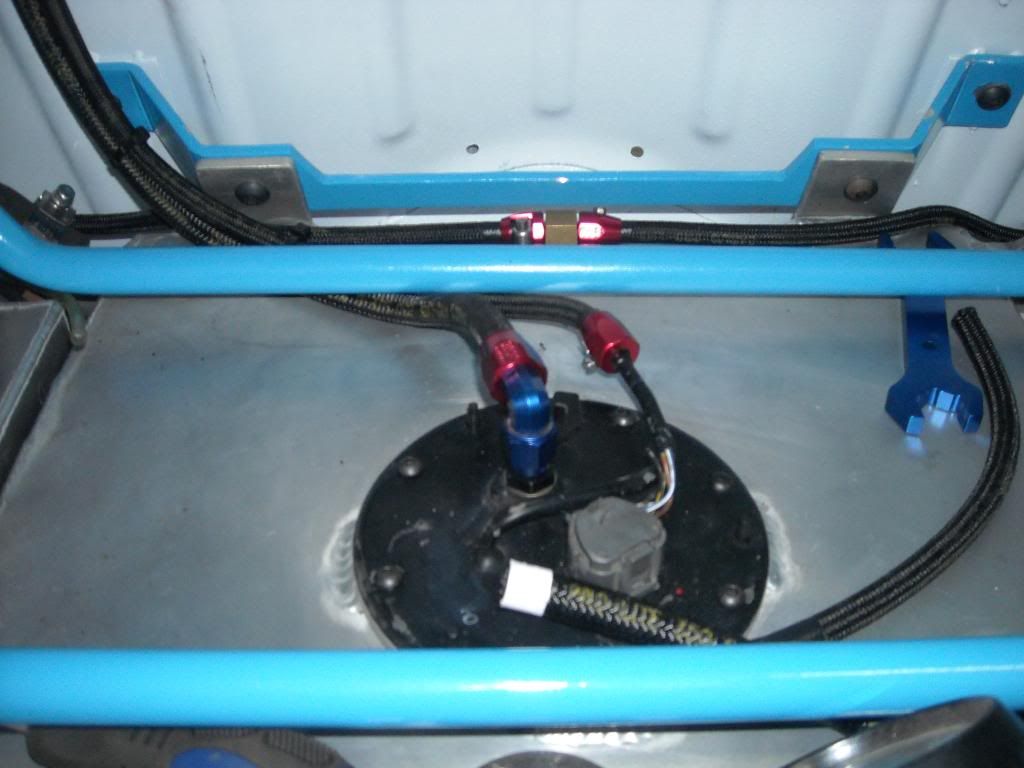
The fuel lines to and from the swirl, to the main pump, filter and return line, and then forward to the hard lines all done, and looking good:
Image

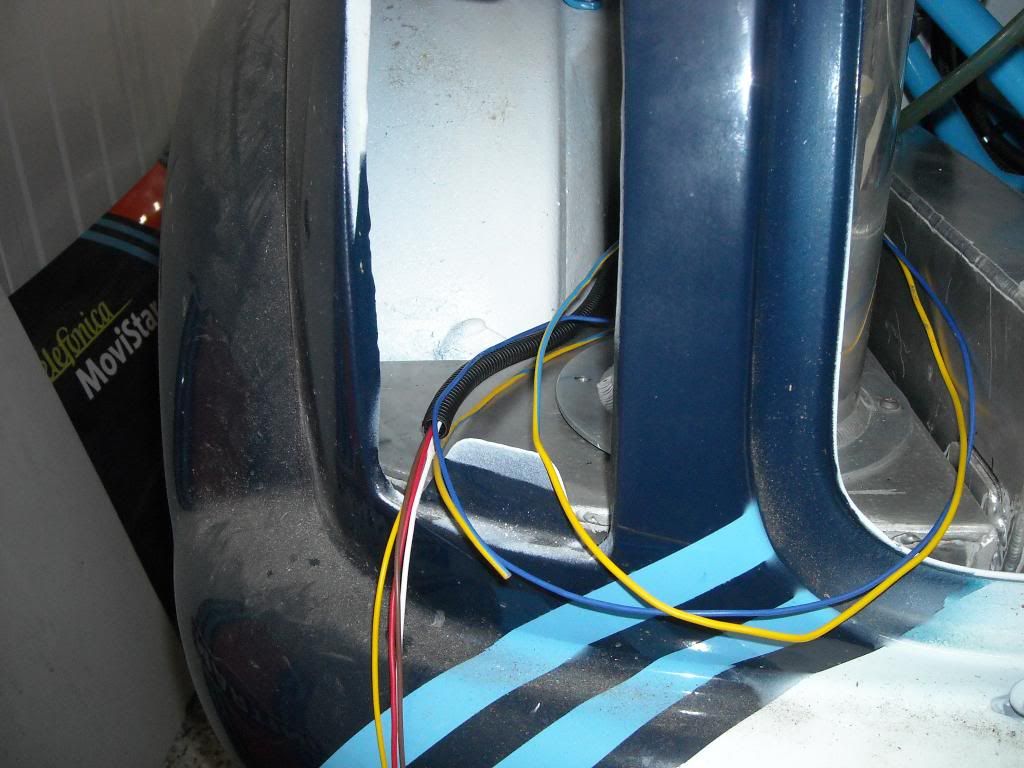
That was basically the end of last weekends foray into the shed. This weekend saw me have some free time on Anzac Day to put some hours in, after I came back from the Dawn Service and the march. The kids went to friends and the wife was at work, and so I had a few hours spare before Pat came over. It was time to get stuck into the eletrical. Because I had so much equipment in the boot - like 12 circuits - I ended up doing a spreadsheet with regards to what wire went where and what it was terminated to. The spreadsheet was invaluable in making sure I fitted off the wiring correctly - as long as you had all the circuits listed - and I hadn't!!

I ended up forgeting the reversing lights - !!! I plum forgot them until I saw the double prongs on the indicator bulbs! After a few curses and expletives under my breath (and checking with Hallsey), I ended up pulling out the loose wiring loom, undoing it and them redoing it with two extra wires - 'cause I ended up commoning the signal wires from the in-tank sender unit, and the WMI sender unit - basic mistake and glad I found it - it was a case of too many of the same colour wires, in this case black, and confusing one for another.

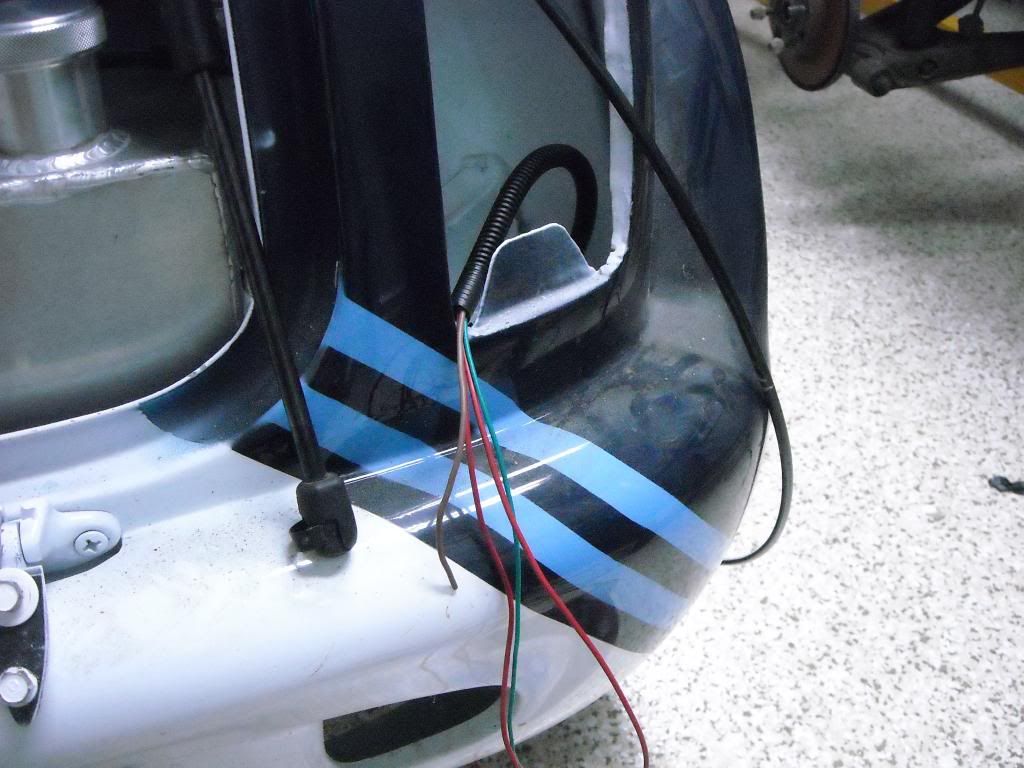
So, with the wiring loom rerun, and all taped back up, and the wiring count spot-on this time, I proceeded to fit-off the equipment that was able to be done. First was the windscreen washer pump - I ended up pulling this out of its grommet and solderig some fly-leads onto the motor connector directly and them terminating them into a male 2-piece connector. While it was out, I tested the pump in a bucket of water as it has three connectors - the third connector actually makes is spin at half speed and in reverse - this services the single washer nozzle on the rear windscreen, which I wont have. Once it was all terminated correctly - full speed in the forward direction - I reinstalled in into the tank, and terminated the wiring into the female 2-piece connector. Next to go was the main fuel pump - Bosch make this really easy - 5mm post for the positive with its corresponding 5mm lug, and 6mm for the negative with its corresponding 6mm lug - you cant get them mixed up, it just took some time to fit the rubber boots over the cables, fit the cable ends off, get my hands in there and put the lugs on, followed by the compression washers (both 5mm and 6mm), and then the nuts (again both 5mm and 6mm), and a good tighten with the 1/4-drive socket.

Cables run:
Image

Main fuel pump and windscreen washer terminated:
Image

Also done is a penetration through the floor for the windscreen washer silicon hose, which runs over to the drivers side and runs alongside the WMI hard nylon line (no pics).

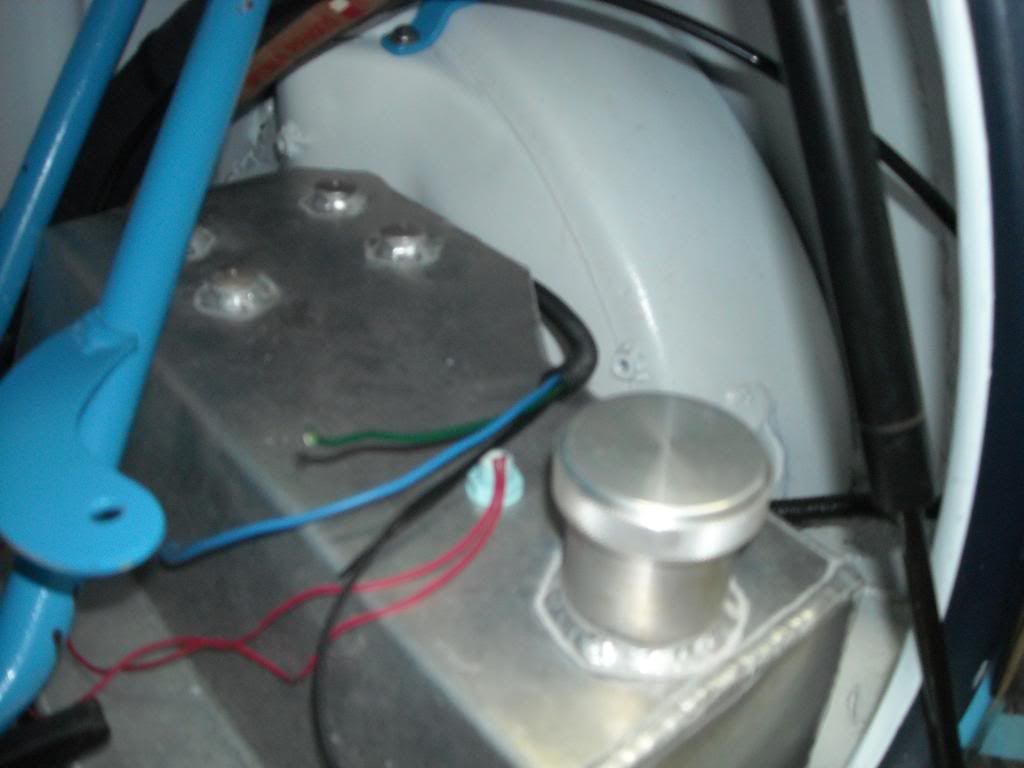
Next to be terminated was the fuel tank sender/pump unit. It has fives wires - two for the pump, two for the sender and an earth to ground the whole unit to the tank. Since it had its own connector, it was a basically just soldering and heat shrinking the correct wire on the plug to the correct wire on the loom. I them gave it some mechanical protection seeing as it will live inder the spare, and it was all done:
Image

The only things left to do now are the tail lights, the boot remote release, the WMI pump and tank level sender and the boot mounted number plate light. I have decided to buy new tail lights - from the Mk 4/5 Mini in the UK, as they have a section in the tail light that is dedicated to the reverse light function, not doubling up with the indicators as we do here on our Clubmans - so the light terminations will have to wait. I also need new gaskets as well, so kill two birds with one stone there.

The light wiring is in position and ready to go:
Image

Image

I have also decided to change the WMI pump - I am going to grab a higher psi pump than what I have. The one I have at the moment is perfect for intercooler water spray or even large capacity W2A intercoler pump - but for WMI its really not up to the task. If you take into account the turbs will be running at 16psi the effective water spray pressure is only about 23psi (pump pressure absolute is 40psi) - the nozzles need a minimum of 25psi to atomise properly, so I have ordered a 200psi pump which, believe it or not, is not much bigger than the one I have and bolts up to the same mounting lugs on the tank. Should be here soon.

Wiring for the WMI tank level sender and pump in place:
Image

Also to do is the boot license plate lamp. I have the original, which has been sprayed silver on the inside to help reflect the light upward and onto the license plate. It looked like dog balls on a mouse when I mounted it up!! I want to repaint mine white, so it blends in a little more with the paintwork. Might get that done tomorrow and then refit the boot lid, as the tail lights can all be fitted off from the outside (mostly). Might even look at some flush-mounting LED's for the license plate lighting, hmmm, food for thought there!!

Cheers,
Tricky

_________________
"Not Speeding Officer..........Qualifying"


Top
 Profile  
 
PostPosted: Sun Apr 27, 2014 6:14 pm 
Offline
1275cc
1275cc
User avatar

Joined: Fri Jun 17, 2005 10:31 am
Posts: 3183
Location: Burpengary, Queensland - Home of Tricky Performance Engineering
Hi Gang,

Well Saints be praised - got another hour or so on The Cat today, and did a little bit more in the boot.

Fitted off the WMI tank sender unit - nothing special here, just used another 2-pin connector and some 10mm split conduit. Done:
Image

While I was in this area, I fitted off the loom-side of the WMI pump - simply it was the same as the above, but only the female side of the connector, as the male side will be on the pump itself. Also in this area, was my earth point. This is where all the earths are tied to the body at the rear. There will also be a corresponding earth point at the front of the car - that way if an earth cable gets compromised between the back and the front (unlikely) it will still be earthed by at least one point. The blue is the common for all the pumps (4 pumps), and the white is the common for all the lamps.
Image

Last but not least, I ran the sub-loom for the license plate light, and left it bare until I decide what I am doing for a light (LED or standard Mini lamp) and until the boot lid goes back on.
Image

So, still to do are the tail lights - they need to arrive from the UK; the remote boot release - need to grab a single-pin connector from Autobarn or somewhere; the WMI pump - which needs to arrive from the US; and the boot lid license plate light - which needs to be sorted and painted if necessary. Thats about it, small steps but steps nonetheless.

Cheers,
Tricky

_________________
"Not Speeding Officer..........Qualifying"


Top
 Profile  
 
PostPosted: Sun Apr 27, 2014 6:49 pm 
Offline
848cc
848cc
User avatar

Joined: Wed Mar 14, 2007 3:50 pm
Posts: 404
Location: MORNINGTON PENINSULA
:D :D :D good to see consistent progress my friend :D

every hour worked is an hour closer to driving zee beast

cheers Hallsey


Top
 Profile  
 
PostPosted: Sun Apr 27, 2014 6:50 pm 
Offline
848cc
848cc
User avatar

Joined: Wed Mar 14, 2007 3:50 pm
Posts: 404
Location: MORNINGTON PENINSULA
:D :D :D good to see consistent progress my friend :D

every hour worked is an hour closer to driving zee beast

cheers Hallsey

ooopppssss itchy trigger finger aka double post lol


Top
 Profile  
 
PostPosted: Sun Apr 27, 2014 7:42 pm 
Offline
1275cc
1275cc
User avatar

Joined: Fri Jun 17, 2005 10:31 am
Posts: 3183
Location: Burpengary, Queensland - Home of Tricky Performance Engineering
hallsey wrote:
:D :D :D good to see consistent progress my friend :D

every hour worked is an hour closer to driving zee beast

cheers Hallsey


I cant help but be caught up in the euphoria around me Hallsey, its infectious.

Pat came by on Friday, he has a VTEC-powered Mini race car and he wants me to start his wifes VTEC-powered road car ASAP; Ray came by last week and he just bought himself a VTEC-powered race car: then there is Leonidas who is simply going to be awesome and is progressing at a great rate of knots: and not to mention another client who dropped his shell and halfcut off at the beginning of the month who also wants a mid-mount RWD conversion - its all happening and I want to be a part of it!!!

Need to pull my other fingers out - time is short and ass is sore!! :shock:

Cheers,
Tricky

_________________
"Not Speeding Officer..........Qualifying"


Top
 Profile  
 
PostPosted: Sun Apr 27, 2014 7:47 pm 
Offline
1275cc
1275cc
User avatar

Joined: Sat Nov 19, 2005 1:37 pm
Posts: 2495
Location: Vegus, Brisvegus
It is so good to see you busy at your new business. Not many people can turn a redundancy into such a positive result. These rear engined vtec cars are going to be rocket ships!

M


Top
 Profile  
 
PostPosted: Sun Apr 27, 2014 8:02 pm 
Offline
1275cc
1275cc
User avatar

Joined: Fri Jun 17, 2005 10:31 am
Posts: 3183
Location: Burpengary, Queensland - Home of Tricky Performance Engineering
Hey, thanks Ross, nice of you to say!!

My goal is to build enough mid-engined, RWD Mini's to have our own race series - like the Aussie Racing Cars or SR3 Radicals but much, much cheaper. Talked to John Tetley up here and also Ben from Wakefield Park (who runs the MRA series) and they think its a good thing!! We could bundle all the modified Mini's into one class even!

Oh, and just as an aside, the 2nd mid-mounted RWD Mini isnt going to be Honda-powered - surprise!!! :shock:

Cheers,
Tricky

_________________
"Not Speeding Officer..........Qualifying"


Top
 Profile  
 
PostPosted: Sun Apr 27, 2014 8:07 pm 
Offline
848cc
848cc
User avatar

Joined: Wed Mar 14, 2007 3:50 pm
Posts: 404
Location: MORNINGTON PENINSULA
Mokesta wrote:
It is so good to see you busy at your new business. Not many people can turn a redundancy into such a positive result. These rear engined vtec cars are going to be rocket ships!

M

Dito mokesta Its good to see but not suprising considering the quality of his work

Well done brother

heers Hallsey


Top
 Profile  
 
PostPosted: Tue Apr 29, 2014 9:01 pm 
Offline
1275cc
1275cc
User avatar

Joined: Fri Jun 17, 2005 10:31 am
Posts: 3183
Location: Burpengary, Queensland - Home of Tricky Performance Engineering
hallsey wrote:
Mokesta wrote:
It is so good to see you busy at your new business. Not many people can turn a redundancy into such a positive result. These rear engined vtec cars are going to be rocket ships!

M

Dito mokesta Its good to see but not suprising considering the quality of his work

Well done brother

heers Hallsey


Thanks Steve-o, what a really nice thing to say.

Hopefully i will get some more done this weekend.

Cheers,
Tricky

_________________
"Not Speeding Officer..........Qualifying"


Top
 Profile  
 
PostPosted: Tue Apr 29, 2014 9:02 pm 
Offline
1275cc
1275cc
User avatar

Joined: Fri Jun 17, 2005 10:31 am
Posts: 3183
Location: Burpengary, Queensland - Home of Tricky Performance Engineering
Mental note to self - order gear!!

Cheers,
Tricky

_________________
"Not Speeding Officer..........Qualifying"


Top
 Profile  
 
PostPosted: Thu May 01, 2014 9:54 pm 
Offline
848cc
848cc
User avatar

Joined: Wed Mar 17, 2004 6:05 pm
Posts: 310
Location: Kallangur, Brisbane
Awesome mate, good to see El Gato out of the corner.

_________________
72 Clubbie - Current project - Vauxhall C20XE 2000cc 16v 150hp.
78 Clubbie - Future project.
Image


Top
 Profile  
 
Display posts from previous:  Sort by  
Post new topic Reply to topic  [ 1864 posts ]  Go to page Previous  1 ... 114, 115, 116, 117, 118, 119, 120 ... 125  Next

All times are UTC + 10 hours


Who is online

Users browsing this forum: No registered users and 4 guests


You cannot post new topics in this forum
You cannot reply to topics in this forum
You cannot edit your posts in this forum
You cannot delete your posts in this forum
You cannot post attachments in this forum

Jump to:  

© 2016 Ausmini. All garage work involves equal measures of enthusiasm, ingenuity and a fair degree of irresponsibility.