Jenk wrote:
Thanks SCA1PER Ive tried tapping it out with a centre punch... no good, not sure I want to smash it out either appreciate the advice.
Doc the engine is already out subframe and all so this will make it easier but I really like Dave's (sitnlo62) idea of making a drill guide that will bolt to the side of the block via the other engine steady hole along with one of the crankcase bolt holes enabling you to keep the bit completely square whilst drilling out the easy out with one of those you beaut drill bits. Dave... true champion that he is even offered to make the jig and send it to me from Melbourne... What an absolute legend of a bloke!! Off course I will be buying him a case of beer or two, it just restores your faith in humanity to see that there are still such good people willing to help out there!! your a legend Dave!!
I will photograph the set up once I have it bolted in place to give you all a better idea/understanding of Dave's idea.
cheers
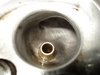
I used Dave's drill jig today on Jenk's S block in my bench drill. Drill bit it uses is an ARTU 6mm `all purpose drill', it appears to be solid carbide with an insert (stellite?) in it. Running at 2,250rpm, it made short work of the ezy-out.
I then removed the jig and drilled it out (slower!) with a 7.0mm HSS drill, and ran the 5/16 UNF plug tap into it by hand in the drill chuck. This peeled the bolt thread remains out.
Thread in the block is still perfect. Some swarf is showing in the pic.
Note I just sat the jig back on for the pic, it's not bolted down.
The welded bracket sits on the flywheel housing flange if using it in situ.
pics-


_________________
DrMini- 1970 wasaMatic 1360, Mk1S crank, 86.6HP (ATW) =~125 @ crank, 45 Dellorto (38 chokes), RE282 sprint cam, 1.5 rockers, 11.0:1 C/R.


