Ausmini
It is currently Thu Jul 24, 2025 3:13 am

All times are UTC + 10 hours


Post new topic Reply to topic  [ 15 posts ] 
Author Message
PostPosted: Fri Jul 17, 2009 5:16 am 
Offline
848cc
848cc

Joined: Mon Jun 18, 2007 11:36 am
Posts: 28
Location: Phoenix, AZ
Guys,

Almost at the point of putting the guts back into my doors (too hot to work in the garage.......), wondering what the best order to do this is? I'm thinking:

1) Lock/remote handle/Door handle
2) 1/4 vent window
3) winder mechanism
4) drop glass

Does that sound right?

Si

_________________
Happiness is a full can of high build primer


Top
 Profile  
 
 Post subject:
PostPosted: Fri Jul 17, 2009 7:24 am 
Offline
1360cc
1360cc
User avatar

Joined: Sun Apr 09, 2006 4:10 pm
Posts: 6337
Location: Ipswich Qld
I think it is more like 1, 3, 4, 2

Steve

_________________
1964 998cc Cooper
1971 Mini K x 2
1972 Clubman GT


Last edited by Panthersteve on Fri Jul 17, 2009 7:54 am, edited 1 time in total.

Top
 Profile  
 
 Post subject:
PostPosted: Fri Jul 17, 2009 7:50 am 
Offline
848cc
848cc

Joined: Mon Jun 18, 2007 11:36 am
Posts: 28
Location: Phoenix, AZ
Thanks Steve, the winder will hold the drop glass enough while the 1/4 vent goes in?. Just don't want to scratch the nice new paint.

Si

_________________
Happiness is a full can of high build primer


Top
 Profile  
 
 Post subject:
PostPosted: Fri Jul 17, 2009 7:51 am 
Offline
998cc
998cc
User avatar

Joined: Fri Mar 26, 2004 8:44 pm
Posts: 1084
Location: Far North Queensland
I would do it in the order you have proposed. Definately door handle/lock stuff in first and door glass last. Good luck.

_________________
Steve


Top
 Profile  
 
 Post subject:
PostPosted: Fri Jul 17, 2009 7:54 am 
Offline
Postally Verbose
Postally Verbose
User avatar

Joined: Mon Jan 02, 2006 9:12 am
Posts: 19595
Location: Northern NSW
Not sure about the other bit's but the 1/4 vent has to go in after the drop window or the drop window won't fit in . It has to tilt forward to get in and is secured by the 1/4 vent .

_________________
Image


Top
 Profile  
 
 Post subject:
PostPosted: Fri Jul 17, 2009 7:57 am 
Offline
1360cc
1360cc
User avatar

Joined: Sun Apr 09, 2006 4:10 pm
Posts: 6337
Location: Ipswich Qld
justminis wrote:
I would do it in the order you have proposed. Definately door handle/lock stuff in first and door glass last. Good luck.


You cant put the glass in last, it needs to be in place before the 1/4 glass goes in. While putting the 1/4 glass in you put the window glass into the channel on the 1/4 glass frame. If the 1/4 glass is installed first you can't fit the window glass.

Steve

_________________
1964 998cc Cooper
1971 Mini K x 2
1972 Clubman GT


Top
 Profile  
 
 Post subject:
PostPosted: Fri Jul 17, 2009 8:48 am 
Offline
848cc
848cc

Joined: Mon Jun 18, 2007 11:36 am
Posts: 28
Location: Phoenix, AZ
I think this is going to be one of those jobs where one side takes all morning and the other side 30mins! Will try 1,3,4,2 and see how I get on, will report back.

One more question, one of the doors had a wooden block in the bottom. I think it was to stop the drop glass going too far down, is that a common problem? Looks like there are stops on the winder mechanism gear. I'm thinking perhaps there was too much play between the drop glass and the 1/4 vent window channel, allowing the drop glass to rotate at the bottom of its travel and make it difficult to wind back up?

Si

Edit: Where have I heard 1,3,4,2 before???!!! Spooky.

_________________
Happiness is a full can of high build primer


Top
 Profile  
 
 Post subject:
PostPosted: Fri Jul 17, 2009 1:07 pm 
Offline
1275cc
1275cc
User avatar

Joined: Fri Oct 20, 2006 5:03 pm
Posts: 2729
Location: Out in the shed cleaning up my own mess.
yep, firing order is 1,3,4,2

watch out you don't scrape your nice new paint on the inside top frame of the door when inserting the 1/4 vent.

Gaffer tape?

_________________
1967 Cooper S - new front bearings to do.
1965 Cooper S shell - Slow progress. No time or money!
1966 Deluxe- next rustoration!
Mk 2 & XJ6 Jags. Less said the better.


Top
 Profile  
 
 Post subject:
PostPosted: Fri Jul 17, 2009 1:56 pm 
Offline
1098cc
1098cc
User avatar

Joined: Sun Oct 10, 2004 4:04 pm
Posts: 1533
Location: melbourne, victoria
did this the other day and 1342 was a goer. Tried to replace quarter vent rubbers? They are like 100 bucks a side.

D


Top
 Profile  
 
 Post subject:
PostPosted: Fri Jul 17, 2009 7:46 pm 
Offline
998cc
998cc
User avatar

Joined: Fri Mar 26, 2004 8:44 pm
Posts: 1084
Location: Far North Queensland
Panthersteve wrote:
justminis wrote:
I would do it in the order you have proposed. Definately door handle/lock stuff in first and door glass last. Good luck.


You cant put the glass in last, it needs to be in place before the 1/4 glass goes in. While putting the 1/4 glass in you put the window glass into the channel on the 1/4 glass frame. If the 1/4 glass is installed first you can't fit the window glass.

Steve


Of course. . . :oops: shouldn't post before I've had the coffee . . . .

_________________
Steve


Top
 Profile  
 
 Post subject:
PostPosted: Sat Jul 18, 2009 1:15 am 
Offline
848cc
848cc

Joined: Mon Jun 18, 2007 11:36 am
Posts: 28
Location: Phoenix, AZ
I do have some new rubber strip for the doors, bought it many years ago and its been sitting on the shelf - I hope its still good. Has to be better than the siliconed up stuff that was on there. Did you use the rivets supplied or pop rivets? Thinking I will pop rivet them on, the supplied rivets look a little cheesy to me.

Si

_________________
Happiness is a full can of high build primer


Top
 Profile  
 
 Post subject:
PostPosted: Sat Jul 18, 2009 1:51 am 
Offline
848cc
848cc
User avatar

Joined: Thu May 04, 2006 10:49 pm
Posts: 67
Location: Santa Rosa, CA USA
pommie wrote:
I do have some new rubber strip for the doors, bought it many years ago and its been sitting on the shelf - I hope its still good. Has to be better than the siliconed up stuff that was on there. Did you use the rivets supplied or pop rivets? Thinking I will pop rivet them on, the supplied rivets look a little cheesy to me.

Si


Simon, I used the rivets that were supplied, even though they seem a bit cheap. I liked the small brass (real rivets) that were on there, but couldn't find anything comparable. I've had no issues in 5 years.

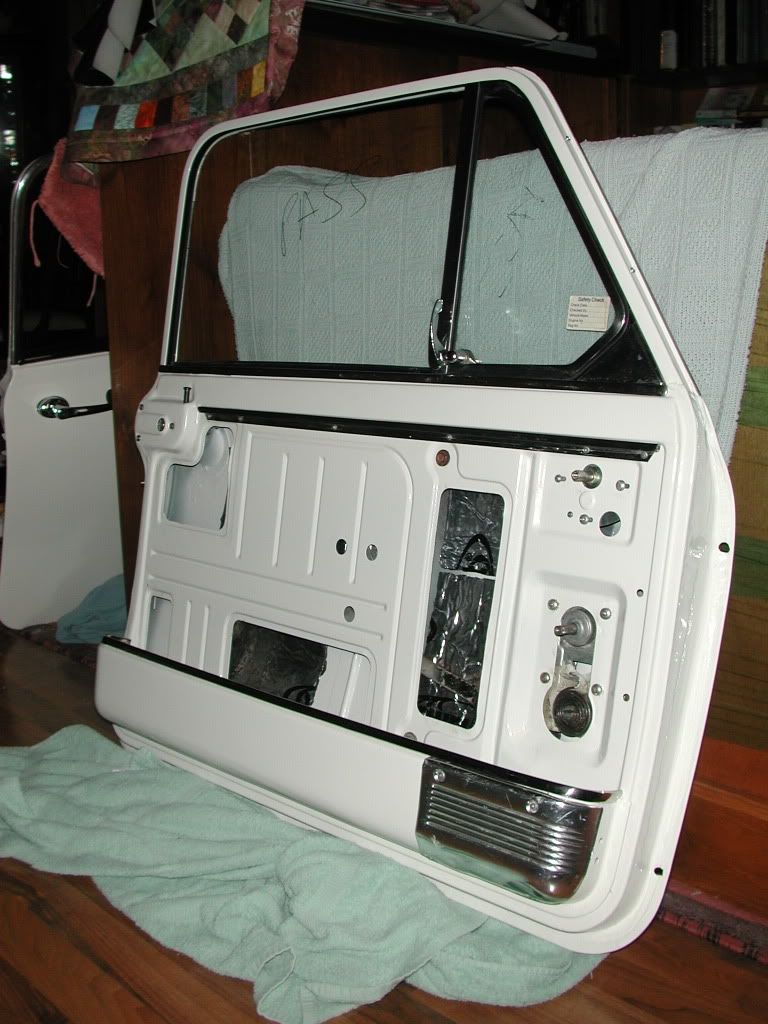
I also re-assembled my doors right after having the car/ doors painted, and I generously applied painters tape in 2 or 3 layers to the door frame before putting in the wing windows. They do rub the doors, so this will save your paint.

Another thing you might want to consider before re-assembling is the condition of your inside door latch mechanism

For about a year, my door latch has been hanging up slightly when using the inside door handle. It got worse after MMEMW in Winona to the point I couldn't open the door from the inside. Last weekend, I took out the inside latch assembly and found it worn. There is a cam that a stepped pin rides up and 2 springs that push down on the pin which forces the handle back down to the start position. My cam had worn unevenly, so the roller was stuck sideways in the latch assembly. The assy is riveted, so I drilled them out, opened it up, filed the cam so it was even and replaced the petrified grease with new. I replaced the rivets with 6-32 flat head screws which fit perfectly into the rivet counter-bores and lock nuts.

Now the latch goes almost 1/4" into the door when I open it from inside and the operation is much smoother.

Good luck with it.

_________________
Image


Top
 Profile  
 
 Post subject:
PostPosted: Sat Jul 18, 2009 3:22 am 
Offline
848cc
848cc

Joined: Mon Jun 18, 2007 11:36 am
Posts: 28
Location: Phoenix, AZ
Will do Craig, a few layers of tape is a good idea. Funny how they riveted this stuff together, they must have considered the grease "lifetime fill' ;-) I'm going to put the latch assembly in first, I think it was working ok 2 years ago when I dismantled it but I'll check it. I'm at the point where I'm ready to throw this thing back together, can't wait to get it finished - need to take a deep breath and be patient.

Si

_________________
Happiness is a full can of high build primer


Top
 Profile  
 
 Post subject:
PostPosted: Sat Jul 18, 2009 9:07 am 
Offline
1275cc
1275cc

Joined: Mon Mar 22, 2004 7:41 pm
Posts: 4319
Location: Plumpton, NSW
Anton (GT) used to have a site called JAM and on there he had a how to on installing 1/4 vents and possibly assembling doors. Does anyone remember the current website address and if it is still there?
It may help in this situation.

_________________
Image


Top
 Profile  
 
 Post subject:
PostPosted: Sat Jul 25, 2009 11:08 am 
Offline
848cc
848cc

Joined: Mon Jun 18, 2007 11:36 am
Posts: 28
Location: Phoenix, AZ
Thanks fore the help Guys, 1342 did the trick - here is the order I used as per your suggestions:

Door lock U-bracket with connecting rod already attached
Inside door opener handle mechanism
Outer door handle
Lock mechanism
Bailey channel felt
Window winder machanism
Drop glass
1/4 window assembly.

Si

Image

_________________
Happiness is a full can of high build primer


Top
 Profile  
 
Display posts from previous:  Sort by  
Post new topic Reply to topic  [ 15 posts ] 

All times are UTC + 10 hours


Who is online

Users browsing this forum: No registered users and 129 guests


You cannot post new topics in this forum
You cannot reply to topics in this forum
You cannot edit your posts in this forum
You cannot delete your posts in this forum
You cannot post attachments in this forum

Jump to:  

© 2016 Ausmini. All garage work involves equal measures of enthusiasm, ingenuity and a fair degree of irresponsibility.