-------------------------------------------------------------------
This is the Start of Part II - the EFI part of the project.
-------------------------------------------------------------------
A lot of the hard work has already been done for this section as the Megasquirt was installed along with most of the wiring and sensors required for the EFI in the ignition phase.
The Megasquirt has been running well since installation. One problem I did have was related to having a alternator that was not regulating properly and a battery that was past it's use by date. You must have a good electrical system, more so with ECU's in charge of the spark.
Please feel free to add comments, questions or even tips for both phases!
Things to do to complete installation, in no particular order:
Remove existing 25L tank;
Run wire from FP connection on MS Relay Board to boot and crimp plug to suit the electric fuel pump in the new 37L ?? tank;
Mount the fuel pressure regulator on the engine bulkhead;
Run 5/16" Bundy tubing (fuel return line) from bulkhead to new fuel filter on rear subframe;
Connect fuel line and return to new tank inlet and outlets;
Secure tank;
Mount SU TBI adaptor in HIF44;
Connect Injector electrical plugs;
Connect rubber EFI hoses to fuel pressure regulator;
Have fire extinguisher at hand;
Test fuel lines for leaks;
Fix any leaks;
Adjust pressure to 12PSI;
Try and start it!.
Day 1:Have no money for the Bundy tubing, so not looking good this week for a start up.

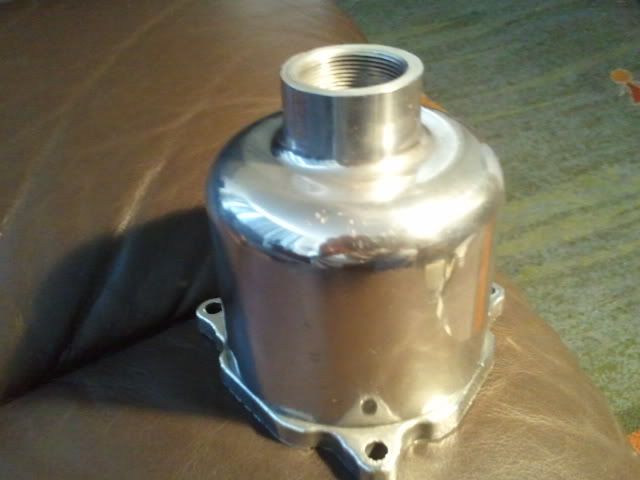
Nether less I had some time to polish the spare SU cover that will eventually go over the top of the TBI SU adaptor. I still have to mill, (since I don't have a mill, I'll have to file), a slot so the fuel barb and injector wires can come out... maybe a job for tomorrow.
Here it is partially done...
 Day 2:
Bugger all done today, had a drive around and marvelled in the new found low down torque; 
Took the factory air-cleaner off, to look at the front mounting bracket which unfortunately will get in the way of the brass 1/8" BSP 5/16" tail fitting supplying fuel to the carb adaptor. I might get away with removing part of this bracket.
The bracket in question is at the front of the SU near the inlet manifold.
 Day 3:
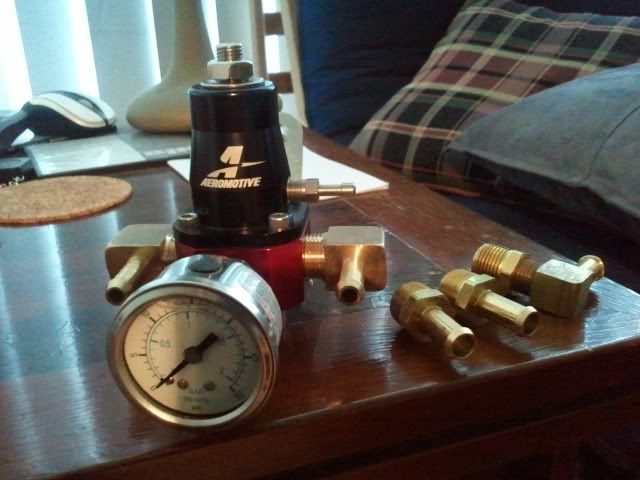
Got some Right Angle 3/8" x 5/16" tail brass "thingies" to replace the straight ones as supplied with the Aeromotive fuel pressure regulator. Unfortunately one of the three I bought, has a malformed thread and would not be able to seal properly, so it will go back for exchange at Bursons when I pass next.
You may be wondering about why I'm using the right angle "thingies" instead of straight ones? Well I'm a neat freak (well most of the time) and I wanted to make all the rubber hoses come in from the same direction and encroach the least amount in the bulkhead area. Also note I will be using some Loctite PTFE sealant on all of the threads so I wont get leaks.
The 0-30PSI adjustable regulator will be mounted on the bulkhead near the LHS engine steady mount just above the line where the original fuel pipe emerge from.
Day 4:Discovered last night that the brass fuel barbs I had purchased were the wrong thread size. I assumed wrongly that they were 3/8" BSP, but I needed 3/8" NPT which is a size more commonly used in the USA. So after I buggered around trying to find some locally, I got Piratek to order some in for early next week. Done.
Thanks to a suggestion from Fat Boy Dave, I'm now thinking of mounting the fuel regulator in the boot near the tank. I understand that there will be a slight drop in pressure, but that can be easily fixed by just cranking up the regulator. This will mean I don't have to run a fuel return line... which is great because I just hate crawling around under cars!
The supplier of the carb adapter, has stated in a FAQ on his web site that the run from the regulator should be no more than 3 foot. I have requested more info from him, hopefully I might hear from him by the end of the weekend. Discussing this today with Mick, we both thought... just suck it and see. But being the techo type I would like to know what the reasoning was behind the statement. If anyone reading this knows why, please let us know.
Not related to the MS'ing of my car, but I discovered when leaving Mick's that I had no panel lights when I turned on my headlights, but they turned on with the parkers!? Half way home a car following me was flashing his lights, so I pulled over to discover that my taillights were only coming on with my parkers, but not with my headlights... damm out with the multimeter tomorow.
Day 5: - Removing Fuel TankSorry for the lack of updates all you avid reader(s). Between my finances or lack thereof and school holidays... not much action. Thanks to the few that have sent PM's etc wondering where I was at. 
Decided to tackle removing the standard tank. I wasn't looking forward to this as I read on at least one of the threads here, that some one had tried for three weeks to remove his tank, also I hate crawling under cars! 
After jacking the car and putting it on axle stands, then I removed the battery, safety first. I then drained the tank (only around 3 litres) I clamped the rubber hose under the boot with a pair of vice grips, undid the hose clamp and placed the end into a 10L fuel canister. Done, easy peasy, only got a few dribles on me and the ground.
Undid the fuel tank drain plug from underneath the car using a 7/16" long socket I had. Unscrewed the long bolt joining the two halves of the tank strap and also removed the short strap. Used a screwdriver to lever the lip of the rubber gasket and used my finger to pull it off. Removed both the overflow pipe that was connected at the top of the tank, and also removed the rubber pipe connecting to the tank outlet. Grasped the tank wriggled it and out it came. I noticed that it was put back into the car, most probably when it was re-painted, without the foam collar that goes around the filler neck on the inside of the car. This is why I could smell fuel sometimes. 
The Rover tank uses a mounting strap that goes diagonally around rather than around the circumference as per the original. I'm going to use the Rover strap as I believe it locates the tank far better, and more importantly much safely... most probably why Rover changed it. Another member, Harley has a thread outlining what he did here: http://www.ausmini.com/forums/viewtopic.php?p=786569#786569 I'm waiting for the photos so I can make an adapter mount for the Rover strap.
I also need to get a new rubber boot seal, as some water has been getting in to the boot. I'll wire brush the surface rust and paint it with something, not sure what yet. 
Day 6: - KillRust to the rescueRust and more rust. The boot lid seal is perished and has gone hard, it has let in water that has rusted a nice circle where the spare wheel normally sits. If I had the money and knew how to MIG weld, I would have preferred to replace the wheel well, but I decided to just convert the rust using a phosphoric acid product, and then KillRust epoxy black paint over the top. A previous owner has done the same. Does anyone know of short courses in MIG welding over this side of Melbourne (I'm in Werribee):?:
Here is a picture of the KillRust'd boot floor. 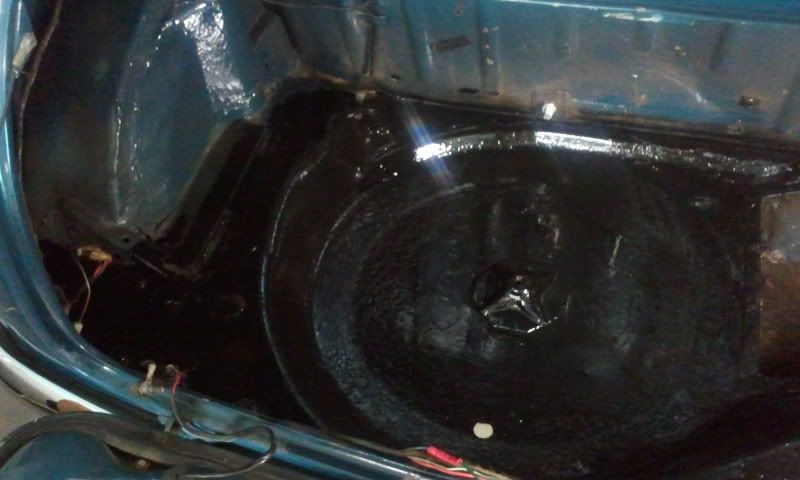
Not pretty, but hopefully it will buy me time until I can do it properly.
Tomorrow's to do list (I will hopefully):
fit the new L/H tail-light assembly;
fit the fuel tank;
make a mounting bracket for the different tank strap;
fit the EFI filter under the car;
mount the fuel regulator in the boot;
wire fuel pump to MS Relay Panel;
remove mechanical fuel pump and put blanking plate on;
run rubber EFI hoses as appropriate;
put fuel in tank;
pressure test system.
Day 7: - Fuel TankNot a lot done just did the following:
fitted the new L/H tail-light assembly;
fitted the fuel tank;
fitted and connected the fuel pump wiring and connector and threaded the wire inside the car... this will connect to the FP relay on the MS relay panel;
Fitted new blanking grommets to the two holes in boot, one under the tank the other in tyre well;
I have decided against locating the fuel regulator in the boot and mounting it in the engine bay near the L/H engine mount. This will require me to run some 5/16" bundy tube and clamp it with a few bundy clips along the run.
I'll use the existing 1/4" fuel line as the return line.
My budget, which went out of the windows ages ago, is very low, so I might have to wait to early next week for more monies to fill the coffers.
Still to be done are:
mount the fuel regulator in the engine bay;
wire fuel pump to MS Relay Panel;
remove mechanical fuel pump and put blanking plate on;
run 5/16" bundy tubing and secure using bundy clips;
run rubber EFI hoses as appropriate;
put fuel in tank;
pressure test system.
Day 8: - 1/4 Way thereToday I:
Decided to use a Ryco Z578 EFI filter in the Rover filter bracket. The reason for this is I couldn't locate anyone within the local area that could sell me the correct sized inverted flare tube nut's. The Z578 comes with 5/16" tails and it fits in the Rover clamp also, done deal!
Here it is before fitting to subframe.
Here it is mounted on subframe. Had to drill a extra hole (6.5mm diam) towards the rear.
Started to mount the fuel regulator in engine bay bulkhead;
Removed carby, and in doing so I lost the choke cable spring clip... http://www.minispares.com/Product.aspx?ty=pb&pid=37553&title=spent the next hour crawling under the car and over the garage, still haven't found it; 
Modified the air cleaner/throttle bracket so that the fuel hose can exit through it. Will upload a picture to show what I'm on about;
Removed the mechanical fuel pump, spacer and studs. Can't find the blanking plate I bought... will have to have a better look, plus will have to get a couple of 5/16" UNC bolts for it;
To be continued:Day 9: - PlumbingToday I:
Firstly I found the choke clip that I thought I'd lost, sitting smugly on the diff housing. I also found the mechanical fuel pump blanking plate sitting upstairs on my electronics workbench.
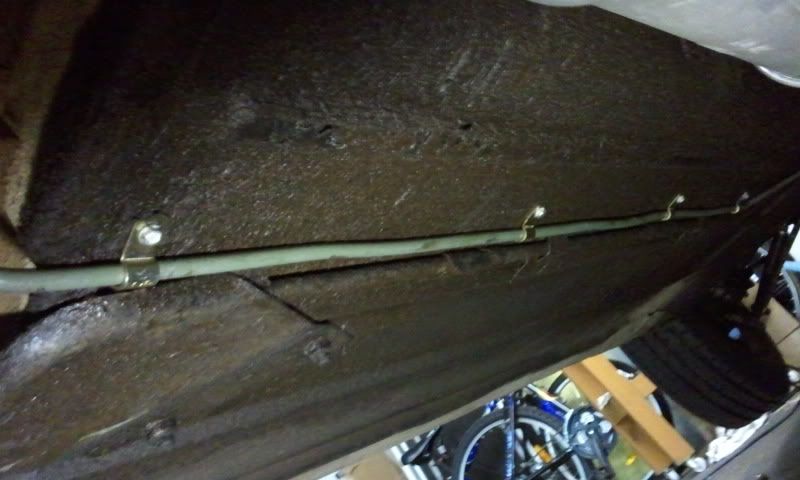
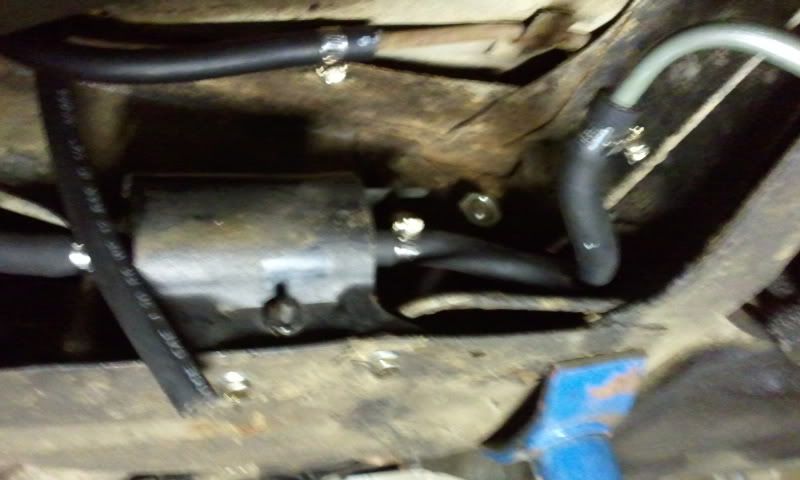
Rolled out the 5/16" bundy tubing and spent some time rolling around under the car measuring, re-measuring then bending and then more bending. Thanks Mick for the loan of the tube bender gizmo! I managed to get it to roughly follow the existing fuel lines with the exception of not going between the subframe and the rear bulkhead. Same for the front. I secured the main run with bundy tubing clips.
Here is a view from the rear of the bundy tube run. Excuse the oily look, it's from my previous engine... guess the floor wont rust.
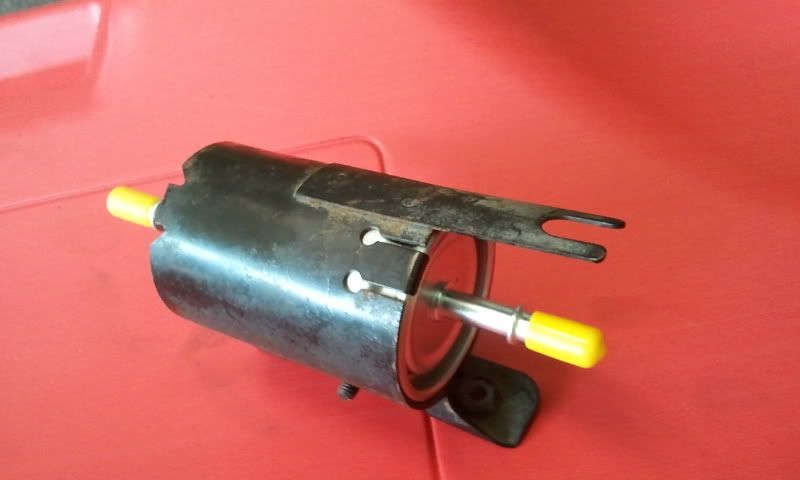
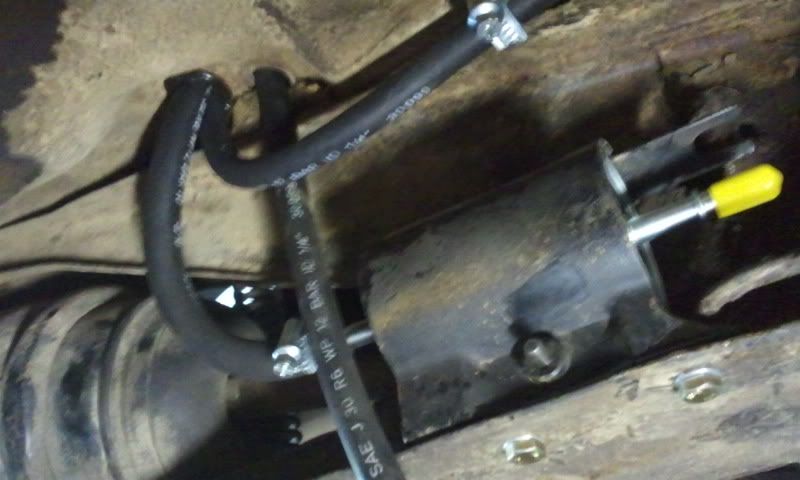
I remove the Ryco Z578 EFI filter and fitted a Ryco Z200 EFI filter, as Andrew (afh001) pointed out that the Z578 uses a quick connect system, and I needed 5/16" barbs.
Here is a picture showing the Z200 mounted in the Rover filter bracket. Excuse the blur, I had the shakes... low sugar levels I think.
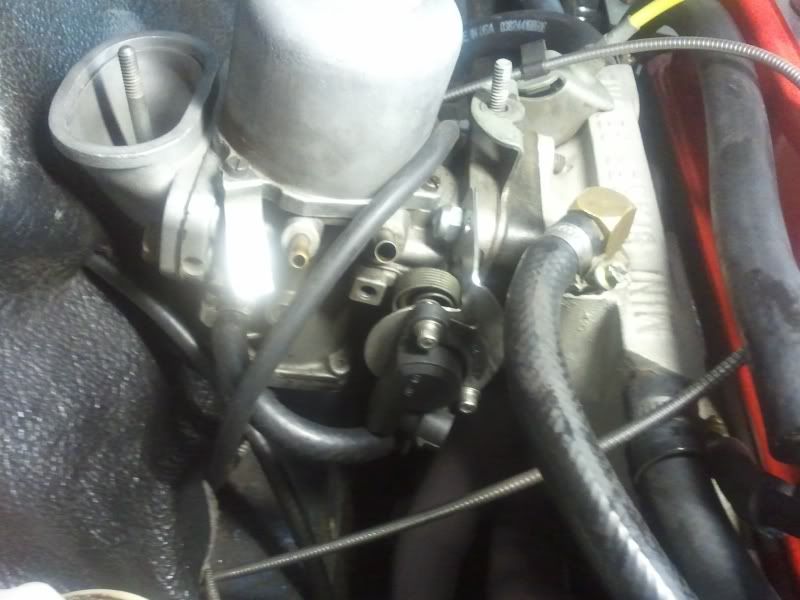
Mounted the fuel regulator with a bolt through the bulkhead. Remounted the HIF44 and the modified air cleaner/throttle bracket with new gaskets. Fitted the needle and bell housing. Connected the SU to the fuel regulator.
Here is the fuel mounted regulator. Once again blurry... sorry. 
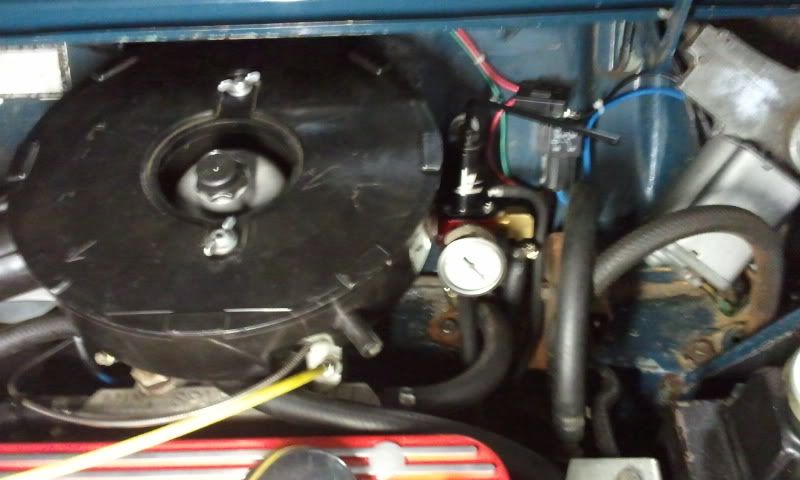
You might be wondering why I have re-connected the SU, and not the EFI carby adaptor; I wan't to start the car and make sure I can set the fuel pressure down to ~3PSI so if any problem happens with the EFI fuelling side, I can simply just plonk the bell housing along with the needle adjust down the pressure, and away I go. Also I have updated the firmware in the MegaSquirt so I want to make sure it will start without introducing any further unknowns into the equation.
Tomorrows list of things to do:Put at least 5L fuel in tank!;
Wire the fuel pump wire to the relay panel;
Refit the MegaSquirt;
Turn on ignition and check for:
Fuel pump working;
Fuel leaks;
Adjust for 3PSI.
Start the car;
Adjust base timing of MegaSquirt... I've been naughty, should have done this when I first got the MS going.
Run the two injector wires in a separate loom, located away from the other sensors, and especially the VR ignition wires;
Remove the SU's bell and needle;
Fit the carby adaptor;
Wire the injector;
Re-adjust fuel PSI up to 12PSI;
Start the car... hopefully. 
I'm really pushing the time envelope, as I'm hoping to drive this to the car show at Hanging Rock this coming Sunday. Worst case scenario is if I cant get it running on the EFI, I'll revert back to fueling it from the SU... that's the plan anyway.
Day 10: - Get it runningToday I:
Put fuel in tank!;
Wired the fuel pump wire to the relay panel;
Refited the MegaSquirt;
Turned on ignition and checked for:
Fuel pump working... Yes;
Clamped fuel inlet to carb, so that pressure does not overwhelm it
Fuel leaks... None, pressure stays up for a long time!;
Adjust for 3PSI... Wouldn't go to 3PSI, 5PSI seems to be the minimum;
Take off clamp, checked that the SU didn't flood with the 5PSI pressure, it didn't.
Start the car, it started;
Ran the two injector wires in a separate loom, located away from the other sensors, and especially the VR ignition wires;
Removed the SU's bell and needle;
Fitted the carby adaptor;
Wired the injector;
Re-adjust fuel PSI up to 10PSI (injector is rated 56lb/hr @ 10.15 PSI (70Kpa);
Started the car... click whirr, whirr... VROOM, VROOM
IT RUNS!Car starts, idles, and accelerates with some hesitation and farting around.
Took it for a 5Km drive whilst monitoring, have to look further into:
1. AFR at idle frequently hits 25:1... not good, I think it's the techedge, will check further, maybe it needs another free air calibration again;
2. Coming to a stop the car nearly dies, have to give it a real lot of throttle to clear it. Might be associated with #1;
3. Acceleration enrichment is not right, needs more. Engine feels a bit like when you have no oil in the SU damper, I.e. gives a stumble when the accelerator is floored then finally takes off right to the red line.
If I can get the idle AFR and acceleration enrichment fixed, I think I will be able to take it to the Hanging Rock show.
Update:Did some tuning of the VE table around the idle point, and also some ignition stuff. Car now is idling much better. Took it for a drive to the petrol station and around Werribee. I turned on the TunerStudio's Auto Tune function which alters the VE (volumetric efficiency) for a given RPM and MAP point. It tries to alter the VE value so the AFR matches the target AFR for the same RPM and MAP point. Guess what, it works!
At the moment there is a slight hesitation just of idle, but it's early days yet. One thing I have noticed is there seems to be very strong torque down low, for example pulling away from 30Kmh in third gear is very smooth.
Will take the car to pick up number one son from his Mum's tomorrow, this will give the Auto Tune function a wider variety of loads/RPM's.
Day 11: - Tuning and Drive to Hanging Rock ShowToday I:
Got up really early (for me anyway) to get ready for trip to the classic car show at Hanging Rock;
Car started from cold on first turn, always a good thing!;
I turned on data logging and "Auto Tune" for both the drive there and back, which I will study tonight;
Lots of cars there, even Gogomobile's and Hillman Imps including a Husky;
Caught up with David (fatboydave), Scott (poeee), Noel (?), Shawn (?), Josh (miniimports), and others;
Most had a look and discussion of my conversion... thanks everyone for your interest and kind comments;
The car is going better since it's had a couple hundred Km's under its belt using the Auto Tune function of TunerStudio. It's now where near perfect, but it handled the drive, from crawling at a snails pace to 110Kmh on the Calder Highway. I think I have a small problem with the wideband O2 sensor; seems to show very lean readings straight after any moderate increase in MAP readings I.e straight after accelerating it leans out then comes good again. It might just be lack of acceleration enrichment, I'll have to investigate further.
I'm not sure if I should update this thread with a new phase called "Tuning", or even if anyone is interested in my tuning attempts with the MegaSquirt ECU and TunerStudio software. Maybe if you're interested a Post or PM will set me straight.
Tomorrow:
Make a bracket to fit the AIC (air idle control) valve, and plumb in the valve and connect it up to the MS; this will provide warm up control, I'm not sure though, whether it provides idle control.