Ausmini
It is currently Sun Jun 22, 2025 4:34 am

All times are UTC + 10 hours


Post new topic Reply to topic  [ 342 posts ]  Go to page Previous  1, 2, 3, 4, 5, 6, 7, 8 ... 23  Next
Author Message
 Post subject:
PostPosted: Tue Sep 05, 2006 7:22 am 
Offline
998cc
998cc

Joined: Tue Apr 06, 2004 4:30 pm
Posts: 871
Location: welington new zealand
probably mine that im waiting for.
gess the whole of oz is against me. sulk.

YEah he mentioned the bolts to me aslo and said that the hardness was appauling. I mentioned ot him about the competition diff pins and they are the same hardness as the std diff pins but charge twice as much, they still wear out.

_________________
www.minicranks.com add me to your watch list and come back again soon, under construction.


Top
 Profile  
 
 Post subject:
PostPosted: Tue Sep 05, 2006 7:54 pm 
Offline
religious status
religious status
User avatar

Joined: Fri Mar 19, 2004 6:19 pm
Posts: 39750
Location: near Baulkham Hills, NSW
Of course, then there's layshafts.... some sold here from UK (made there, maybe) are about as hard as licorice.
If you can file a shaft, it is useless to use as a rolling element bearing.
It must be 63HRc at least.
Thankfully we can get Oz made ones that are made from good stuff and properly heat treated... :wink:

_________________
DrMini- 1970 wasaMatic 1360, Mk1S crank, 86.6HP (ATW) =~125 @ crank, 45 Dellorto (38 chokes), RE282 sprint cam, 1.5 rockers, 11.0:1 C/R. :mrgreen:


Top
 Profile  
 
 Post subject:
PostPosted: Wed Sep 06, 2006 9:58 am 
Offline
1360cc
1360cc
User avatar

Joined: Tue Jun 01, 2004 3:41 pm
Posts: 6858
Location: Special Tuning Sydney
Mini Update 3

My crank is cracked!!! :cry: :cry: :cry:

Yes folks, Graham suspected that it may be cracked as it bent itself back quite easily after not budging several times. We sent the crank off to Spiro and Graham asked him to crack test the centre main before grinding and sure enough, apparently there is a huge crack around the center main! :shock: :cry:

This is perhaps why the crank was not balancing properly. It may have been in a big blow up in it's previous life...

Oh well what a waste of good work, but lucky we tested it!!! :shock: Could you imagine if we just whacked it in?

Luckily I have another spare small J 000 000 cross drilled EN16 crank 8)

More news later...

_________________
Lillee - 1969 Morris Mini K


Top
 Profile  
 
 Post subject:
PostPosted: Wed Sep 06, 2006 4:17 pm 
Offline
998cc
998cc
User avatar

Joined: Tue Jun 07, 2005 9:34 pm
Posts: 536
Location: In Your Roof
Oh brother dont talk about bent cranks!! I just went through this with a rebuilt motor with a bent Cooper S crank.
Lucky for me the shop rebuilt the block again with a new crank even though it was 5 months after the warranty was over though but I had only done around 150km on the engine!
Thanks to Dr Mini for the diagnosis of the engines knocking noise because a bhusted crank was the last thing I expected or wanted to expect :shock:


Top
 Profile  
 
 Post subject:
PostPosted: Wed Sep 06, 2006 7:10 pm 
Offline
the King of Bling
User avatar

Joined: Thu Jun 03, 2004 11:11 pm
Posts: 19858
Location: Baulkham Hills
I must admit that was one of the first thing I got checked of my Cooper S motor was the Crank...Bad luck chong but atleast you did find out and time wasted Gilly :twisted:

Chong your doing a great job Mate :wink:

_________________
Stop Licking the Dog...I Don't Care Who Started It


Top
 Profile  
 
 Post subject:
PostPosted: Wed Sep 06, 2006 7:27 pm 
Offline
1360cc
1360cc
User avatar

Joined: Tue Jun 01, 2004 3:41 pm
Posts: 6858
Location: Special Tuning Sydney
Cheers Jim :(

Yeah the rebuild was going too good :lol: I needed a good dissapointment to keep me inline :wink:

_________________
Lillee - 1969 Morris Mini K


Top
 Profile  
 
 Post subject:
PostPosted: Sat Sep 09, 2006 8:48 pm 
Offline
1360cc
1360cc
User avatar

Joined: Tue Jun 01, 2004 3:41 pm
Posts: 6858
Location: Special Tuning Sydney
Hello all,

Not much to update this week as I sent the spare crank off for grinding. I still managed to spend all day at grahams helping him out taking apart a Nb racing S engine. Learnt lots and had nots of fund doing it!

I will spend this week cleaning the block as I have had no chance at all tlast week.

More updates next week! 8)

_________________
Lillee - 1969 Morris Mini K


Top
 Profile  
 
 Post subject:
PostPosted: Mon Sep 11, 2006 9:47 am 
Offline
848cc
848cc
User avatar

Joined: Mon Aug 07, 2006 2:15 pm
Posts: 425
Location: Perth, WA
Lucky I found another crank instead of buying your spare one off you :) Sorry to hear about the other crank, it's a shame but I'm sure it will all work out.

_________________
-Wasabi
1972 Clubman - Daily Driver
1962 850 - EW1 Powered


Top
 Profile  
 
 Post subject:
PostPosted: Wed Sep 13, 2006 1:57 pm 
Offline
1098cc
1098cc
User avatar

Joined: Tue Mar 16, 2004 10:39 pm
Posts: 1629
Location: Sydney, E. Burbs
Lillee wrote:
I will goto Hare and Forbes at North Parramatta this weekend (near Graham's actually :) ) and buy myself a dial gauge and magnetic base set 8) About time I invested in one :oops:


have a look here maybe:
http://www.transquip.com.au/product.aspx?ID=4519


Top
 Profile  
 
 Post subject:
PostPosted: Wed Sep 13, 2006 2:07 pm 
Offline
1360cc
1360cc
User avatar

Joined: Tue Jun 01, 2004 3:41 pm
Posts: 6858
Location: Special Tuning Sydney
Good spotting mike! that looks pretty good. Cheers

_________________
Lillee - 1969 Morris Mini K


Top
 Profile  
 
 Post subject:
PostPosted: Fri Sep 15, 2006 10:22 am 
Offline
1360cc
1360cc
User avatar

Joined: Tue Jun 01, 2004 3:41 pm
Posts: 6858
Location: Special Tuning Sydney
Mini Update 4

The spare crank has passed the crack test and is being ground today! Yay! thank goodness :lol: Thanks to Spiro of St George Crankshafts in Seven Hills 8)

More updates tomorrow.

_________________
Lillee - 1969 Morris Mini K


Top
 Profile  
 
 Post subject:
PostPosted: Sun Sep 24, 2006 12:08 am 
Offline
1360cc
1360cc
User avatar

Joined: Tue Jun 01, 2004 3:41 pm
Posts: 6858
Location: Special Tuning Sydney
Latest Update

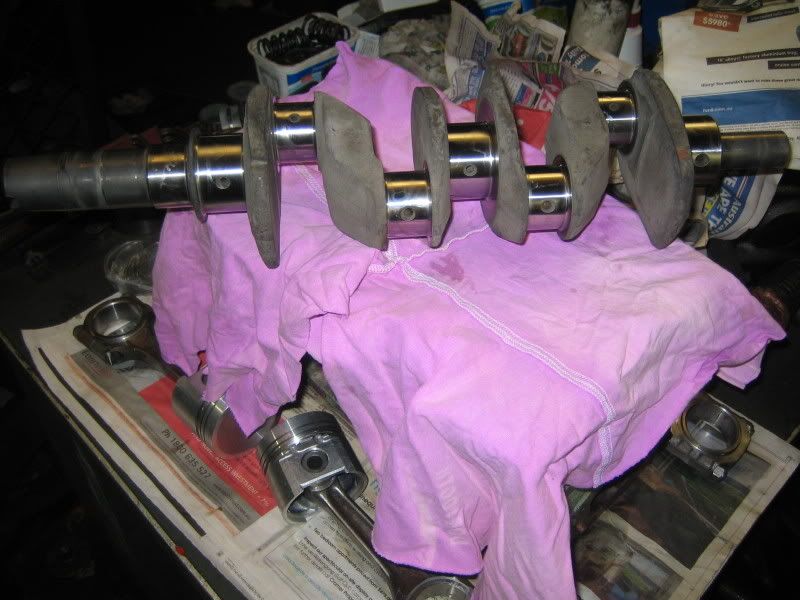
I really must apologise for missing out on updates last week and this week. You can all pretty much say that the build has been stalled because of the cracked crank. As you know my spare crank has been sent off to be crack tested and ground. Well it has come back looking like new, is now 010 mains and 010 big ends.

I had a bit of trouble with bearings as I had ordered 010 mains originally, then changed them for 020 mains (as I thought the cracked crank was going to be ok at 020) and then had to chang them again back to 010 mains! Morale of the story is, don't buy bearings until you know you have a crack free, freshly ground crank! :wink:

This week at Grahams

Welll finally all the crank issues are over, well almost all. When the crank was sent to Spiro for grinding, he noticed that one of the big end journals had picked up a bearing at some stage and picked up metal that had welded itself to one of the crossdrill holes :?

Anyway Graham managed to drill it out and balance the crank. He is undecided about whether we should replug the hole or not with a new plug... he says it is unecessary for what I am doing with it (road car). We will decide this later...

The other thing "wrong" with the crank is one of the counterweights has been severely angled off with a big grinder. This was "factory" balancing. They didn't have time to worry about making cranks look nice, they just took to them with a huge grinder and took out what they needed to in one pass :shock: Subsequently there is ALOT taken out of one of the counterweights. Graham has managed to balance the crank and there was not much needed to be taken off the crank to blance the entire crank. Graham says although the counterweight grinding is not ideal, it is ok for what I am doing (road car). If it were a full race car he would build the counterweight with weld and grind it back and balance again.

All in all I am happy with the results of the crank. It does look very good.

Dry Assembly: Take 2

Today i managed to try assemble the crank and rods with pistons to check the deck hieght. To my surprise the middle 2 pistons were 8 thou above the deck and the outer 2 cylinders were 4 thou above the deck. Graham says this is acceptable and we can get away with it as I don't plan to rev the engine past 6500rpm anyway. This was a relief as 010 thou or more meant taking the pistons off the rods and machining them. *phew*!

Well that was all for this week unfortunately as it was a short day. Sorry about not having photos as I know you all love pictures :lol: but I promise to have more rivetting pictures soon showing my head on the flow bench, assembly of the head and complete assembly of the block, crank, pistons and cam.

This could happen before next weekend 8)

_________________
Lillee - 1969 Morris Mini K


Top
 Profile  
 
 Post subject:
PostPosted: Sun Sep 24, 2006 8:27 pm 
Offline
1360cc
1360cc
User avatar

Joined: Tue Jun 01, 2004 3:41 pm
Posts: 6858
Location: Special Tuning Sydney
Update 24 September

As promised I will update everyone with pics! (I know how much you guys love pics :wink: )

Final preparations

How exciting!!! this is it! I've been waiting for this for week!

I started by scrubbing the insides of the block including oilways. I used Graham's long handled brush and got all the dirt out of the oilways, bearing feed oilways, main galleries and the block, crank and rods and making sure it was entirely spotless. I then ran them through 15 mins on the hot washer. They all came out spotless.
Image
All clean and ready for assembly

Image
The new uncracked, ground and balanced crank. Note that the dull finish is due to acid dipping and hot washing.

Image
The cleaned block

Image
Note that I have an older 1100S block, you can tell because it has a gaping hole in between 2 and 3. This was removed in later 1100S or so called GT blocks. Graham ground around the hole so that there are no sharp edges or burrs.

Final Block Assembly

I then began to assemble the crank and rods with the new Duraglide bearings. I used bearing saver assembly lube on both the bearing surface and the journal surfaces. Graham reminded me to use LMM grease on the threads and under the heads so that they would torque down properly.

Graham then warned me that the bolts may bottom out at full torque, in particular the centre main bolts. He must be a psychic because sure enough the bolts were bottoming out! the hole is deep enough but the thread bottomed out. There are really 3 options, tap it deeper, cut the bolts shorter or use hardenned washers to space the bolt enough so that it doesn't bottom out. Graham just happened to have a stash of ARP hardenned washers (as you would :lol: ) and all was sweet.

Crank End Float

Using my old thrust washers we inserted them to check the crank end float was 003 thou. Ideally it would be good to be about 5-7 thou clearance. We started by checking the flatness and some of the trust washers where varying in thickness by 1thou along the length! Using wet dry and a pane of glass I took to thinning the thrusts down a further 1 thou each. The total float is now 005 thou. Perfect 8)

Pistons and rods assembly

I then installed the rings onto each piston by following the very clear instructions contained in the hastings box. I used a special piston ring expander tool to put the top 2 compression rings in. Now instead of using a ring compression tool Graham has a special ring compression pipe thingy! It is a bit of steel machined up with a shamfered top and is perfectly the size of +060. Basically using WD40, the piston is pushed into the tool which compresses the rings. The whole assebly is then slid into the cylinder and the piston is pushed into the cylinder. It works so well I managed to install all 4 pistons in no time at all. I got to get myself one of these! :wink:

Image
Graham's Special piston compression tool

Image
The finished product!

All that is left to do with the block is to paint it!! Now you must all be wondering what colour I have chosen to paint this hot engine of mine :P I have decided that since Lillee is relatively stock looking (no flares) and is a red car she would look hot with a stock looking S engine :D I know some of you don't agree (like how boring) but I think the metallic green will look good against a silver gearbox and silver clutch cover.

I will attempt to do this during the week at home before installing the cam and assembling the rest of the engine. Until then, may all your dirty hands smell like WD40 :lol:

_________________
Lillee - 1969 Morris Mini K


Last edited by Lillee on Mon Sep 25, 2006 8:54 am, edited 1 time in total.

Top
 Profile  
 
 Post subject:
PostPosted: Sun Sep 24, 2006 9:49 pm 
Offline
1275cc
1275cc
User avatar

Joined: Mon Apr 26, 2004 6:31 pm
Posts: 4663
Location: Sydney - strangely, I am glad of the sight of hills!!
good to see it together Chong. must have taken you about 5 minutes after i left on Saturday :D

now you are ahead of me again :cry:

_________________
the world is a book, and those who do not travel read only a page
66 Mini Minor sponsored by http://www.lifeonthehedge.com.au/ The Dog Harness Specialists
It was a pleasure ausmini. I'll miss all you misfits and reprobates ;-)


Top
 Profile  
 
 Post subject: Endfloat
PostPosted: Sun Sep 24, 2006 10:15 pm 
Offline
1360cc
1360cc
User avatar

Joined: Sun Apr 11, 2004 11:32 am
Posts: 12390
Location: Sthrn HiLoLands, NSW, Australia
Chong....interestd to know if you and GR used anything special to check end float :?:

How much force is needed on the end of the crank.....I recently found one that had about a millimetre of endfloat....that was easy to demonstrate by grabbing the nose of the crank and pushing backwards and forwards.

Did you use a dial guage or feelers :?:

Great work with reporting on the engine build :D

_________________
"Show me the Mini!"


Top
 Profile  
 
Display posts from previous:  Sort by  
Post new topic Reply to topic  [ 342 posts ]  Go to page Previous  1, 2, 3, 4, 5, 6, 7, 8 ... 23  Next

All times are UTC + 10 hours


Who is online

Users browsing this forum: No registered users and 34 guests


You cannot post new topics in this forum
You cannot reply to topics in this forum
You cannot edit your posts in this forum
You cannot delete your posts in this forum
You cannot post attachments in this forum

Jump to:  

cron

© 2016 Ausmini. All garage work involves equal measures of enthusiasm, ingenuity and a fair degree of irresponsibility.